Hidden settings to adjust Dock animations
Here are a couple of tips for customising the delay and animation speed of your Dock if you have it set to automatically show and hide (in System Preferences).
Custom delay time
You may have noticed that there is a short delay before the Dock appears when your mouse hits the edge of the screen. There is a hidden setting that allows you to adjust the delay time using the Terminal.
Start by opening up the Terminal app (in Applications/Utilities). To remove the delay entirely, paste in the following line and press Return.
defaults write com.apple.Dock autohide-delay -float 0
The changes won’t take effect until you restart the Dock, which you can do by typing killall Dock and pressing Return.
The number at the end of the command is the delay time in seconds, which you can customise to your liking. My preferred delay is 0.1, which is a bit quicker than the default. To return to the default, just use the following command:
defaults delete com.apple.Dock autohide-delay

Custom animation speed
There is a related hidden setting that allows you to customise the speed of the animation when the Dock slides onto the screen. As before, paste the following line into the Terminal and press Return.
defaults write com.apple.dock autohide-time-modifier -float 0.5
Remember to restart the Dock with killall Dock for the changes to take effect. Just like the delay, the number at the end is the length of the animation in seconds. 0 will make the Dock instantly appear with no animation. My preferred time is about 0.5, which makes things just a little snappier than the default.
To return to the default, just use the following command:
defaults delete com.apple.Dock autohide-time-modifier
8 Tips for iCal in Lion
iCal has been completely overhauled in OS X Lion - here are 8 tips to help you take advantage of all the new features.
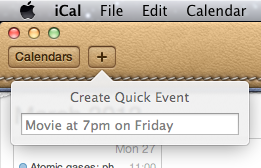
Create a quick event
iCal now has a a great new way to add events that means you no longer have to spend ages filling out dates and times with fiddly controls. Instead, just click the + button in the toolbar or press Command-N to bring up the Quick Event popover. This allows you to type in the event details in a human-readable form — for example, “Movie at 7pm on Friday” or “Meeting at 3pm until 6pm” — and iCal will interpret what you mean and create an event.
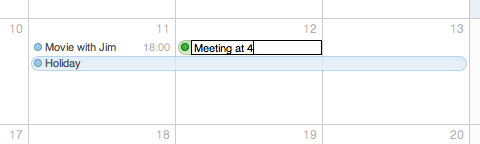
Specify times in the event name
When creating events by double-clicking a day in month view, the new default behaviour is to create all-day events. If you want to create a normal event, just specify the time when typing in the event name. iCal seems to be quite flexible at interpreting what you mean - things like “Gym at 6” and “4pm Meeting” will both work.
You can also specify the length of all-day events in this way. Just type “Holiday until Saturday” or “Jim away until the 14th”.
Remove the leather effect
The new look and feel of iCal was one of the most controversial changes when Lion first came out, provoking outrage amongst many UI purists. If the new look isn’t for you, there are a couple of simple tweaks that will change things back to normal. First, if you just want to remove the torn page effect from the bottom of the toolbar, the Big Bucket Development blog shows you how to achieve this by replacing a single image. Alternatively, if you want to get rid of the new look completely, MacNix has a simple method that can bring back the aluminium look in both iCal and Address Book.
It’s worth making a backup of iCal before trying either method, just in case you ever want to revert back to the new leather style.
Show more (or fewer) than seven days in week view
This is a “top sekret” feature that requires a quick trip to the Terminal before it can be accessed. Start by opening the Terminal app (located in Applications/Utilities) then paste in the following line and press return:
defaults write com.apple.iCal IncludeDebugMenu YES
Quit and re-open iCal, and you should see a new Debug menu in the menubar. In this menu, under the Top Sekret [sic] section you’ll find an option to set the number of days in week view to 7, 14, 21 or 28 days. You’ll need a pretty large screen for these options to be that useful.
It isn’t necessary to enable to debug menu to show fewer than seven days in week view. First make sure you aren’t in week view, then just hold down the Command and Option keys and them press and number between 2 and 6.
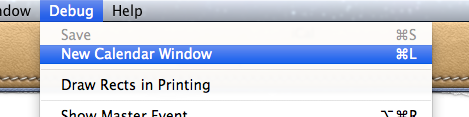
Open multiple calendar windows
This is another secret feature hidden in the debug menu (see above). Once the debug menu is enabled, it is possible to open up multiple iCal windows by selecting New Calendar Window or by pressing Command-L. This is great if you would live to have two different views open simultaneously — for example separate weeks, or a month view and a day view.
Adjust the font size
It’s now possible to change the size of the text in the calendar view. Just choose Make Text Bigger or Make Text Smaller in the View menu or press Command-minus (-) or Command-plus (+).
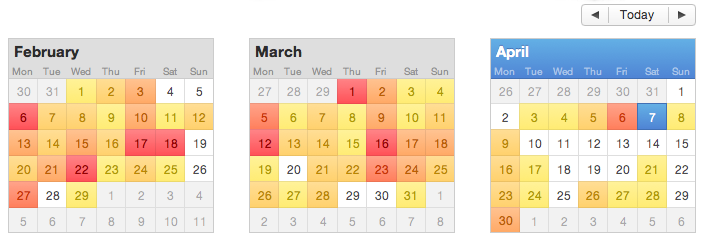
Year view heat map
The new “year at a glance” view is fancy, if not altogether that useful. It allows you to see a “heat map” of how many events you have throughout the year, with busier days shown in red and quieter days show in yellow. Double-clicking any month will bring up the month view for that month.
Set as Full Screen
iCal is one of only two apps that I regularly use Lion’s full screen mode with (the other being Terminal). This allows me to leave it always running in the background, out of the way. Whenever I need to check my schedule or reminders, a simple four-fingered swipe to the left will slide the desktop across to iCal running full screen in its own space. To set iCal as full screen, just click the full screen button in the top right corner of the window. You can even combine this with the multiple calendar windows tip to allow you to swipe between multiple full screen calendars that show the current day, week and month.
Get iTunes track notifications in your Dock
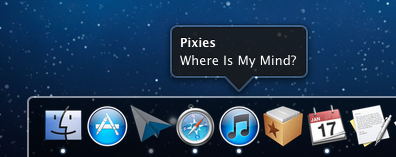
In Lion there is a cool hidden setting to enable “Now playing” notifications that appear from the iTunes icon in the Dock. Every time a new song starts, a small popup containing the artist and the song name appears and then slowly fades out after a few seconds.
To enable this, start by opening Terminal (located in Applications/Utilities), then paste in the following line and press Return.
defaults write com.apple.dock itunes-notifications -bool YES
For the changes to take effect, the Dock has to be restarted. The easiest way to do this is to type killall Dock into the Terminal and press Return. If you change your mind and want to disable the notifications, repeat the above commands, but replace YES with NO.
For those of you who have your Dock set to hide when not in use, you’ll notice that when the Dock is hidden the iTunes icon is added to the notification. If you want the icon to show even when the Dock is not hidden, just use the following command in the same way as above:
defaults write com.apple.dock notification-always-show-image -bool YES
As before, remember to restart the Dock with killall Dock for changes to take effect.
It’s not entirely clear why this setting isn’t present in the iTunes preferences. It might still be under development — there is still room for improvement. For example it would be better if it included the album artwork like Bowtie, Growl and DockArt already do. It could also be a sneak peak of future plans Apple has for a notifications framework for all apps in Mac OS X, much like Growl provides at the moment.
Browse man pages in Lion's Terminal
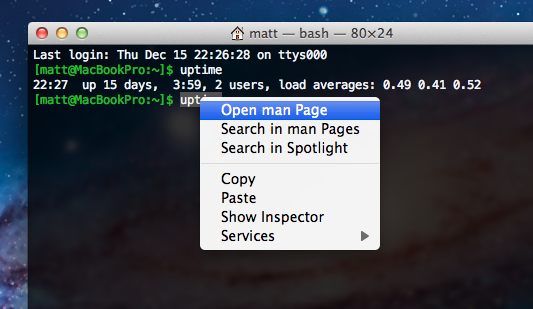
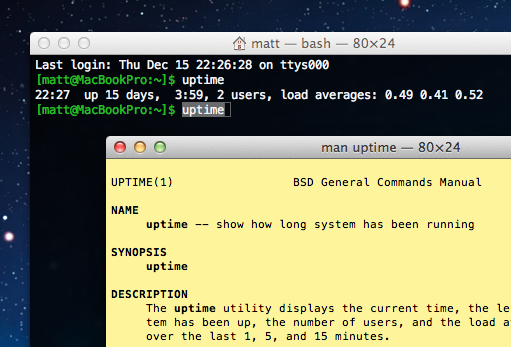
Here’s a handy new feature tucked away in the Terminal in Lion. To quickly view the man page for any command, just right-click on it and choose Open man Page from the context menu. A new window will pop up, displaying the manual for that command.
This can save you a little bit of time, especially if you like to open up man pages in a new window alongside whatever you are currently working on. This way, you no longer need to open up a new window and type man <command> every time. It also displays the man pages with a distinctive yellow background, so its easier to distinguish if you have a lot of Terminal windows open.
As with a normal Terminal window, the colour scheme is also customisable. In the Terminal Preferences, just look under the Settings tab and choose the Man Page theme from the list.
The Open man Page menu item is also available from within the yellow man page windows. I find this really useful when I get to the “See Also” sections that are common at the end of many man pages. Instead of having to remember all the related commands and look at their man pages one at a time, I can simply right-click on each and simultaneously open up man pages for all of them.
Finally, there’s another menu item, Search in man Pages. This uses the apropos command to display a list of all the available man pages for commands that contain the keyword you have clicked on. As you’d expect, you can just right-click on any of the search results and choose Open man Page to view the relevant page.
Every conceivable way of accessing the Library folder in Lion
A lot of noise has been made about the fact that the Library folder inside your user home folder is now hidden by default in Lion. Even though you can’t just go to your home folder and click on it any more, there are still loads of other ways to access it. Here’s every single method we could think of to show the Library folder, either on a temporary or permanent basis.
What is the Library folder for?
First, a quick recap of what the library folder is and why you might want to access it. Mac OS X actually has three different Library folders:
- One located at the root of your hard drive
- One located in a folder called System at the root of your hard drive
- One located in every user’s home folder
The purpose of all three Libraries is to store files that are used by applications and the system that users generally doesn’t interact with directly. The System Library contains all the core parts of OS X that are needed for it to function — there are very few reasons to ever change anything in it. The other two Libraries are very similar, both containing things like fonts, saved preferences and Dashboard widgets. These are all things that you interact with through other applications, so it makes sense to file them out of the way in a Library folder.
The only difference between these two libraries is that things in the hard drive Library are for all users of the computer, while things in the user folder Library are just for that specific user. If you’ve ever had to enter your administrator password while installing an application, chances are it was putting something in the hard drive Library that needed to be accessible to all users of the Computer.
The Library in your user folder is the one that you are most likely to want to access at some point. If an application is playing up, deleting its preference file in the Preferences folder in this Library is a good troubleshooting step. If you ever have to manually install a plugin for any application, this is most likely where you will have to put it.
With this in mind, it might seem a little odd that Apple decided to hide this Library folder. However, it’s also the most obviously visible of the three libraries, and therefore the most susceptible to accidental changes and deletions that cause problems. Now it’s hidden, if you ever need to get to it, simply take your pick from following methods.
Option-click the Go menu
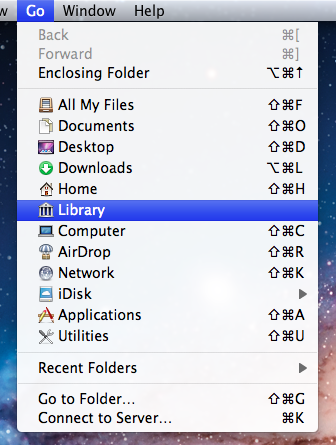
In the Finder, the Go menu offers lots of handy shortcuts to common places like your Documents and Applications folders. The Library folder doesn’t normally appear here, but if you hold down the Option key, it should pop up in the middle of the list. This is probably the best method for most people. It’s great if you only occasionally want to access the Library, as it stays hidden in your home folder but is still accessible fairly quickly.
Go to Folder…
While in the Finder, simply press Command-Shift-G to bring up the Go to Folder dialog. To access the Library, type in ~/Library and click Go. It is possible to type the path to any folder into this dialog. The ~ character is just a shortcut to your home folder. A more verbose alternative would be /Users/matt/Library.
Assign a keyboard shortcut (works in Finder only)
As long as an item appears in a menu somewhere, it’s fairly straightforward to add a keyboard shortcut for it. So as the Library appears in the Go menu, this isn’t too difficult. Simply open up System Preferences, and go to the Keyboard section. Click on the Keyboard Shortcuts tab, then select Application Shortcuts from the list and click the plus (+) button.
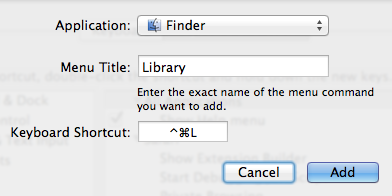
In the dialog that appears, choose Finder from the drop-down menu, type Library for the menu title and then choose whatever shortcut you want.
There are two small problems associated with this method: Firstly, for some reason this stops the Library from appearing in the Go menu, even when the Option key is pressed. Secondly, the shortcut will only work when Finder is the active application. To get around these problems, see the next method.
Assign a global keyboard shortcut (works in all apps)
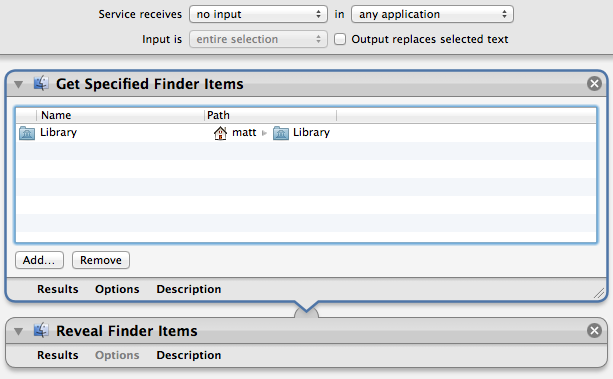
The easiest way to assign a global shortcut is by using an Automator Service. Start by opening up Automator (located in the Applications folder) and choosing the Service template. Drag the following two actions across from the library into the workflow area:
- Get Specified Finder Items
- Reveal Finder Items
Click the Add button in the Get Specified Finder Items action, and navigate to your home folder. Press Command-Shift-. (period) to show the hidden files, select the Library folder and click Add. Finally, change the drop-down menus at the top of the window to no input and any application, then Save the Service.
To add the keyboard shortcut, go to the Keyboard section of System Preferences as above, but instead choose Services from the list. Find your new Service, double click to the right of it and press your shortcut.
Access via the Terminal
If you are comfortable working in the Terminal, it’s still fine to navigate to the Library folder with cd ~/Library and then list its contents with ls.
Alternatively, you can use the Terminal as a way to open up the folder in the Finder. Simply type open ~/Library and press Return.
Add an alias to the Finder sidebar or toolbar
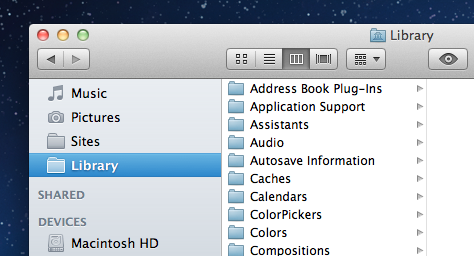
Once you have accessed the Library folder using one of the methods above, it’s easy to drag the folder into the sidebar or toolbar for easy access. This creates an alias to the Library folder that will permanently stay in the sidebar or toolbar until you remove it, while the Library folder remains hidden in your home folder.
Make it permanently visible
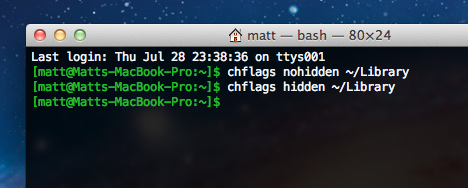
If you think all the above methods are just a waste of time and you want your Library back the way it was in Snow Leopard, it is possible to make it visible again. Open up Terminal (located in Applications/Utilities), paste in the following line and press Return:
chflags nohidden ~/Library
There’s no need to restart the Finder — the change should occur instantly. If you change your mind and want to hide the Library again, use the following command:
chflags hidden ~/Library
Make all hidden files visible
This is probably overkill if the Library folder is the only hidden item you want to access, but there is a simple Terminal command to make all hidden files visible in the Finder:
defaults write com.apple.finder AppleShowAllFiles YES
For more information on this command and how to set a keyboard shortcut to toggle hidden files, check out our article on how to quickly show and hide hidden files.
Press and hold keys for iOS-style accents popup
Here’s yet another iPhone feature that has cropped up on the Mac in Lion. While typing, simply pressing and holding on a key will bring up a popup showing all the possible diacritics (accents, cedillas, etc.) that can be added to the letter. You can then choose from the possibilities by pressing the corresponding number on your keyboard, or by clicking the one you want.
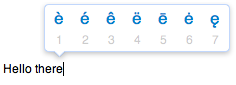
This seems to be a fairly quick way typing accents, and is much easier to use than the old method which involved remembering a number of Option key combinations. It does have one drawback however — it stops you from pressing and holding to write a long line of repeated letters, like thiiiiiiiiiiiiiiiis.
If you don’t regularly type accents, then losing the repeated character functionality might not be worth it for you. In this case, you can disable this new feature using a Terminal command. Open up Terminal (located in Applications/Utilities), paste the following line and press Return.
defaults write -g ApplePressAndHoldEnabled -bool NO
You will need to restart each application for the changes to take effect. Simply repeat the command with YES at the end to reverse.
Keep track of hidden settings changes made using the defaults command
The defaults command is a great way to change hidden settings in Mac OS X. These hidden settings are generally options that developers decided to hide in the final version of their app for some reason — they might be too complicated for the average user, or maybe they cluttered up the preferences window too much. But while these settings no longer appear in the application preferences, we can still change them through the Terminal by using defaults. As long as you know the right command, it’s simply a case of typing it in and pressing Return. For some examples just check out our previous tips.
One problem with this is keeping track of all the changes you have made. A recent article over on MacOSXHints proposed a solution, but it’s a bit inelegant as it involves creating a replacement defaults script that intercepts your commands first. Here’s a much more straightforward solution that I came up with. It basically involves first logging previously made changes to a file, then setting up a script that appends any future changes to the file as they are made.
This simple solution involves using the history command. To see what this does, start by opening up Terminal (located in Applications/Utilities), typing history and pressing Return. Up to the last 500 things you have typed into the Terminal should appear in a numbered list. We don’t care about most of them, so we can filter this list using grep as follows:
history | grep "defaults write"
As before, just enter this line and press Return. A list of all the defaults commands you have ever made should appear. Unfortunately, as history only stores the 500 most recent items, over time the older defaults commands will start to disappear. So on its own this isn’t really sufficient to keep an accurate log, but we can use it to help us make our own permanent log. To do this, start by entering the following command into the Terminal, adjusting the file path if you want to.
history | grep "defaults write" >> ~/Documents/defaultsLog.txt
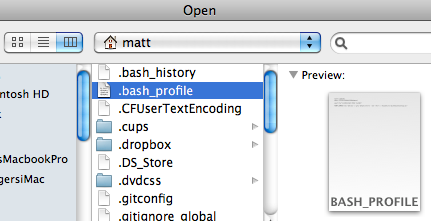
Now we have all our previous changes saved, we can set up a script that adds any future ones onto the end of that same file. Open up TextEdit and choose Open from the File menu (Command-O). Go to your user folder and then press Command-Shift-. (Period) to show hidden files. The one we are looking for is .bash_profile. Don’t worry if you can’t find it — instead you can just create a new file and save it in your user folder as .bash_profile. Either way, once you have this file open, add the following line to the end:
PROMPT_COMMAND='echo "$(history 1 | grep "defaults write")" | sed '/^$/d' >> ~/Documents/defaultsLog.txt'
This is a quick little script that runs every time a new command prompt is shown. It simply checks if the last command contained defaults write, and if so, adds it onto the end of the file.
Quickly show and hide hidden files
In Mac OS X, files with names that start with a dot (.) are hidden. You may have noticed some of these before, for example when copying files from your Mac to a PC where they aren’t hidden. The most common one you might bump into is the .DS_Store file that Mac OS X puts in every folder (to save various view settings), but there are all sorts of other hidden files used by all sorts of applications.
These files are hidden by default for good reason — the average user almost never needs to change them, so keeping them visible would just cause useless clutter. But every now and again you may find that you need to view the hidden files, for example to browse the UNIX filesystem, to work with .htaccess files or to find a file that you accidentally (or purposefully) hid by naming it with a dot.
Using the Terminal
The easiest way to show hidden files is using the Terminal. Just open up Terminal (located in Applications/Utilities), paste in the following line and press Return.
defaults write com.apple.finder AppleShowAllFiles -bool YES
The Finder needs to be relaunched before the changes take effect, so type killall Finder and press Return. To hide the files again, use the following line instead.
defaults write com.apple.finder AppleShowAllFiles -bool NO
While this method is fine if you only want to change the visibility of hidden files occasionally, it is a bit cumbersome if you find yourself having to do it regularly. Read on for some quicker ways to access hidden files.
In open and save dialogs
In open and save dialog boxes, there is a handy keyboard shortcut to toggle the visibility of hidden files. While the dialog is open, just press Command-Shift-. (dot). Just press it again to hide the files again.
For some keyboard layouts, normally in ones where a comma is used as a decimal point, you may find that this shortcut is Command-Shift-, (comma) instead.
Setting up a keyboard shortcut
While Apple helpfully provided a keyboard shortcut for use in open and save dialogs, they didn’t do the same for normal Finder windows. Luckily, it’s not too tricky to set up a keyboard shortcut yourself.
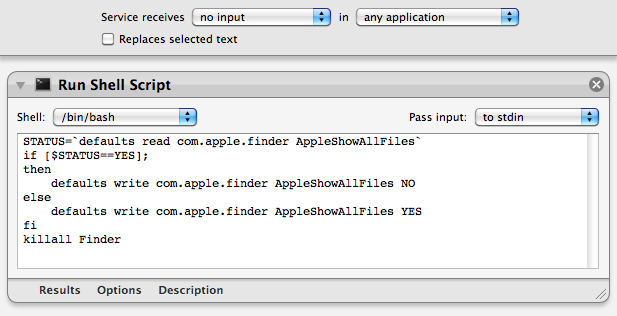
To start, open up Automator (in the Applications folder) and choose a Service template. From the library choose "Run Shell Script" and drag it across to the workflow area. In the text box paste the following command:
STATUS=`defaults read com.apple.finder AppleShowAllFiles`
if [ $STATUS == YES ];
then
    defaults write com.apple.finder AppleShowAllFiles NO
else
    defaults write com.apple.finder AppleShowAllFiles YES
fi
killall Finder
Finally, change the "text" drop-down menu to “no input” and then save you workflow as “Toggle Hidden Files”.
Now if you go to the Finder menu and look under Services, you should find a “Toggle Hidden Files” option. To add the keyboard shortcut, go to the Keyboard section of System Preferences and click the Keyboard shortcuts tab. Select Services from the list on the left, then scroll down to the bottom of the list on the right to find “Toggle Hidden Files”. Double-click on the area to the right of it, then press the keyboard shortcut you want. I used Command-Shift-. (dot).
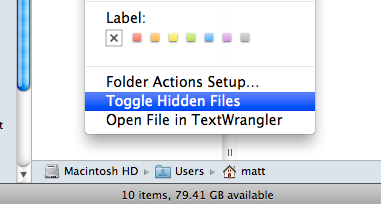
Setting up a context menu item
To use a context menu instead of a keyboard shortcut you just need to follow the same instructions as above, but make some slight changes in Automator. Instead, change the “text’ drop-down menu to “Files and Folders” and the “any application” drop-down menu to “Finder”. Now when you right-click on a file or folder in the Finder, a new “Toggle Hidden Files” option should appear.
Extract the code from any Safari Extension
If you have been using any of the new Safari Extensions you might want to peek inside them to see how they work. Fortunately this is really easy because .safariextz files are just xar archives that can be extracted using the Terminal. Here's how you do it.
Start by downloading the Safari extension. It should come in the form of a file with a .safariextz extension. If you wanted to install the extension to use it in Safari you would just double-click it, but don't do that now as the file will disappear from your Downloads folder.
Instead open Terminal, located in the Utilities folder inside the Applications folder. In the window that appears, type the following line and then press return.
cd ~/Downloads/
This should be the path to the folder where the .safariextz file is located. You will need to change this if you have saved the extension somewhere else. For example you might use cd ~/Desktop/Extensions or /Users/matt/Documents/safariextensions/
If you are new to using the Terminal, note that starting with ~/ is a shortcut to inside your user folder, and starting with / is for inside your hard drive. The cd command is for changing directory, i.e. 'moving' to a folder.
Next paste in the following line and press return.
xar -xf 'TheExtensionName.safariextz'
You need to replace TheExtensionName with the filename of the extension. The quotes around the filename are only really important if it contains spaces. If you want to avoid typing in the name, you can just drag the file into the Terminal window from the Finder and it will be entered for you.
After you press return, a new folder will appear with the same name as the extension. This folder contains all the javascript, plist and HTML files that make up the extension. You can then go to the Extension Builder in Safari and click the plus (+) button to add the extension and edit it.
Try this out with some of the extensions I've made. Feel free to use any of my code for your own extensions. If you are feeling nice, leave a link back to http://www.macosxtips.co.uk/extensions.
Top 15 Terminal Commands for Hidden Settings in Snow Leopard
Every time Apple brings out a new version of OS X, we compile a list of our favourite Terminal commands for enabling hidden features and changing hidden settings (here are the lists for Tiger and Leopard).
For those who are new to Terminal Commands, here's a quick run down of how to use them. Don't worry, it's really easy. Start by opening up Terminal, located in the Utilities folder in the Applications folder. In the window that appears, paste in one of the lines provided below, and then hit Return. For the changes to take effect, you need to restart the application concerned. For applications like the Dock or Finder, it is easiest to just type killall Dock or killall Finder into the Terminal to restart them. To reverse the changes, you just need to change the last word of the command and run it again. If the last word is YES, change it to NO, change 1 to 0, and change TRUE to FALSE and vice versa for all.
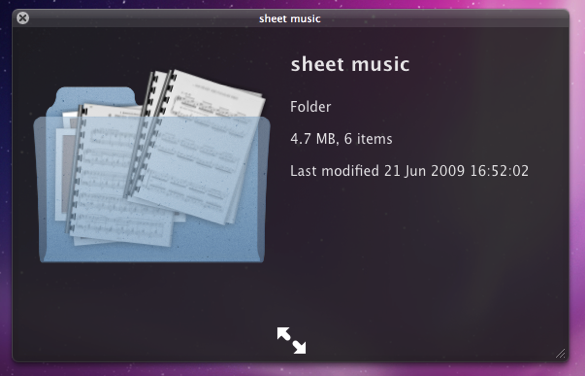
1. Folder previews in Quick Look
This is my favourite hidden feature in Snow Leopard. When enabled, using Quick Look (hit the space bar) on a folder will show you a preview of the folder's contents inside a translucent folder icon. The previews of the files inside the folder also cycle through so you can see all of them. Just use the following command:
<code>defaults write com.apple.finder QLEnableXRayFolders 1</code>
You will need to restart the Finder, either by typing killall Finder into the Terminal or by Control-Option-clicking on the Finder in the Dock and choosing Relaunch.
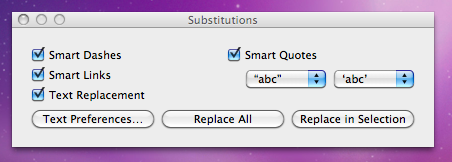
2. Globally enable Text Substitutions
You may have realised that the new text substitutions feature in Snow Leopard isn't enabled in all applications by default, most noticeably in Safari. To enable it , you need to right-click on a text box and choose Substitutions then Show Substitutions. To globally enable text substitutions, use the following three commands one at a time. The first one will enable substitutions, while the second will enable dash replacement and the third will enable spell checking.
defaults write -g WebAutomaticTextReplacementEnabled -bool true
defaults write -g WebAutomaticDashSubstitutionEnabled -bool true
defaults write -g WebContinuousSpellCheckingEnabled -bool true
If you decide there are some specific applications where you want to disable these again, you can do it in the normal way. As always you will need to restart each application for the changes to take effect.
3. Bring back AppleScript Studio palette
As of Snow Leopard, AppleScript Studio has be deprecated in favour of AppleScriptObjC. You can still work on AppleScript Studio projects, but you can't create new ones, and the AppleScript Studio palette in Interface Builder is gone. To bring it back, use the following command:
defaults write com.apple.InterfaceBuilder3 IBEnableAppleScriptStudioSupport -bool YES
4. Disable "focus follows mouse" in Terminal
In Leopard there was a Terminal command to make the Terminal's window focus change with mouse movement. If you had previously enabled this, you will find things don't work quite right in Snow Leopard when you use Command-Tab to switch between applications in different spaces. To fix this, you will need to disable the focus follows mouse behaviour using the following command:
defaults write com.apple.Terminal FocusFollowsMouse -string NO
5. Force Dictionary to only use one window
If you aren't a fan of using Command-Control-D to quickly look up definitions, you might use the "Look up in Dictionary" contextual menu item or Services menu item. In Snow Leopard, each word you look up using these methods opens in a new Dictionary window, which gets a bit annoying. To make each word you look up open in the same window, just use the following command:
defaults write com.apple.Dictionary ProhibitNewWindowForRequest -bool TRUE
6. Change the behaviour of the green zoom button in iTunes
With the release of iTunes 9, Apple messed around a bit with the behaviour of the green zoom button in iTunes. Things are back to normal as of iTunes 9.01, but briefly the green button maximised the window instead of switching to the mini-player. If you liked the temporary change, you can bring it back using the following command:
defaults write com.apple.iTunes zoom-to-window -bool YES
Of course, you can always get the alternative behaviour by holding the Option key and clicking in the green button.

7. Debug menu in Address Book
The debug menu has been available in Address Book for some time, but there are some new additions in Snow Leopard. If you don't already have it enabled, the command is:
defaults write com.apple.AddressBook ABShowDebugMenu -bool true
Restart Address Book, and then click Debug in the menu bar to see the new options. You can enable reflections under contacts pictures, get to the "People Picker Panel" and enable a debug panel called "Ye Olde Debug Settings”.
8. Autoplay movies in QuickTime X
One of the weird things about the new version of QuickTime is that it has no Preferences. Luckily you can still change things using the Terminal. To make a movie automatically start playing when you open it, use the following command:
defaults write com.apple.QuickTimePlayerX MGPlayMovieOnOpen 1
9. Keep QuickTime in full screen when switching applications
If you are watching a movie in full screen in QuickTime and you use Command-Tab to switch to another application then the movie will automatically exit full screen. To make it stay full screen in the background, use the following command:
defaults write com.apple.QuickTimePlayerX MGFullScreenExitOnAppSwitch 0
10. Disable Rounded corners in QuickTime
If the slightly rounded corners of movies in QuickTime bug you, use the following command to disable them:
defaults write com.apple.QuickTimePlayerX MGCinematicWindowDebugForceNoRoundedCorners 1
11. Always or Never show titlebar and Controller in QuickTime
The following two commands either permanently enable or disable the titlebar and controller that pop up when you mouse over a movie in QuickTime:
defaults write com.apple.QuickTimePlayerX MGUIVisibilityNeverAutoshow 1
defaults write com.apple.QuickTimePlayerX MGUIVisibilityNeverAutohide 1
12. Automatically show closed captioning and subtitles on opening
This turns on subtitles and closed captioning automatically when you open a movie that supports them.
defaults write com.apple.QuickTimePlayerX MGEnableCCAndSubtitlesOnOpen 1
13. Make list view stacks work like grid view Stacks
This command slightly changes the behaviour in Stacks in list view. Once enabled, they act more like grid view Stacks, but with a single list of files and icons on the left. The main difference is when "drilling-down" through folders within the Stack.
defaults write com.apple.dock use-new-list-stack -bool YES
You will need to restart the Dock for changes to take effect. The easiest way is to use killall Dock in the Terminal.
14. Enable mouseover highlight in stacks
If you want items in grid view stacks to highlight when you move the mouse over them, use the following command. It's slightly different from the equivalent in Leopard. Also, note that you can get the highlight behaviour in Snow Leopard without using this command by using the arrow keys to select items in a stack, or by clicking and holding on a stack before dragging the mouse up onto the grid.
defaults write com.apple.dock mouse-over-hilite-stack -boolean YES
You will need to restart the Dock for changes to take effect. The easiest way is to use killall Dock in the Terminal.
15. Set a precise screensaver password delay
A useful new feature of Snow Leopard is the ability to set how long your Mac is asleep or how long the screen saver is on before it requires a password to wake up again. You can access this from the Security section of System Preferences. However, you have to choose a time period from a drop-down menu, and you can't enter your own custom time period. To do this, use the following command. The number at the end is the time in seconds. For example 1800 is 30 minutes, which bizarrely isn't an option in the drop-down menu.
defaults -currentHost write com.apple.screensaver askForPasswordDelay -int 1800
How to use Network Utility
Everything you can do in Network Utility you can actually do in a Terminal window using unix tools. But why go to all that effort when Apple have created a nice application that lets you do things much more easily.
When you first open up Network Utility you will see nine tabs along the top [Update: eight in Snow Leopard]. Here's a run through of what you can do in each tab.
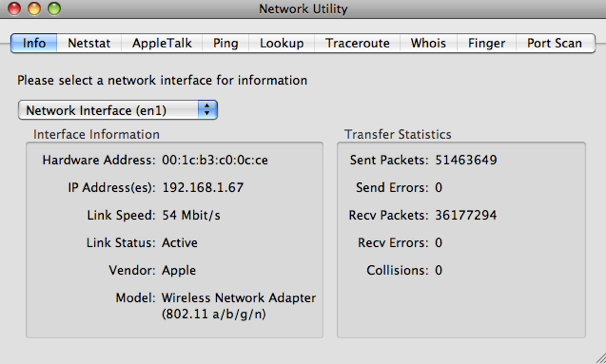
1. Info
The first tab, Info, unsurprisingly gives you general information about your network. The Network Interface drop-down menu shows all the different ways your Mac can connect to the Network. Typically these are ethernet, wireless and Firewire.
The useful bits of information are the Hardware Address and IP Address. You will only have an IP address if that network interface is connected, otherwise it will say unknown. The Hardware Address, otherwise known as a MAC address, can be used to uniquely identify your computer (even though it is possible to change it).
One useful way to use the MAC address is when setting up your wireless router. You can set most routers to only allow specific MAC addresses to join, meaning other people can't log onto your wireless and connect to the internet.
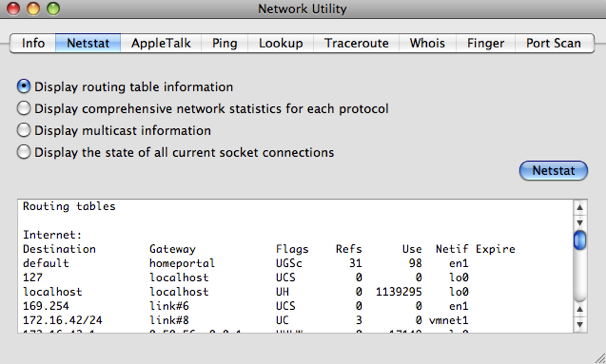
2. Netstat
Netstat is a tool that is really useful to network administrators for troubleshooting, but pretty useless to the average user. If you choose "Display routing table information" and click Netstat, you will get a list that contains all the computers on the network. For example, I get Matts-Macbook, Matts-iPhone and ChrisG5.
If you choose "Display the state of all current socket connections" and click Netstat you'll see a list of your computer's network connections. For example, the first items on the list will correspond to any web pages you have open. If you type the numbers under "Foreign Address" into Safari, the web page will sometimes appear.
3. AppleTalk
The AppleTalk tab is very similar to the Netstat tab, but specifically for Apple's proprietary protocol called AppleTalk. It was very popular in the early days of the Mac, but now has been pretty much abandoned and is unsupported in Snow Leopard. You can read more about AppleTalk on its Wikipedia page. [Update: The AppleTalk tab is completely gone in Snow Leopard]
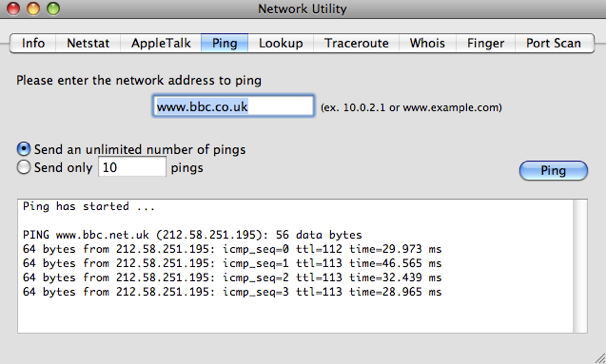
4. Ping
Ping is a tool to check if an internet address is working. When you "ping" an address, you send a small bit of data which it sends back.
You can use this to check if a website is down if it isn't loading in Safari. Alternatively, if you think your internet connection is down, you can try pinging sites that almost never go down like google.com and bbc.co.uk to see if you have a problem on your end.
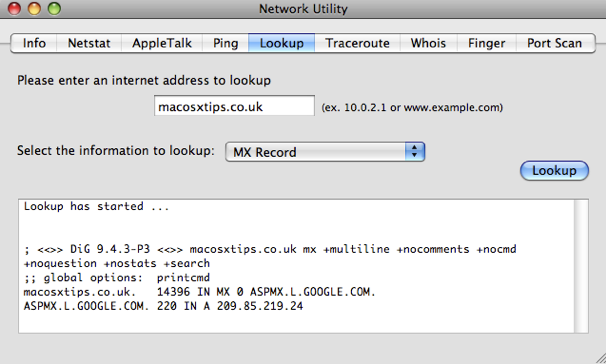
5. Lookup
Lookup allows you to get information about a web site or IP address. The drop-down menu allows you to choose from a number of different types of information. For example, performing a Name Server lookup on macosxtips.co.uk will tell you that this site is hosted by Dreamhost, and a MX record lookup will tell you that our email is handled by Google.
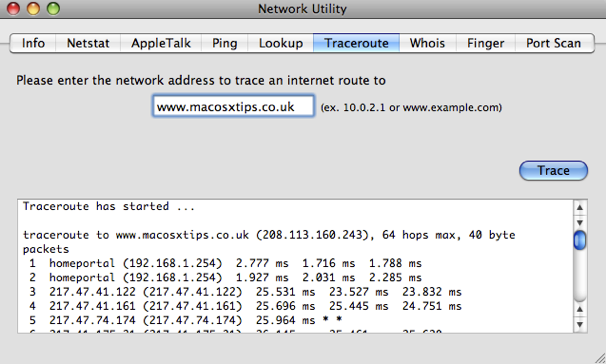
6. Traceroute
When you enter an address and click Trace, traceroute will show you the route taken by data sent between you and the server. It allows you to see all the servers that your data goes through along the way.
You can use this to troubleshoot connection problems by finding out the point where your data is being blocked.
You can also use it when you are downloading a file and have multiple download mirrors in different locations to choose from. Just type the addresses of the mirrors into traceroute and you can get a good idea of which mirror is fastest.
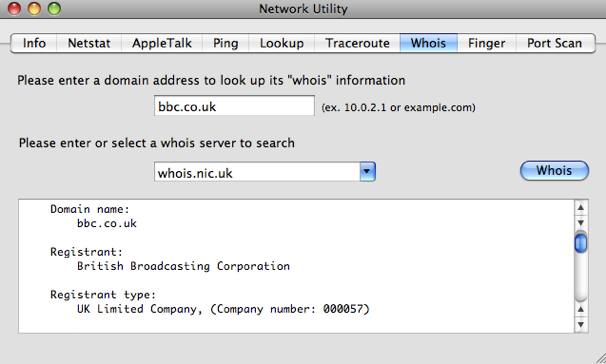
7. Whois
The Whois database gives you information about internet addresses and who has registered them. The default whois server whois.internic.net works quite well for most addresses, but you might have to type "domain apple.com" for example to get it to work. For .co.uk addresses use "whois.nic.uk" as the whois server. You will get information like the registrant, their address, who they registered with, when their registration was started and and when it expires.
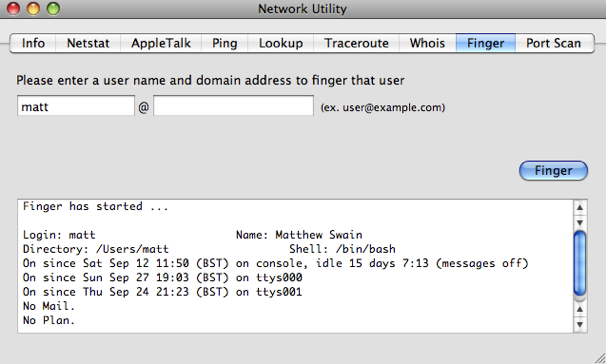
8. Finger
Finger, created in 1971, is one of the earliest forms of status updates that are now done using Facebook and Twitter. It's hardly used anymore, but you can use finger to check if your friends are online, and you can post .plan files to your profile similar to blog posts.
One of the best ways to use finger is to type in your username or the username of another user on your Mac. It will tell you if they/you are currently logged in and how long since they/you last logged in.
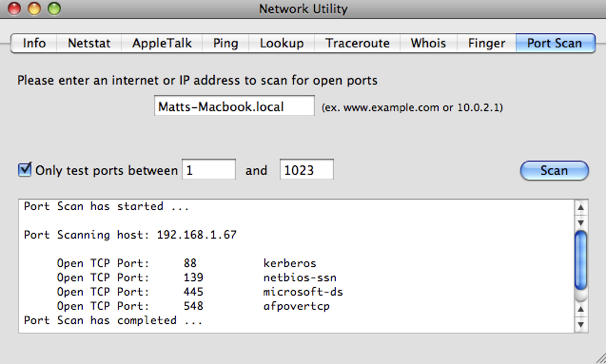
9. Port Scan
The final tab in Network Utility, Port Scan, is for scanning which ports are open at a certain address. These Network ports are a sort of virtual version of the ports on the side of your computer, and each port is for a certain type of network traffic. For example, port 80 is used for web pages.
You can use Port Scan to test your own computer by typing in the name of your Mac followed by ".local". You can find this name in the Sharing section of System Preferences.
Things like iTunes sharing, instant messaging, BitTorrent, AFP and SMB sharing all use different ports. If you find that one of these isn't working, it might be because your firewall is blocking the port that it uses. Instead of turning off your firewall, you can just set it to open that port.
Just run Port Scan with the application or sharing turned off and then again with it turn on to see which port appears. You can then set your firewall to open this port and allow network traffic through. Note that the built in firewall that comes with Mac OS X works on a per application basis rather than a port basis, to keep things simpler for the average user.
Terminal commands for improving Spotlight
Spotlight works great most of the time, but occasionally you may need to do a bit of tinkering to get it to work properly. Most of us have probably had a problem where Spotlight won’t find a file you know is there. Here are a few Terminal commands for changing hidden Spotlight settings, performing more complicated searches and updating the index.
Add a file to the Spotlight index
In theory, all files are added to the Spotlight index when they are created. However, every now and again something goes wrong and a stubborn file might refuse to show up. To manually add it to the index, you can use the following command. Start by opening up Terminal (located in Applications/Utilities). Type in mdimport and then hit the space bar. Next, find the file you want to add in the Finder, and drag it onto the Terminal window. Terminal should automatically type in the path to the file for you. Of course, if you know the path you can type it in manually yourself. Finally, hit return and the file should now show up in you Spotlight searches.
Add a folder to the Spotlight index
Adding a folder works in exactly the same way as with a file. However, in Mac OS X 10.4 Tiger and earlier, the command is slightly different if you want the contents of the folder to be indexed too. In that case use mdimport -f instead. You might want to use this to add the System folder with mdimport -f /System as it isn't searchable by default.
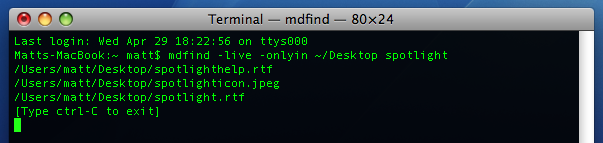
Search Spotlight from the Terminal
Considering Spotlight is so quick and easy to access, you will probably only use this if you are already working in the Terminal and want to find a file, or if you want some extra options. To do a search, just type mdfind query where query is what you want to search for. To limit this to a specific folder, instead use mdfind -onlyin ~/Desktop query replacing ~/Desktop with the path to your folder. To run a “live” search which will update the results as users add files, use mdfind -live query. Control-C will stop it updating. To see all the other options, look at the man page by typing man mdfind into Terminal.
Re-index an entire drive
If you are having problems with your Spotlight index, you might want to start over and re-index your hard drive. In the Terminal, type sudo mdutil -E / and hit return. You may have to enter your password. The existing Spotlight index will be deleted, and Spotlight will start creating a new index in the background. You can re-index other hard drives by changing the command to include their name, like sudo mdutil -E /Volumes/OtherHardDrive.
Re-index a specific file format
When Spotlight adds a file to the index, it checks to see if it recognises the file type and then uses an mdimporter plugin to index the contents if it does. Each file format has its own plugin, and most are located in Macintosh HD/System/Library/Spotlight or Macintosh HD/Library/Spotlight. Double clicking on a plugin will give you the option to re-index all the files associated with it. Alternatively, you can do this from the Terminal with the command mdimport -r. For example, mdimport -r /System/Library/Spotlight/Chat.mdimporter would cause all of your chat files to be re-indexed.
Add a new file format to the Spotlight index
One of the great things about Spotlight is that it will index the contents of many types of files. For example you can search for a word written in a PDF document or the telephone number of one of your contacts. Many third party applications require plugins to make Spotlight index their file's contents, which are available on the Apple Spotlight plugins page.
Make Spotlight index source code
Apple's developer tools come with a source code mdimporter plugin that allows Spotlight to search the contents of your source code. However, if don't want to install the developer tools (it's a big download) then you can just modify the rich text mdimporter plugin to handle the same job. Go to Macintosh HD/System/Library/Spotlight and find the RichText.mdimporter file. Right-click on it and choose "Show Package Contents". Inside the Contents folder, double-click on the info.plist file to open it in TextEdit. Near the top you will see a list that looks like this:
<string>public.rtf</string>
<string>public.html</string>
<string>public.xml</string>
<string>public.plain-text</string>
<string>com.apple.traditional-mac-plain-text</string>
<string>com.apple.rtfd</string>
<string>com.apple.webarchive</string>
<string>org.oasis-open.opendocument.text</string>
<string>org.openxmlformats.wordprocessingml.document</string>
You can add any of the following lines to the end of this list to enable Spotlight to index the contents of the specified format:
<string>public.c-header</string>
<string>public.c-plus-plus-header</string>
<string>public.c-source</string>
<string>public.objective-c-source</string>
<string>public.c-plus-plus-source</string>
<string>public.objective-c-plus-plus-source</string>
<string>com.sun.java-source</string>
<string>public.perl-script</string>
<string>public.python-script</string>
<string>public.csh-script</string>
<string>public.shell-script</string>
<string>public.ruby-script</string>
<string>public.php-script</string>
<string>com.netscape.javascript-source</string>
When you are done, you will want to double-click on RichText.mdimporter to re-index all these file formats.
If you have another file format that is a really just a text file under the hood, you can find out what to add to the info.plist file by running mdimport -n -d1 somefile.ext in the Terminal. The output should contain a "type" that looks something like the items in the list above.
Remove something from the Spotlight index
This is really straightforward, but I thought I'd include it for completeness. Simply go to System Preferences and click on Spotlight. In the Privacy tab, click the plus (+) and choose your file or just drag it from the Finder.
10 tips for using Mac OS X like a pro
Here is a collection of 10 tips that are slightly more advanced than usual. They are aimed at those who want to become more expert Mac users - and of course those who think they already are experts... In general these tips will help you save time and effort when carrying out day to day tasks and hopefully introduce some concepts and applications you may not have come across before.
1. Download Quicksilver

This is really the most important pro app for Mac OS X. The principle of Quicksilver is simple, but it is amazingly powerful: Hit a hotkey, then start typing what you want to do. You can open an application. Send an email to a certain contact. Pause iTunes. Anything (more or less). But what makes this so incredible is that Quicksilver learns over time so you can get what you want faster and more efficiently with less and less effort. Head here for a more detailed explanation, or if you've got some time to spare, watch this demo video. Download it from the Blacktree site.
2. Get to grips with keyboard shortcuts
This may seem like a really simple tip, but far too often I watch supposedly experienced computer users take forever performing simple tasks like copying and pasting. The fact of the matter is keyboard shortcuts make everything easier, but not only do you have to learn them, you have to get into the habit of using them. There is a hugely extensive list here, but to be honest nothing will save you more time than getting into the habit of using shortcuts for quitting, closing windows, copying and pasting and switching applications.
For the more adventurous, you can create your own keyboard shortcuts in the keyboard and mouse section of System Preferences. And if you want to go even further, here are 10 AppleScripts that you can assign keyboard shortcuts to using Quicksilver.
3. Drag and drop everywhere
This is often a problem that comes from working in Windows a lot, where drag-and-drop doesn't quite have the same power. However in Mac OS X, you can use it almost anywhere. Dragging folders onto open/save dialogs will make it display that folder. Dragging text selections onto icons in the Dock does all sorts of useful things. And you can just drag files onto "Choose File" buttons in web pages.
4. Change hidden settings with Terminal commands
Often developers choose not to include some settings in the preferences of an application in order keep things nice and simple for the user. Luckily, they often leave these hidden settings accessible via the Terminal. Although this will scare off a lot of people, being comfortable with the Terminal is really useful and it's the best way to get a higher level of customisation and enable hidden features on your Mac. Luckily, modifying preference files is one of the easiest things you can do in the Terminal - just paste in a line of code and hit return. Simple! Here is a list of Terminal commands that will work with every version of Mac OS X, and here are some ones just for Leopard.
5. Download VLC
VLC is a multipurpose media player that can play pretty much any movie file you throw at it. While Quicktime will serve you for most needs, VLC will handle anything that Quicktime struggles with, as well as stubborn DVDs and VIDEO_TS folders. Download it here.
6. Understand the concept of packages
In Mac OS X, packages are just folders disguised to look like single files. In fact, almost every application is a package. To look inside packages, just right-click on one and choose Show Package Contents. Why would you want to do this? Inside application packages are all the files it needs to run. Once inside, you can tinker about and change things. Here's a previous tip with a collection of things you can do, including changing the unexpectedly quit message, the iCal alarm message and the layout of System Preferences.
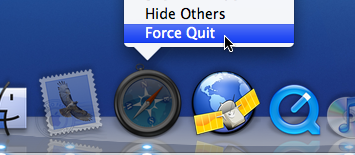
7. Quickly kill accidently opened applications
If you are clumsy like me, you will often accidently click the wrong icon in the Dock. Or maybe you occasionally want to stop iTunes opening up when you plug in your iPod. If you are quick enough, you can just right-click (Control-Click) on the icon in the Dock and choose Force Quit. If you are too late, pressing the Option key will change Quit to Force Quit so you can close the unwanted application even faster.
8. Make rectangular selections (Cocoa apps only)
This is one of the best tricks for saving time when you are moving round chunks of text. If you want to select a column in a table or remove the numbers from the start of each line in a list you would normally have to go through every line individually. This can be hugely time consuming if you have a long list. To get around this, just hold the Option key while making the selection. Now you can draw a box around the stuff you want to copy or delete etc. and not worry about having to select entire lines.
9. Learn some AppleScript
Don't be put off by the idea of a programming language - AppleScript is about as close to normal english as you can get. AppleScript's real power is it's ability to automate repetitive tasks — in fact Automator is basically just a visual way to create AppleScripts. The best way to get familiar with AppleScript is to download some example scripts, try and figure out how they work, and then try and extend them or customise them for your own needs. If you are looking for scripts, I've written loads of tips that use a small bit of AppleScript to solve a problem.
10. Get comfortable using the command line
While you might be fine pasting a single line into the Terminal to change some hidden settings, you might not be comfortable actually working from the command line. I guess the whole point of Mac OS X is that it is a pretty graphical interface placed over the command line, but in reality some things are faster from the Terminal, and some things aren't possible without it. Learning about using the command line requires a whole tutorial in itself so I won't go into it here. O'Reilly have a great series of tutorials for beginners, and OSXDaily have a list of common commands.
A few more GeekTool tricks
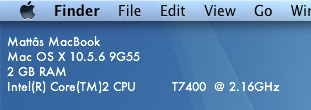
Show Basic System Information
It is possible to use shell commands in GeekTool to display the computer name, operating system version, the amount of RAM and the processor details. This is useful if you have loads of the same model, or if you often remotely control other Macs.
To display this information, just open up System Preferences and click on GeekTool (download it first if you haven't already). Create a new entry, and change the type from File to Shell. Paste the following code into the box:
scutil --get ComputerName;sw_vers | awk -F':\t' '{print $2}' | paste -d ' ' - - -;sysctl -n hw.memsize | awk '{print $0/1073741824" GB RAM"}';sysctl -n machdep.cpu.brand_string;You might notice that each line of the code corresponds to a line of the output. In fact the code is actually 4 separate terminal commands. If you want you can delete or modify any of the lines and it won’t affect any of the others. Just make sure each line ends with a semicolon.
These details pretty much never change, so it's worth changing the refresh time to something very high. It is measured in seconds, so something like 100000 (about one day) should be alright. Once you adjust the font, colour and position, the result looks something like the screenshot below.
Show Free Disk Space
df is a command line utility for getting information on how much disk space you have free. The following command gets the output of the df command and converts it into a more readable format:df -hl | grep 'disk0s2' | awk '{print $4"/"$2" free ("$5" used)"}'Just add this into GeekTool in the same way as usual. "
disk0s2" is the identifier for the hard drive. You can find out what yours is Disk Utility (located in Applications/Utilities). Just click on the hard drive in the list on the left and choose Get Info... from the File menu (Command-I). The Disk Identifier property is near the top of the info window.The second part of the command is awk which rearranges the output. You can change this arround. Just make sure all text is inside double-quotes, and all variables (e.g. $2) are outside. $2 gives the capacity, $3 gives the used, $4 gives the free, and $5 gives the percentage used.
This one would fit quite well with the system info above, but it is likely to change more so you might want to keep it separate and have it refresh more often.
![]()
Display Album Artwork and Song Details of iTunes Currently Playing
I won't go into detail with this, because I don't have it set up on my system. This basically involves using AppleScript to get the details from iTunes. The song details are relatively straightforward to get, but the album artwork is a bit more complicated. Mac OS X Hints shows how to do the song details here, and the album artwork here.
Display a One-line Weather Forecast
Unfortunately this one is for US readers only (or people who want to know the weather in the US). The website Weather Underground gives a single line weather forecast that just compares today or tomorrow to the previous day. As usual, just create a new GeekTool entry, change the type to Shell and paste the following in the box:
curl -s http://www.wunderground.com/cgi-bin/findweather/getForecast?query=12345 | awk '/Today is/ || /Tomorrow is/' | textutil -convert txt -stdin -stdout -format htmlReplace 12345 with your zip code, and you should have a weather forecast for your area. Running this takes a bit of time and system resources, so it's best to change the refresh rate to at least a few hours (about 10000).

Stop GeekTool preventing Sleep
You may have noticed that GeekTool prevents your Mac from going to sleep after the time period set in the Energy Saver section of System Preferences. The display will sleep, but the computer itself will never sleep because it is continuously performing tasks and Mac OS X doesn't think it is idle. This isn't really an issue for me, as I normally close the lid of my MacBook when I'm not using it, but I can see how this would be a problem for others. There is a solution explained over at Mac OS X Hints that uses an application called SleepWatcher to disable GeekTool as soon as the display goes to sleep.
Tweets on the desktop with GeekTool
If you are looking for more Geektool scripts then check out the Mac OS X Tips Geeklets site. It has loads of user-contributed Geeklets all in one place for you to download.
As reported in TUAW yesterday, a reader named Ben G saw my recent tip for displaying iCal events and to do items on the desktop and took it one step further. Inspired by iCalBuddy, he has written a similar command line utility called twitterbuddy that instead displays the latest tweets by the people you follow. Getting this onto your desktop is pretty much the same process as with iCalBuddy.
Once you have downloaded twitterbuddy, double-click the install.command file to install it. To test it works, open up a new Terminal window and type in
twitterbuddy -h. This should bring up the following list of options:
As you can see, typing
twitterbuddy -u yourusername -p yourpassword -n 5 -t Tweets will display the last 5 tweets you have received, with the title “Tweets”. After perfecting your settings in Terminal, adding the command to GeekTool is easy. As with iCalBuddy, the only subtlety is that you have to use the full path, as shown below:/usr/local/bin/twitterbuddy -u macosxtips -p ******** -n 5 -t Tweets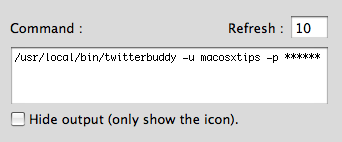
For help setting up GeekTool and formatting your output, check out the iCal on the Desktop tip, as everything is the same. Many thanks to Ali Rantakari, the deveoper of iCalBuddy and Benjamin Goering, the developer of twitterbuddy for all their hard work.
Also, if you want to, follow me on Twitter.
14 Tips for Safari 4 Beta
1. Download Safari 4 beta
2. Update your plugins
While most plugins for Safari should be fine with the new version, InputManagers are likely to need updating. 1Password has released an update, but you have to go to the 1Password app in your Applications folder to access it. Go to the Preferences and in the updates section, check the box that says Include Beta versions. Now when you check for updates it should download a version that works with Safari 4. Updates for Glims and Saft are already available from their respective sites, but as far as I know PithHelmet and SafariStand haven't been updated yet.
3. Safari breaks Xcode
This one is mainly for developers. If you are using the 3.0 version of Xcode, you will find that it crashes on launch once you have downloaded the Safari 4 beta. Just head over to the Apple Developer Connection to download version 3.1.2 of Xcode that works fine.
4. New keyboard shortcuts
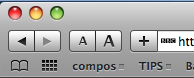
Now Control-Tab will allow you to cycle through your tabs (as opposed to Command-Tab that cycles through applications). Don't worry if you were used to the old shortcut though, Command-Shift-Arrows still work.
5. Add the zoom button
The new zoom feature works just like Safari on the iPhone. Instead of just increasing the font size, it increases the size of images and other media too. You can access this from the View menu or with the Command-+ and Command-- shortcuts. Alternatively, choose Customize Toolbar from the View menu to add the zoom button to the toolbar.
6. Restore the old style tabs
One of the biggest changes visually is the new tabs, located along the top of the window. If you aren't a fan of this, a simple Terminal command will move them back to the old position. Just open up Terminal (in Applications/Utilities) and paste in the following line:
defaults write com.apple.Safari DebugSafari4TabBarIsOnTop -bool FALSETo bring back the new tabs on top, just repeat the command with
TRUE at the end. You will need to restart Safari for changes to take effect.7. Disable search suggestions
Now the Google search box gives suggestions for your search as well as recent searches. To disable this, just use the following Terminal command in the same way as above:
defaults write com.apple.Safari DebugSafari4IncludeGoogleSuggest -bool FALSEAs before, repeat with
TRUE at the end to bring back suggestions.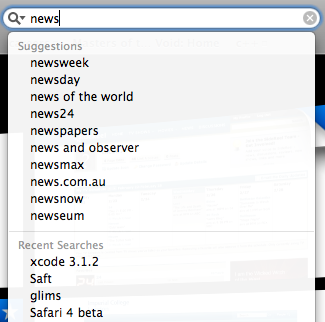
8. Bring back the old progress bar
Unfortunately, the new spinning progress indicator doesn't give you a good idea of how far the page has loaded. To bring back the old style, you have to use both of the following commands.
defaults write com.apple.Safari DebugSafari4IncludeToolbarRedesign -bool FALSEThis changes the progress indicator to a blue pie chart. To get the blue bar, now use the following command:
defaults write com.apple.Safari DebugSafari4LoadProgressStyle -bool FALSERepeat both commands with
TRUE at the end to go back to the new style.9. Disable bookmarks Cover Flow
If Cover Flow isn't your thing, you can get rid of it in the Bookmarks window by using the following Terminal command:
defaults write com.apple.Safari DebugSafari4IncludeFlowViewInBookmarksView -bool FALSERepeat with
TRUE at the end to bring back Cover Flow.10. Disable dimming in Top Sites zoom
When you choose a page in Top Sites, it zooms in to take up the whole page with a neat animation effect. To stop the page dimming during this, use the following Terminal command:
defaults write com.apple.Safari DebugSafari4TopSitesZoomToPageAnimationDimsSnapshot -bool FALSERepeat with
TRUE at the end to revert back to the original behaviour.11. Disable Top Sites
If, for some reason, you want to completely disable the Top Sites feature, use the following command:
defaults write com.apple.Safari DebugSafari4IncludeTopSites -bool FALSERepeating with
TRUE at the end will enable Top Sites again.12. Disable "fancy" URL suggestions
This is actually one of my favourite new features in Safari 4. When you are typing in a web address, suggestions are separated into Bookmarks, History and a Top Hit. If you prefer the old window, use the following command:
defaults write com.apple.Safari DebugSafari4IncludeFancyURLCompletionList -bool FALSERepeat the command with
TRUE at the end to enable the fancy completion list again.13. Add web sites to Top Sites
If you click the Edit button in Top Sites, it is easy to use the pins to force sites to stay in Top Sites. To manually add a site that isn't already there, open it up in a separate window, then drag the favicon (next to the address) over to one of the positions in Top Sites. You can also drag sites from your bookmarks to Top Sites.
14. Fix GrowlMail
Unfortunately GrowlMail will now cause Mail to crash. There is a quick workaround that involves putting GrowlMail into summary mode. Do this by using the following Terminal command:
defaults write com.apple.mail GMSummaryMode -int 2Supposedly the next version of GrowlMail should fix this problem.
Display iCal Events and a To Do list on your desktop
If you are looking for more Geektool scripts then check out the Mac OS X Tips Geeklets site. It has loads of user-contributed Geeklets all in one place for you to download.
1. Get GeekTool and iCalBuddy
To set this up you need to download two (free) applications. The first is GeekTool, a preference pane that allows you to display files, images and shell scripts on the Desktop. The second is iCalBuddy, a command line utility that lets you access events and to do items without having to open iCal.
Download GeekTool from here and install it by double-clicking on the preference pane. You can now access it by going to System Preferences and looking in the bottom row.
Download iCalBuddy from here and double-click it to unzip the folder. Then double-click the install.command file, and enter your administrator password when the window appears. You can then close the window.
2. Set up GeekTool
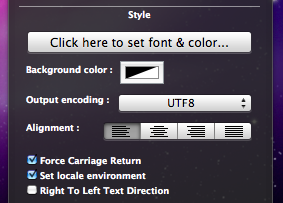
Once you click on the GeekTool section in System Preferences, you will see a window with three different icons. Drag the one called “Shell” to a position on the desktop behind the window. A black “Properties” inspector window will appear, where you can enter the settings for this geeklet. The bits you need to change are the Command and Style sections. In the command box, paste
date and click the button below to set the font and colour to something that complements your background and make it a bit bigger. If you look on your desktop now, the date should be written in the top left. You can click and drag this around to where you want it, or you can type in the position in the bottom right of the GeekTool window. As you can see, the time only updates every 10 seconds. You can change this in the Refresh box above the Command box.3. Change the appearance
If you have a dark Desktop background, you may find that you can't see the date. By default the date appears in an ugly plain fixed width font with a black text colour. To make this more visually appealing, click on the "Colors and Font" tab and adjust the settings. You can see my settings in the screenshot below. Obviously lighter text colours work better with darker desktop backgrounds and vice versa.
The Shell option on GeekTool works just like the Terminal. If you type
date into the Terminal and press enter, you should get exactly the same thing back as shown by GeekTool. Conveniently, the date Terminal command has a number of options to change the style of the date. As you can see, the default setting includes the time, time zone and year that I don't really want. The command for my preferred date format is date '+%a %e %B' which gives something like Wed 18 February. Apple has a list of formatting options here you can use to change it to whatever you want. You need to put a + at the start, followed by the symbols for the bits you want. You can but punctuation like commas between the symbols, and the whole thing has to be enclosed in single quotes.

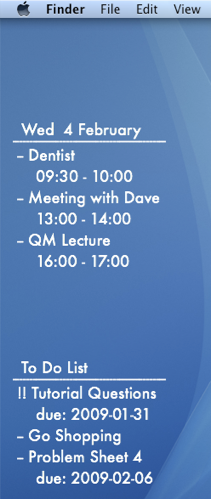
This is where the iCalBuddy application comes in. Create a new geeklet by dragging the “shell” icon onto the desktop as before. In the Command box type
/usr/local/bin/icalBuddy eventsToday. This should bring up a list of today's events on the desktop. There are loads of customisation options for iCalBuddy, so I won't go through them all, but I'll show you mine. The command I use is:/usr/local/bin/icalBuddy -nc eventsToday | sed -e "s/*/--/" | sed -e "s/!/!!/"-nc part removes the calendar name in brackets because all my events are in the same calendar. The sed -e "s/*/--/" part changes the * at the start of each event to a -- because I think it looks better. The "sed" and "awk" commands are really useful for customising the output, but I won't go into much detail here. Just do a Google search for a tutorial if you want more information. For the different iCalBuddy customisation options, check out the man page.One customization to note is the "eventsToday+NUM" option. Replacing
eventsToday with eventsToday+3, for example, will display the events for the next three days in separate sections titled by the date.6. Add to do items
To do items work in pretty much the same way as the iCal events. The command to use is
/usr/local/bin/icalBuddy uncompletedTasks. Similar to before, the command I use is:/usr/local/bin/icalBuddy -nc uncompletedTasks | sed -e "s/*/--/" | sed -e "s/!/!!/"7. Add some titles
If you just want GeekTool to display some text, the easiest way to do it is to use the
echo command. Just create a new entry and use the command echo To Do List to make it display "To Do List" on the Desktop.8. Set the Refresh rate
The next thing to do is to set a suitable refresh rate for each item. It is worth noting that these command take very little system resources, and having them all update every 10 seconds produces absolutely no decrease in performance whatsoever that I've noticed. However, in principle you should only really make them refresh as much as you need them too. I've set all mine to update once an hour (3600). This means that the worst case scenario is that the information is wrong for up to an hour between midnight and 1am each night. If you like having the time displayed in the date command, you probably want that to update every second.
8. Make it pretty
Finally, you just have to change the font and colour of each entry and position them somewhere you want on the Desktop. I went for the far left as it's a place guaranteed not to get covered up by icons.
9. Go crazy
There are hundreds of things you can do with GeekTool, and it's definitely worth trying them out and seeing what you like. In the end, I only kept the iCal events and to do list, but you may like having constant updates of your uptime, running processes, CPU use, local weather maps, IP address, current iTunes track etc. Check out the Mac OS X Tips Geeklets site for more.
Create a disk image that works in Windows
Disk images have far more widespread uses than this though. They can be used to create a exact copy of any CD, DVD or hard drive and turn it into a single .dmg file. You can then transfer this file around, and then simply double-click on it to mount the disk image. The most common uses of this are to create backups, to create a file for burning to CD/DVD, or to transfer the entire contents of a hard drive from one computer to another.
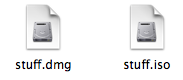
Unfortunately, the dmg type disk images that Mac OS X uses are not really Windows friendly. The cross-platform standard for disk images is the ISO format. These can be created on your Mac, and can be read by any Mac or Windows PC. This is especially useful if you want to burn a CD or DVD and your Mac doesn't have a burner but your PC does.
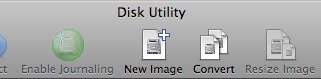
The first step in creating an ISO image is to make a folder of all the things you want to be in your disk image. Next, open up Disk Utility, located in the Utilities folder in the Applications folder. In Disk Utility, choose "New... Disk Image from Folder" from the File menu, or hit Command-Shift-N. Choose your folder, and then select a name for your image. Choose "DVD/CD master" from the Image format pop-up menu, and leave the Encryption as none. Click Save, and you're almost done.
You have created an ISO image, but strangely Disk Utility gives it the .cdr extension instead of the standard .iso extension. To avoid confusing Windows PCs, just rename your image with the .iso extension and you're done.
If you already have a normal Mac .dmg disk image, it's just as easy to convert it to .iso using Disk Utility. Just select Convert from the toolbar or the Images menu. Use the same settings as above, and remember to change the file extension to .iso.
For those of you who love the command line, you can convert disk image formats using hdiutil. This has the benefit of not requiring you to change the extension, but probably won't work out any quicker as the process is so straightforward in Disk Utility.
To convert from DMG to ISO, open up Terminal (in Applications/Utilities) and type:
hdiutil convert /path/to/image.dmg -format UDTO -o /path/to/newimage.isoReplace the two paths with the location of the image and the place you want to save the new image. For example I would use /Users/matt/Desktop/image.dmg. To avoid mistakes, you can just drag the image to the Terminal and it will enter the path for you.
To convert from ISO to DMG, just use the following instead:
hdiutil convert /path/to/image.iso -format UDRW -o /path/to/newimage.dmgData Detectors in Mail
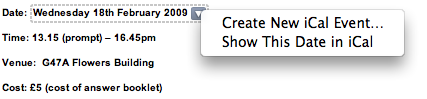
To use the data detectors feature, simple hold your mouse over a date or time in an email message. A dashed box should appear around the item, with an arrow that you can click to bring up a drop-down menu. The two options available are "Create New iCal event" and "Show This Date in iCal". If you create a new event, a dialog box just like the one in iCal pops up, ready filled with the information. This all happens within Mail, so there is no need to even open iCal.
While this is a great timesaving trick, unfortunately the Mail dialog lacks some of the features that the iCal one has. You can only add a single alarm, and you can't add attendees or attachments. However, it is still possible to use data detectors to fill out your event information and have access to these more advanced options.
Simply hold down the Option (alt) key when clicking on the data detector drop-down arrow. The menu item should now read "Create New Event in iCal". Selecting this will load up iCal and create a new event with the information in the Mail message.
If you already started creating an event in Mail, and then decide you want to add multiple alarms or attendees, simple hold down the Option (alt) key. The "Add to iCal" button at the bottom should change to "Edit in iCal", allowing you to make the changes you want.
Enable Data Detectors in iChat
Apple also built data detector functionality into iChat, but chose to disable it for some reason. Luckily, enabling it again can be done by a simple Terminal command. Start by opening up Terminal (/Applications/Utilities). In the window that appears, paste the following line, and hit enter.
defaults write com.apple.iChat EnableDataDetectors 1Next time you open iChat, data detectors should be enabled. To disable them again, repeat the command with a 0 at the end instead of a 1.
Disable Data Detectors in Mail
If you never use data detectors, you might want to disable them. This can be done using the following Terminal command:
defaults write com.apple.mail DisableDataDetectors YESNext time you open Mail, data detectors shouldn't appear. If you want them back, just repeat the command with NO at the end.
Text to Speech in Mac OS X
Since Mac OS X 10.4 Tiger, the amazing operating system has included many built in things. One of the many great things included with Mac OS X is called TTS (text to speech). I'll be covering an easy way to dive into text to speech. All you have to do is fire up Terminal.app (/Applications/Utilities/Terminal.app) and type in:
say 'text to say with no quotes'So if you type in:
say Hello WorldAnd hit return, then (as long as your speakers are turned on) your computer will 'say' hello world to you! A more advanced way to do this is to type in:
osascript -e 'say "some text" using "some voice"'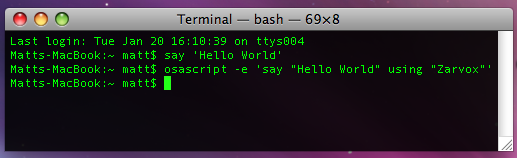
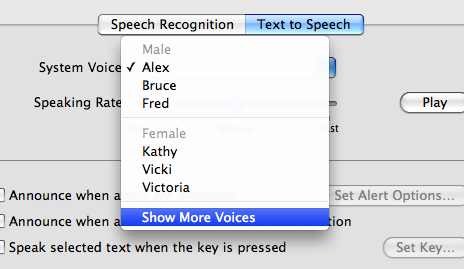
You can check the voices your system has in System Preferences in the Speech pane under the Text to Speech tab. You might have to select “Show more voices” at the bottom to get the full list.
[Matt adds: For any Cocoa application (Safari, TextEdit, etc.) there is a "Start Speaking Text" option under the Services menu (in the Application menu) that will speak your selection in the currently selected system voice. Great if you want a web page or long piece of text read to you. You can even assign a keyboard shortcut to it in the "Keyboard and Mouse" section of System Preferences. Also, since Leopard, Apple has added a new voice, Alex, which is much more realistic than the usual "robot" sounding voices that are available.]
The Ultimate Mac Screenshot Guide
Keyboard Shortcuts
The quickest way to take a screenshot is to use a keyboard shortcut. Annoyingly, these aren't particularly intuitive. There are two main ones:Command-Shift-3 - Take a screenshot of the entire screen.
Command-Shift-4 - Allows you to click and drag around the area you want a shot of.
Each of these will save a file to the desktop named Picture 1.png, or a higher number if that file already exists.
Now there are a few extra things you can do. If you press Space after pressing Command-Shift-4, you will notice that the cursor changes to a picture of a camera. You can now just click on a window, icon, widget or almost any other interface element to take a screenshot of it. You can also add Control into the keyboard shortcut to put the image in the clipboard instead of saving it to the desktop. For example, pressing Command-Control-Shift-3 would allow you to then paste the image into another document.
The Grab Application

You can create a timed screenshot by going to the Capture menu, or by pressing Command-Shift-Z. Using this, you can achieve screenshots that are supposedly “impossible”. One example is the login window.
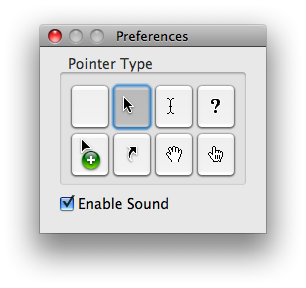
To change the pointer type, go to the Preferences. See the image below for the different options.
Disable Shadow
If you use the Command-Shift-4 Space method to take a screenshot of an entire window, you will find that the shadow is in the screenshot. This was added in Leopard because without the shadow, windows don't actually have a border if they have no scrollbars. However, if you prefer no shadows, you can disable them with a Terminal command. Simply open up Terminal (located in Applications/Utilities), paste in the following line and hit return.defaults write com.apple.screencapture disable-shadow -bool trueAfterwards you will need to log out and in again for changes to take effect. To enable shadows again, simply repeat the command but with false at the end. The two images below show a before and after shot.

Change Image Format
The default image format for screenshots is png, which gives a nice, high quality picture. However you can change this if you want. As before, use the following Terminal command:defaults write com.apple.screencapture type pngSimply replace png with your file format of choice. The available options are jpg, tiff and pdf. Changing to jpg gives a lower quality but smaller file. Some people prefer this for quick snaps, but others dislike the slightly blurry results it gives. As before, log out and in again for changes to take effect.
Advanced Screenshot Applications
If widgets are your thing, Screenshot Plus will probably be the method of choice for you. It's free, and allows you to do everything that you can achieve with keyboard shortcuts. It also allows you to view a preview image, before saving it to the desktop or importing it into Preview.If you really want to go all out on your screenshots, you might want to consider buying an application like Snapz Pro. It allows you to do all of the things above, as well as record movies of your screen.
Finally, if you want to get screenshots of long webpages that don't fit on the screen, Paparazzi! is your solution. It gives allows you to set the size of the image, set a delay, choose the file name and choose the file format. Of course, if you want a PDF of the web page, that functionality is already built into Mac OS X.

Also, the MacTipper Blog pointed out one more thing I forgot. Using another Terminal command, you can change the default save location to somewhere other than the Desktop. The command is as follows:
defaults write com.apple.screencapture location /Full/Path/To/FolderFor full instructions, check out the MacTipper Blog.
Reset a lost OS X account password in single user mode
Remember, only use this if you have lost the Mac OS X install DVD. Also, don't do this if you have FileVault enabled in your account, and note that this will not change your keychain password.
First, we need to restart in Single User mode. To do this hold down Command-S while the computer is starting up. A command line prompt should appear on the screen instead of the login window or your normal desktop.
At the prompt, type
mount -uw / then return. Next, type launchctl load /System/Library/LaunchDaemons/com.apple.DirectoryServices.plist then return. You will need to type these exactly the same, so write them down beforehand.
The next step requires you to know the short username of the account. If you don't know this, type
ls /Users followed by return, and look for it in the list that appears.Next, type
dscl . -delete /Users/username AuthenticationAuthority followed by return. Make sure you replace username with the short username of the account.The final command to type is
passwd username followed by return. As before, replace username with the short username of the account.The rest is self-explanatory. Type the new password, followed by return. When prompted, retype the password.
Finally, type
reboot and hit return! Your password should be reset.Enable Single Window Mode in Safari
If you use Safari regularly, you may notice that certain links refuse to open in the same window. If a link is set to open in a new window, normally holding down Command while clicking it will make it open in a tab instead. However, in certain places (like Gmail messages) links open in a new window no matter what you do.

defaults write com.apple.Safari TargetedClicksCreateTabs -bool truePress return, and quit and reopen Safari. Now all links targeted for a new window will open in tabs instead. To change back to the normal settings, use the same command but with
false at the end instead:defaults write com.apple.Safari TargetedClicksCreateTabs -bool falseDon't forget there are loads of other tricks for Safari 3, such as enabling the web inspector and bookmarking all open tabs.
Terminal Commands for Hidden Settings in Leopard
In general, these will only work with Leopard. I have slipped in a few that will work with Tiger, but you should check out the old list for commands that will definitely work.
If you don't already know, here are some quick instructions of how to use them: You'll find Terminal in the Utilities folder within the Applications folder. To carry out any of the following commands you will need to copy/paste or type in the line of text then hit enter. Most of the commands change settings that can't be done through the application or system preferences.
For the most part, applications will need restarting before changes take place. For the Dock and the Finder, it isn't obvious how to do this. The easiest way is to type a second command into the Terminal afterwards. Type "killall Dock" followed by return for all the Spaces, Stacks and Dock commands. "killall Finder" followed by return for all the Finder related ones.
Spaces
defaults write com.apple.dock workspaces-edge-delay -float 0.5Changes the delay when dragging windows off the edge of the screen to other spaces. Default value is 0.75.
defaults write com.apple.dock workspaces-wrap-arrows -boolean NODisables the wrap-around when using Control-Arrow keys to changes Spaces. To enable again, repeat with YES at the end.

Stacks
defaults write com.apple.dock persistent-others -array-add '{ "tile-data" = { "list-type" = 1; }; "tile-type" = "recents-tile"; }’Creates a Recent Applications stack in your Dock, that you can change to display other recent items. To remove it, use the command defaults delete com.apple.dock persistent-others but be warned, this will remove all your stacks.
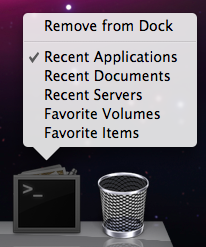
defaults write com.apple.dock mouse-over-hilte-stack -boolean YESAdds a Mouse Over gradient to items in your stacks. To disable, repeat with NO at the end.
Dock
defaults write com.apple.dock no-glass -boolean YESChange to 2D Dock. To change back to 3D, prepeat with NO at the end.
defaults write com.apple.dock tilesize -int 256Allows you to increase the size of the Dock past the maximum allowed by the slider in System Preferences. Don't go larger than 256. Use the slider in System Preferences to shrink the Dock down again.
defaults write com.apple.dock largesize -int 512Allows you to increase the Dock magnification past the maximum allowed by the slider in System Preferences. Don't go larger than 512. Use the slider in System Preferences to shrink the Dock down again.
defaults write com.apple.dock enable-spring-load-actions-on-all-items -boolean YESMakes all items in the Dock spring loaded. For example, hold a file over an application and it will open or come to the front so you can drop the file onto a specific window. Repeat with NO to reverse.
Finder
defaults write com.apple.finder FXListViewStripes -bool FALSERemoves the stripes in list view. Repeat the command with TRUE to reverse.
/System/Library/Frameworks/CoreServices.framework/Versions/A/Frameworks/LaunchServices.framework/Versions/A/Support/lsregister -kill -r -domain local -domain system -domain userResets the "Open With" menu, clearing duplicates. The command is different from the one in Tiger.
defaults write com.apple.finder _FXShowPosixPathInTitle -bool YESChanges the title of a window to its full path. Repeat with NO to reverse.
![]()
Spotlight
sudo chmod 0 /System/Library/CoreServices/Spotlight.appDisables the Spotlight icon. Type "killall Spotlight" for changes to take effect. To re-enable it, type 755 instead of 0.
Time Machine
sudo defaults write /System/Library/LaunchDaemons/com.apple.backupd-auto StartInterval -int 7200Changes Time Machine's backup interval. Requires an administrator password. Default value is 3600 (seconds).
iCal
defaults write com.apple.iCal IncludeDebugMenu YESEnables the Debug menu in iCal, just like the Safari one. Repeat with NO at the end to disable.
Safari
defaults write com.apple.Safari DebugConfirmTossingUnsubmittedFormText NODisables the warning given when closing a window with text entered into a form that you haven't submitted. To bring back the warning, repeat the command with YES.
Check out this article for more Safari 3 tips.
Menubar
Changing the menubar will require an administrator password and you will need to restart the Mac for changes to take effect.
sudo defaults write /System/Library/LaunchDaemons/com.apple.WindowServer 'EnvironmentVariables' -dict 'CI_NO_BACKGROUND_IMAGE' 1Remove translucency in menubar, turns it white.
sudo defaults write /System/Library/LaunchDaemons/com.apple.WindowServer 'EnvironmentVariables' -dict 'CI_NO_BACKGROUND_IMAGE' 0Removes translucency in menubar, turns it grey.
sudo defaults delete /System/Library/LaunchDaemons/com.apple.WindowServer ‘EnvironmentVariables’Reverts back to default translucent menubar.
All Applications
defaults write -g PMPrintingExpandedStateForPrint -bool TRUEApplications use the expanded Print dialog by default. Similar to the expanded Save dialog in earlier OS versions. Repeat with FALSE to reverse.
Get to grips with the "Open With" menu
Firstly, if the application is in the Dock, you can simply drag the file onto its icon in the Dock. Alternatively you can open up the application first, and choose "Open" form the File Menu. A third method is to use the "Open With" menu. You will find this by right-clicking (Control-clicking) on the file and looking near the top of the contextual menu. Within the Open With submenu you will find every application that can open the file, as well as an "Other" option.
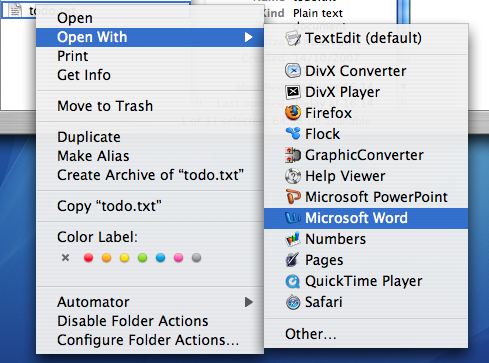
When you use the Open With menu, it is a "this time only" thing. Next time you double-click on the file, it will open with the default application again. To change the default application, bring up the menu as before, but hold down the Option key before choosing the application. The menu should change to "Always Open With".
When you use the Always Open With menu, it is a "this file only" thing. To apply a new default application to all files of that format, you can use the Get Info window located in the File Menu. In the Open With section, set the new application and click the "Change All" button.
To reset all of your files to open with the original default application, you need to delete a certain file. Go to your user folder, and navigate into the Library folder then into the Preferences folder. Find the com.apple.LaunchServices.plist file, and drag it to the Trash. Alternatively, drag it to the Desktop if you think you might change your mind and want to put it back later.
Over time, you may find that the Open With menu gets cluttered with duplicates, older versions or applications you thought you deleted long ago. To get rid of these, you need to use Terminal. Open up Terminal (from Applications/Utilities) and paste the following line:
/System/Library/Frameworks/ApplicationServices.framework/Frameworks/LaunchServices.framework/Support/lsregister -kill -r -domain local -domain system -domain userPress return and your Open With menu should have been cleaned up to only include the most current applications.
Tips for Safari 3

Merge Windows
Safari 3 now allows you to drag and drop tabs. You can drag a tab off the bar to create a new window or drag it onto an existing window to add it. You can also use this to rearrange the order of your tabs. If you have lots of open windows each with different numbers of tabs, there is an easier way to get them all into one instead of dragging and dropping. In the Window menu you will find the "Merge All Windows" command. This will instantly combine all your open windows into one tabbed window.
Enable Web Inspector
The Web Inspector allows you to easily see how the source code creates the web page. You can inspect various elements of the web page and view their style, metrics and properties. If you select an element in the inspector window, it will briefly be outlined in red on the web page.
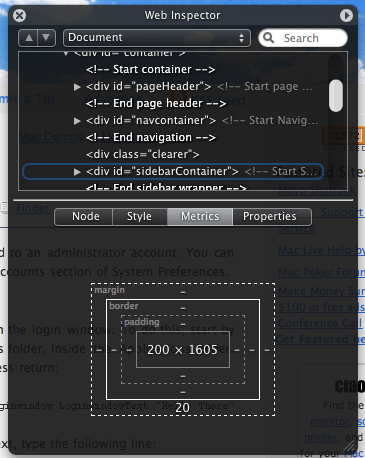
To enable the Web Inspector, open up Terminal (located in Applications/Utilities), type the following line and press return:
defaults write com.apple.Safari WebKitDeveloperExtras -bool trueNow quit and re-open Safari. Open a web page and right-click (Control-click) anywhere. You should see a new "Inspect Element" item in the list.
Pie Chart Loader
Normally Safari indicates how far a page has loaded using the address bar as a progress bar. The box gradually fills with colour from left to right. If you want, you can easily change this to the pie chart type indicator that is used in Mail. Again, open up Terminal (in Applications/Utilities), type the following command and press return:
defaults write com.apple.Safari DebugUsePieProgressIndicator -bool trueTo switch back to the old progress bar, simply repeat the above command with false instead of true.
Bookmark all tabs
This new feature obsoletes the tip I wrote last month about bookmarking all tabs in Safari 2. Doing this is now much simpler - you just need togo to the Bookmarks menu. Here you should find an item that says something like "Add bookmark for these 4 tabs...". The default settings creates a bookmark called "Saved Tabs" in the bookmarks bar. This is actually a folder of your tabs, but it has been set to automatically open all the pages in tabs when clicked.
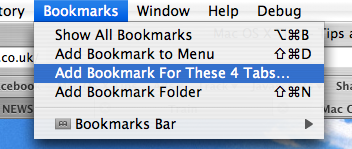
Others
There are loads of other new features in Safari 3 that are well known or don't really require any explanation. For example, the find command now dims the page and highlights the words you searched for, web history now indexes the text content of the page for easier searching, you can reopen the last closed window or the windows from your last session and all text fields are resizable.
5 Login Window Tips
1. Add a message to the login window
You can add a string of text above the list of users in the login window. To do this, start by opening up Terminal. This is located in the Utilities folder, inside the Applications folder. Once it has loaded, paste in the following line and press return:
sudo defaults write /Library/Preferences/com.apple.loginwindow LoginwindowText "Hello There”Replace "Hello There" with your text. To remove the text, type the following line:
sudo defaults write /Library/Preferences/com.apple.loginwindow LoginwindowText “”2. Hide accounts
If you find yourself with an overly long list of users in the login window or you just want to get rid of that annoying scroll bar down the side, you can stop accounts appearing in the login window.
Start by go to the Accounts pane in System Preferences, and find the "short name" of each user you want to hide. Once you have these, open up Terminal and enter the following:
sudo defaults write /Library/Preferences/com.apple.loginwindow HiddenUsersList -array-add shortname1 shortname2 shortname3Replace shortname1 2 and 3 with the short names of the user accounts you wish to hide. You can hide as many as you like, just separate each with a space.
To make a hidden name appear again, type the command with no names in it, therefore resetting the list of hidden users.
sudo defaults write /Library/Preferences/com.apple.loginwindow HiddenUsersList -array-addNotice that doing this adds an extra option to your login window - "Other..." When you select this, you will be presented with text boxes to enter a username and password.
If you aren't running OS X 10.4, this doesn't work. Another option is to replace the list of users with username and password text boxes. Go to the Accounts pane in System Preferences and click on Login Options. There you will find an option to display the login window as name and password fields. This isn't as pretty, but saves time if you have lots of users, and is also more secure.
3. Change the Apple logo
You can replace the large Apple logo that appears at the top of the login window with any tiff image that is 90x90 pixels. In the Finder, choose Go to Folder from the Go menu or press Command-Shift-G. In the dialog box that appears, type the following line:
/System/Library/CoreServices/SecurityAgent.app/Contents/Resources/To change back to the Apple Logo, just drag the copy that you made back to the Resources folder.
4. Get useful system stats
The name of you Mac is displayed in the login window below the words "Mac OS X". Since Mac OS X 10.4.3, you can click on the name of your Mac to show different statistics about your machine. Each time you click, it will cycle through different bits of information that are particularly useful when troubleshooting problems.
The order of the statistics are as follows:
One click: Your OS X version number (e.g. Version 10.4.9)
Two clicks: Your OS X build number (e.g. Build 7M271)
Three clicks: Your mac's serial number (e.g. WN1511LHKNW)
Four clicks: Your mac's IP address (e.g. 196.254.0.1)
Five clicks: The status of any networked account
Six clicks: The date and time (e.g. Saturday, January 20 2007 4:02:31 AM GMT)
Seven clicks: Back to where you started, the name of your computer.
So you click a few times and set the information line to your favourite thing, but next time you log in, it has changed back to the name of your mac. To change the bit of information that appears first, you need to do a bit of tinkering in the Terminal (Applications/Utilities). Open Terminal and type the following command:
sudo defaults write /Library/Preferences/com.apple.loginwindow AdminHostInfo HostName Depending on which piece of information you want displayed, replace HostName with one of the following:
SystemVersionSystemBuildSerialNumberIPAddressDSStatusTime
After doing this, hit return, and the next time you view your login window the information you chose will be displayed. To change it back to normal, simply repeat the command with
HostName at the end.5. Change the background image
There are ways to change the background image by replacing the Aqua Blue image, but that is slightly crude. A better way to do it is using the Terminal. Type the following command and press return:
sudo defaults write /Library/Preferences/com.apple.loginwindow DesktopPicture /Users/Shared/mynewbackground.jpg
/Users/Shared/mynewbackground.jpg is the location of the image you want to use. You don't have to type it out. Just paste the command as far as DesktopPicture and put a space after it. Then find your image in the Finder, and drag it onto the Terminal window. The address to your image should just appear. As far as I can tell, you have to place the image in a place that all users have access to (the shared folder is a good place).To change back to the normal Aqua Blue image, type the following command and press return:
sudo defaults write /Library/Preferences/com.apple.loginwindow DesktopPicture /Library/Desktop\ Pictures/Aqua\ Blue.jpg Reset a Lost OS X Account Password
If you still know the Administrator Password
If you still know the password to an administrator account, it is very simple to reset any standard or managed user's password. While logged in as the administrator, open up System Preferences and click on the Accounts section. All the accounts on the computer should be listed down the left hand side. Under each account name it should say Admin, Standard or Managed. If the lock at the bottom of the window appears locked, click on it to allow changes to the preferences.
Resetting an Administrator Password
Obviously, if you don't have access to an administrator account, you can't carry out any of the above steps. If you have forgotten the Administrator password or you can't log into your Mac at all, you will need to use the Mac OS X Install Disc.
Enter the Mac OS X Install Disc that is the closest version to that running on the Mac. For example, if you are running Mac OS X 10.6 Snow Leopard, you should enter the Snow Leopard install disk, not any earlier ones. Restart the computer, and hold the C key as it starts up. This might take longer than usual, and you can release the C key as soon as the Apple logo appears on the screen. When the window appears, choose your language and click the right arrow.
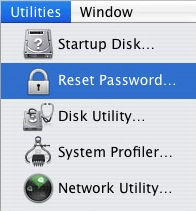
The next step depends on what version of Mac OS X you are using. Generally you need to choose Reset Password from the Utilities menu. For earlier versions of Mac OS X, choose Reset Password from the Installer menu.
Choose your Hard Drive from the top and then choose the Account from the drop down menu. Be careful not to select System Administrator, as this is actually the root user, not the administrator account on your Mac. Now enter the new password, click Save, quit the Installer and restart the computer.
Note that there are a few issues with this method. Firstly, it does not reset your keychain password. You will have to do this separately. Secondly, do not attempt this if you have FileVault enabled. To reset an FileVault protected account, you need the master password.
Resetting a FIleVault Protected User's Password
If you have enabled FileVault to encrypt your Account, you need to know the master password that you set when you enabled it. This is the password that the administrator should know that allows you to reset any password on the computer. If you have forgotten the master password, unfortunately your data is lost forever.
If you know the master password, start by attempting to log into your account. When you get the password wrong three times, you will be able to click “Forgot Password”. Now you will have to enter the master password and then a new login password for your account.
If you have lost the Mac OS X install Disc
If you have lost the install disc, don't try and use one from an earlier version as this might permanently block you out of your account. You really have two options: Firstly, you could buy a new copy of Mac OS X (try Amazon). Secondly, there is a way of resetting an administrator password without the disc if you are running Mac OS X 10.4 Tiger. Note: Do NOT do this with a FileVault protected account, or your data will be lost forever.
First, note the short name of the account. This is the same as the name of its home folder, but not necessarily the name that appears in the login window. Restart your computer, and while it is starting up, hold Command-S. This will start up your Mac in Single User Mode. Once it has started up, you will need to enter three lines of code. Enter
sh /etc/rc and press return. Then enter passwd yourusername and hit return. Now you will have to enter a new password twice. What you type won't appear on screen, but it is working. Once you have done this, type reboot and hit return.Similarly to the Install Disc method,this will not reset your Keychain password. You will have to do this separately.
Reduce Preview's PDF zoom after Spotlight
When you click on the PDF in the Spotlight results, it opens up in Preview with the search term highlighted throughout the document. This is pretty useful, however the PDF is actually zoomed in 280 percent. This means you can read the word you searched for pretty easily, but you can't see anything else.
![]()
Luckily, by changing one line in the Preview preferences, you can change the zoom level to something less extreme. The easiest way to do this is using the Terminal.
First, quit Preview if it is running and open up Terminal from the Utilities folder in the Applications folder. Type the following line and press return:
defaults write com.apple.Preview Preview -dict-add PVPDFSpotlightSelectionSize 10The 10 at the end corresponds to a 100% zoom level. By default, this number is set to 28, or 280% zoom. If you want some zoom, but not quite as much, try a number like 15 for 150% zoom.
If you don't want to use the Terminal, or you are curious to see what the command actually does, you can open up the preference file in Property List Editor (which you will only have if you have installed the Developer Tools from the Mac OS X install Disk). Go to your user folder and navigate to Library/Preferences and open up com.apple.Preview.plist using Property List Editor.
![]()
Use the expansion Triangles to navigate to Root/Preview/PVPDFSpotlightSelectionSize. Here you can see the number is 28 (or 10 if you have already changed it in the Terminal).
Speed Up Dialog Boxes
The sliding animation may be pretty, but it can waste a fair amount of time if you are opening and closing sheets all day. You can speed this up and make your Mac feel much snappier by using a simple Terminal command to reduce the amount of time taken to display the animation.
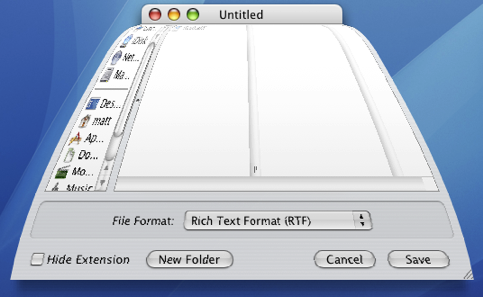
Launch the Terminal (located in Application/Utilities) and type the following command:
defaults write NSGlobalDomain NSWindowResizeTime 0.001The number at the end is the length of the animation in seconds. With it set to 0.001, sheets appear pretty much instantly. The default is 0.2, so type the command with 0.2 at the end to return your sheet animation to normal.
For fun you can try higher values. This allows you to see just how detailed the animation is. Type the command with 2 at the end and load up TextEdit. Resize the window to as small as possible before selecting Save As from the File menu. You'll see the sheet jump up out of the window then gently fall into place.
Playing with Half Minimized Windows
They mentioned the killall Dock thing... if you hold shift and collapse a window it goes slowly into the dock. if you do a killall Dock command in the terminal while it's collapsing, the window freezes in it's squished state, while still allowing you to scroll in it and click links (although the links will be in their original location).
SleepingInsomniac | Homepage | 03.21.07 - 4:42 am | #
This is great fun, and also a little weird. As mentioned, you will need to press Shift while clicking minimize to slow things down and give you enough time to run the command. Have Terminal open with "killall Dock" ready typed so you just have to press enter. When the Dock relaunches, your currently minimizing window gets stuck half way, but is still treated like a normal window. Drag it around, scroll up and down, browse web pages. It's not perfect however - as SleepingInsomniac notes, the links on web pages are still where they were before you minimized, making things a bit confusing.
Check out the image below to get an idea of what it looks like.
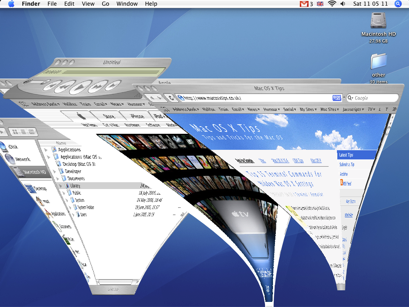
To get your windows back to normal you just need to close (Command-W) and reopen them.
Thanks to SleepingInsomniac for this!
Top 15 Terminal Commands for Hidden Mac OS X Settings
Update: This article is very old. Most of the Terminal Commands still work, but consider checking out our top Terminal commands for Leopard and Snow Leopard. Our Terminal Tips category also has loads of other ways help you get the most out of your Mac.
There are a huge amount of hidden settings for Mac OS X and its applications that aren't accessible from preferences dialog boxes or the System Preferences. Applications such as Tinkertool and Mac Pilot allow you to access some of these, but the real flexibility is from the Terminal. From here it is possible to edit any preferences file for any application on your Mac.You'll find the Terminal in the Utilities folder within the Applications folder. To carry out any of the following commands you will need to copy/paste or type in the line of text then hit enter. For the most part, applications will need restarting before changes take place. For most applications you can just quit and open them again, but for the Finder and the Dock it is easiest to just type “killall Finder” or “killall Dock” into Terminal after the command.
To reverse any of them, just repeat the command with NO at the end instead of YES, or vice versa.
Feel free to add any of your favourites in the comments.
1. Make hidden applications' dock icons translucent.
defaults write com.apple.Dock showhidden -bool YES![]()
defaults write com.apple.iTunes invertStoreLinks -bool YES3. This allows you to drag widgets out of Dashboard onto the desktop. Requires the dock to be relaunched to take effect, so type "killall Dock" and press enter. Now, if you click and hold onto a widget in the dashboard and press F12 to return to the desktop, the widget won't disappear with the rest.
defaults write com.apple.dashboard devmode YES
defaults write com.apple.mail PreferPlainText -bool YES5. Set expanded save dialogs as default (showing column/list view of folders rather than a drop down menu). Replace TRUE with FALSE to reverse.
defaults write -g NSNavPanelExpandedStateForSaveMode -bool YES6. Display the currently chosen screen saver to be shown as the desktop background. Press Control-C or Command-. to stop. More details here.
/System/Library/Frameworks/ScreenSaver.framework/Resources/ ScreenSaverEngine.app/Contents/MacOS/ScreenSaverEngine -background7. Display useful system stats in the login window. More details here.
defaults write /Library/Preferences/com.apple.loginwindow AdminHostInfo SystemVersion Replace "SystemVersion" with one of the following for different stats:
SystemBuildSerialNumberIPAddressDSStatusTimeHostName
8. To remove accounts from the login window type this command with the short name of each account you wish to remove. More details here.
sudo defaults write /Library/Preferences/com.apple.loginwindow HiddenUsersList -array-add shortname1 shortname2 shortname39. Skip disk image verification. Potentially risky, use with disk images from trusted sources.
defaults write com.apple.frameworks.diskimages skip-verify -bool YES10. Put double scroll arrows at both ends of scroll bar. Use Appearance pane in system preferences to reset.
defaults write "Apple Global Domain" AppleScrollBarVariant DoubleBoth![]()
defaults write com.apple.CrashReporter DialogType none12. Set the history limit in Safari to a certain number of items and and/or a certain age.
defaults write com.apple.Safari WebKitHistoryItemLimit 2000defaults write com.apple.Safari WebKitHistoryAgeInDaysLimit 3013. Show hidden files in the Finder.
defaults write com.apple.finder AppleShowAllFiles -bool YES14. Enable the debug menu in Safari.
defaults write com.apple.safari IncludeDebugMenu -bool YES15. Deactivate Dashboard. Requires the dock to be relaunched to take effect, so type "killall Dock" and press enter.
defaults write com.apple.dashboard mcx-disabled -bool YESCustomising the Terminal
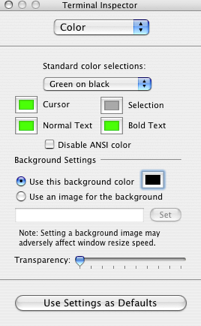
There are some predefined colour schemes, such as the popular green on black, or you can make your own. It is also possible to set an image as the background, and choose the transparency of the window.
It is also possible to create colour schemes using different methods, such as the one outlined in this Macworld Article.
To set a colour scheme as the default, click the button at the bottom of the Terminal Inspector.
But what if you want multiple colour schemes, or you want to send one to someone else? Luckily you can save these settings simply by saving the terminal window.
Choose all your colours and settings as above, then click the File menu and choose Save As. Navigate to Library/Application Support/Terminal. If you don't have a Terminal folder in Application Support, create one. Save the file here with a name like "colour-scheme1.term".
Now, a Terminal window with the saved settings can be opened by choosing File --> Library --> colour-scheme1. To save one of these files as the default, go to the Terminal preferences and select "Open a saved .term file when Terminal starts" then select your chosen file.

Here are a few ready made colour schemes for you to download.
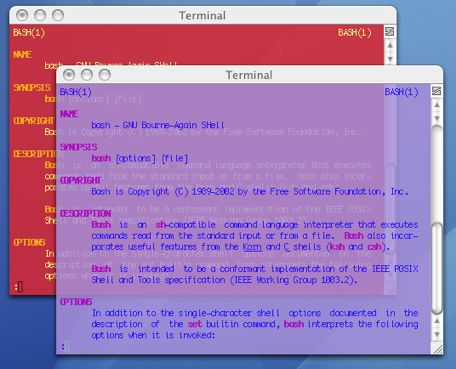
As an extra quirk, you can make Terminal choose a random colour scheme using a handy applescript created by Daniel Jalkut. It can create some pretty horrible combinations, but it does contain and algorithm to make sure the contrast of the text on the background is high enough.
Google Notifier's Hidden Features
![]()
One of the greatest benefits of this piece of software is its simplicity - just put in your Google ID and password and everything works. At times this makes the notifier look somewhat limited, however this couldn't be further from the truth.
The first hidden feature is to customise the number of messages shown in the notifier menu. By default, the menu shows the last four unread messages received (or the last three received and an additional "View More" submenu). To change this, pull down the notifier menu and hold Command and Option while clicking on preferences. This brings up a hidden settings editor where you can easily edit the notifier preferences file.
In the "Key" field, enter "MaxMessagesOnMainMenu" and in the "Value" field enter the number of messages you want on the main menu. Click Set, and then quit and reload Google Notifier. Now when you click on the notifier menu bar item, you will see the number of messages that you set. To return to the default setting, repeat the prcoess, putting 4 in the value field instead of the number you entered last time.

The second trick can be done in much the same way. If you only want the notifier to fetch mail with a certain label, you can create a filter. As before, click on the notifier menu and Command-Option-Click on preferences. This time, in the key field enter "Label" and in the value field enter the name of the label you want to receive. To receive all mail, leave this field blank. And again as before, quit and reload the notifier for changes to take effect.
When you set these preferences, you are actually editing Google Notifier's preference file (Library/Preferences/com.google.GmailNotifier). If you want, you can load up this file with Property List Editor or TextEdit and changes things yourself (be careful!) or you can achieve the same effect using the Terminal (Applications/Utilities). For example the previous trick could be done by typing the following into the Terminal:
defaults write com.google.GmailNotifier Label -string “YOURLABELHERE”Finally you can extend Google notifier using plugins. I found the following on the Official Google Blog:
The Gmail Notifier supports plugins written in AppleScript, or full-blown Cocoa Bundles in Objective-C. Details about the Objective-C plugin API can be found inside the Gmail Notifier application bundle in the required header file, GGPluginProtocol.h (control+click Gmail Notifier.app -> Show Package Contents -> Contents -> Headers).
AppleScript plugins are written by simply implementing a handler like:
on NewMessagesReceived(messages, fullCount)
-- Your code goes here...
end NewMessagesReceived
To install, simply copy the script (plugin) to Library/Application Support/Gmail Notifier (create the directory if it doesn't exist), and restart the Gmail Notifier. An example of a great plugin for the Gmail Notifier for MacOS X is the Gmail+Growl plugin, which sends Growl notifications when new mail arrives.
Get useful system stats in the Mac OS X login window
Since this version, you can click on the name of your mac to show different statistics about your machine. Each time you click, it will cycle through different bits of information that are particularly useful when troubleshooting problems.
The order of the statistics are as follows:
One click: Your OS X version number (e.g. Version 10.4.7)
Two clicks: Your OS X build number (e.g. Build 7M271)
Three clicks: Your mac's serial number (e.g. WN1511LHKNW)
Four clicks: Your mac's IP address (e.g. 196.254.0.1)
Five clicks: The status of any networked account
Six clicks: The date and time (e.g. Saturday, January 20 2007 4:02:31 AM GMT)
Seven clicks: Back to where you started, the name of your computer.
So you click a few times and set the information line to your favourite thing, but next time you log in, it has changed back to the name of your mac. To change the bit of information that appears first, you need to do a bit of tinkering in the Terminal (Applications/Utilities). Open Terminal and type the following command:
defaults write /Library/Preferences/com.apple.loginwindow AdminHostInfo info_nameDepending on which piece of information you want displayed, replace info_name with one of the following:
SystemVersion
SystemBuild
SerialNumber
IPAddress
DSStatus
Time
After doing this, hit return, and the next time you view your login window the information you chose will be displayed.
Hide Accounts in the Login Window
If you are running Tiger, hiding user accounts that you rarely use is simple. Firstly, go to the Accounts pane in System Preferences, and find the "short name" of each user you want to hide. Once you have these, open up Terminal (Applications/Utilities) and enter the following:
sudo defaults write /Library/Preferences/com.apple.loginwindow HiddenUsersList -array-add shortname1 shortname2 shortname3Obviously shortname1 2 and 3 will be replaced with the short names of the user accounts you wish to hide. You can hide as many as you like, just separate each with a space.
To make a hidden name appear again, type the command with no names in it, therefore resetting the list of hidden users.
sudo defaults write /Library/Preferences/com.apple.loginwindow HiddenUsersList -array-addNotice that doing this adds an extra option to your login window - "Other..." When you select this, you will be presented with text boxes to enter a username and password.
If you aren't running OS X 10.4, another option is to completely get rid of this list of users. Go to the Accounts pane in System Preferences, and click on Login Options. There you will find an option to display the login window as name and password fields. This isn't as pretty, but saves time if you have lots of users, and is also more secure.
Set a Screen Saver as the Desktop Background
- Make sure you have a cool screen saver set (macresearch suggests the RSS visualizer)
- Open Terminal (found in Applications/Utilities)
- Type the following:
/System/Library/Frameworks/ScreenSaver.framework/Resources/ScreenSaverEngine.app/Contents/MacOS/ScreenSaverEngine -background - Look at your Desktop.
- To stop the whole thing and return your desktop to normal press Control-C (or Command-.)
There are a few things to look out for with this: Depending on which screen saver you are running and what mac you are running it on, this make take up a large CPU load. Also, your normal background will be shown when pressing F9 or F10 to activate exposé. Finally, if your screen saver starts (from a hot corner or by inactivity for a certain time) it will cancel the screen saver on your desktop.
Hidden Unix Games
ls /usr/share/emacs/21.2/lisp/playinto a terminal window (terminal is located in Applications/Utilities)
To play the games, open a new terminal window and type “emacs” and hit return. Once in emacs, press Esc then x to get to the prompt. Now you can type any of the files in the list to play them.
My favourites are:
snake, tetris and pong, the old classics.doctor, a shrink in your mac (he/she isnt that helpful, unless you threaten to commit suicide)life, one of the first screen savers.dunnet, an old text based game where you can explorezone, makes the text on your screen go crazyHave fun!