Replace DigitalColor Meter in Lion
I encountered my first major annoyance with Lion today: For no apparent reason, it seems Apple have decided to remove some of the most useful features from the DigitalColor Meter utility. For anyone who does any web development, DigitalColor Meter was great for quickly getting the hex value of any colour displayed on the screen, simply by hovering the cursor over it.
While it’s annoying that DigitalColor Meter is now pretty useless, it’s not too tricky to build our own replacement using a tiny bit of AppleScript with the built in OS X colour picker and a free downloadable plugin.
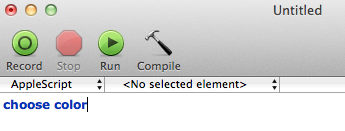
First we’ll start by creating our colour meter application. Open up AppleScript Editor (located in Applications/Utilities) and type choose color in the window that appears. This is actually all the AppleScript we need! To test if it works, click the Run button. Hopefully the familiar OS X colour picker should appear. Close it, choose Save As... from the File menu and give it a name like “Colour Meter.” Also, be sure to change the file format drop-down menu to Application. Now, whenever you double-click on this new application, the colour picker will open.
To get hex values in the colour picker, go to Color Palettes tab (the third one along), and change the Palette drop-down menu to Web Safe Colors. To “choose” a colour from somewhere on the screen, just click the magnifying glass, then click on the colour you want.
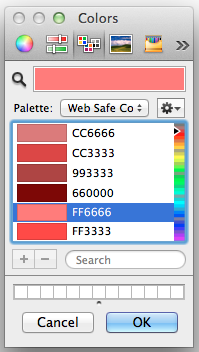
Straight away you might notice a small problem with the hex values that appear: They aren’t all there! This palette only contains “Web Safe Colors,” which basically means R, G and B values of 00, 33, 66, 99, CC and FF. To get the full range of colours, we will need to install a new colour picker plugin.
The two options are RCWebColorPicker from rubicode, and Hex Color Picker from waffle software. They each have their pros and cons, so it’s worth downloading them both and trying them out before deciding on one (or both).
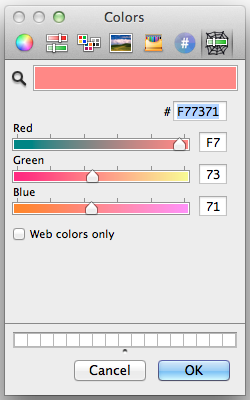
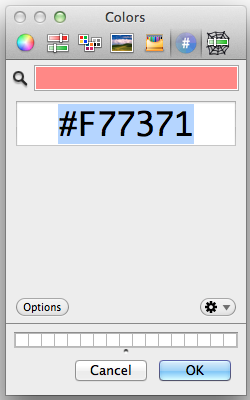
Installation is fairly straightforward, apart from one quirk you might not be aware of — the Library folder within your user folder is now hidden in Lion. The easiest way to get to it is to hold down the Option key while clicking on the Go menu in the Finder, and choose Library from the list. Inside the Library, find the ColorPickers folder and drag the plugin files there. You will need to log out and in again before the new colour pickers will appear.
One final touch for your colour meter application is to give it a proper icon — by stealing the one from DigitalColor Meter. Find both applications in the Finder and choose Get Info for each of them. Select the DigitalColor Meter icon in its Info window and press Command-C to copy it. Then select the icon for your colour picker application, and press Command-V to paste.
![]()
New Growl themes for Lion
Growl is always one of the first things I install on every new Mac. It’s a fantastic notifications system that displays small popups to let you know when all sorts of things happen. You can get notified when new mail arrives, when a song starts in iTunes, when downloads are finished — literally hundreds of applications are compatible with it.
It seems Growl is having a few teething problems in Lion, one of which is that lots of themes need to be rewritten. Luckily, my all-time favourite theme, Mono, has just been updated to be Lion compatible. Check out the beautiful theme in the screenshot below.

While checking out which themes are Lion compatible, I also came across a new theme called Black Glass that might give Mono a run for its money. You can see it in the screenshot below, but you really have to go view the preview to appreciate its slick animations.

One additional problem with Growl in Lion that you might encounter is that sometimes the newly installed themes refuse to appear. There’s an easy fix — go to Activity Monitor (located in Applications/Utilities) and find GrowlHelperApp in the list. Select it and click Quit Process, then stop and restart Growl from its preference pane in System Preferences. Your new themes should now be working perfectly.
[Update: Christian has posted a link in the comments to his own customised Lion-compatible version of the Smokestack theme.]
Three-finger tap a word to view Dictionary and Wikipedia in Lion
For years, Mac OS X has had a great shortcut for getting a quick definition of a word: Simply hover the cursor over the word, and press the keyboard shortcut Command-Control-D to bring up a little Dictionary popup. This still works in Lion, but it’s now much more fully featured and also has a great new way to access it.
If you have a trackpad, you can now just double-tap with three fingers to bring up the new “Look up” interface. If you are having trouble getting it to work, make sure you are just gently tapping on the trackpad, rather than fully clicking. You might also need to make sure the “Look up” option is enabled in the Trackpad section of System Preferences.
For those still without a multitouch input device, don’t worry, you can still access Look up through the same shortcut (Command-Control-D) or by right-clicking on a word and choosing “Look up” from the menu.

The big new addition to the Look up interface in Lion is Wikipedia. This transforms an already useful tool into something that is fast becoming one of my favourite new Lion features.
Wikipedia now manages to catch most of the people and place names and the more unusual words that the old Dictionary Look up in Snow Leopard would fail on. Now, while reading text anywhere on your Mac, you are only a quick tap away from a dictionary definition, a list of synonyms and a full encyclopaedia entry.

As before, Look up will cleverly group words together before displaying a definition, such as a person’s first and last name, or a well known phrase. This isn’t perfect though, so you can force the grouping of multiple words by selecting them before invoking the popup.
As well as Wikipedia, another new section called “Apple” has also been added. This only appears on words that are Apple brand names and trade marks, offering a quick description of the relevant application or hardware.

Getting started with text substitutions
Text substitutions are a relatively new feature that were introduced with Snow Leopard. They allow you to set up certain phrases to get automatically replaced with something else as you type. If you go to the Language & Text section of System Preferences and click on the text tab, you will see a list of substitutions already set up, for example (c) to © and 1/2 to ½.
Oddly, it seems that the only application that text substitutions are enabled in by default is TextEdit, and you need to enable them separately in every other application. To do this, open up the application in question and right-click (Control-click) on any area where you can type. In the menu that appears, go to Substitutions and choose “Show Substitutions.” This will bring up a dialog box where you enable Text Replacement and various other substitution features. If the application doesn’t support text substitutions, you won’t see this menu.
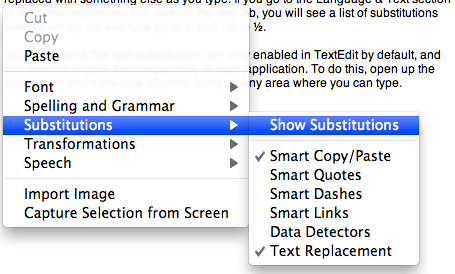
Doing this separately for every application is a bit annoying, especially if you want to enable text substitutions everywhere. Fortunately it is possible to enable text substitutions globally using a Terminal command. Just open up Terminal (located in Applications/Utilities), copy and paste in the following line, then press return.
defaults write -g WebAutomaticTextReplacementEnabled -bool true
This will turn on text substitutions in every application that supports them, but you can still go into individual applications and turn them off on a per application basis if you want.
Now you have text substitutions enabled, you can add new ones in the Language & Text section of System Preferences by clicking the plus (+) button at the bottom of the list. Here are some ideas for substitutions to set up.
- Expand internet and messaging slang abbreviations. For example you could set
brbto “be right back” andtyto “thank you” - Use something like
lipsumto insert a few paragraphs of Lorem Ipsum placeholder text so you don’t have to Google for it each time. - Use something like
msigto automatically insert your signature at the end of mail messages or forum posts. - Automatically enter commonly used commands and code snippets that are too long to remember or too tedious to type. For example you could set
rrubyto enter the first line of a ruby script#!/usr/bin/env ruby. - Abbreviate email addresses that you find yourself regularly typing, for example set
matt@to give matt@macosxtips.co.uk - Create email templates to automatically write out “canned responses.” For example I have
ssorryexpand to a detailed email reply saying that I can’t help with a computer problem and explaining some places to go to find out.
When you come to enter some of the longer substitutions such as email signatures or whole email messages, you will run into the problem of how to enter a line break, as just pressing Return doesn’t work. There are a couple of ways to get around this. Firstly, you can simply use Option-Return instead. Option-Tab is also useful for inserting a Tab character. This is the quickest and easiest way, especially for short replacements like email signatures that only have a couple of lines. If you are creating a replacement that is more than a few lines, you may find it easier to write it in something like TextEdit and then copy and paste it into the list in System Preferences. All the line breaks will be preserved.
One final use for text substitutions is to exclude words from spelling auto-correction. Sometimes you will have a word that you don’t want to auto-correct, but you don’t want to permanently add it to the dictionary using “Learn word” because it isn’t an actual word. To get around this, just add it as a text substitution and make the text replacement the same as the original word. Now the spelling auto-correction will never happen.
How to use Network Utility
Everything you can do in Network Utility you can actually do in a Terminal window using unix tools. But why go to all that effort when Apple have created a nice application that lets you do things much more easily.
When you first open up Network Utility you will see nine tabs along the top [Update: eight in Snow Leopard]. Here's a run through of what you can do in each tab.
1. Info
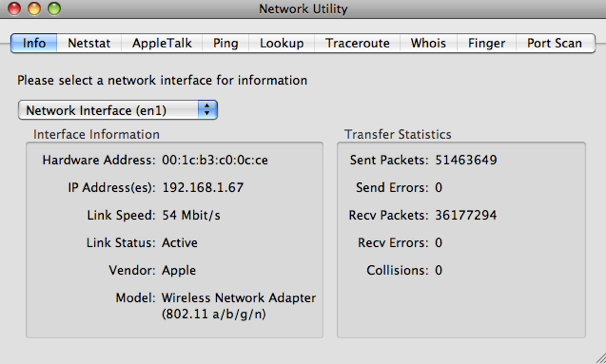
The first tab, Info, unsurprisingly gives you general information about your network. The Network Interface drop-down menu shows all the different ways your Mac can connect to the Network. Typically these are ethernet, wireless and Firewire.
The useful bits of information are the Hardware Address and IP Address. You will only have an IP address if that network interface is connected, otherwise it will say unknown. The Hardware Address, otherwise known as a MAC address, can be used to uniquely identify your computer (even though it is possible to change it).
One useful way to use the MAC address is when setting up your wireless router. You can set most routers to only allow specific MAC addresses to join, meaning other people can't log onto your wireless and connect to the internet.
2. Netstat
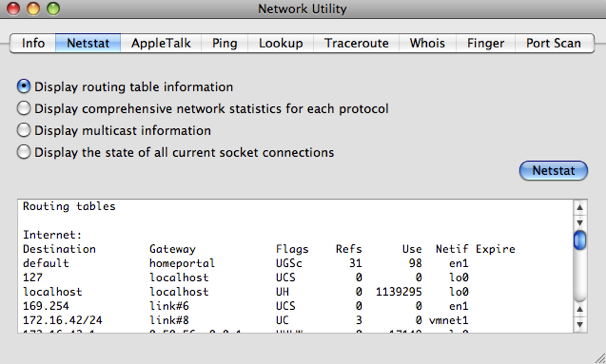
Netstat is a tool that is really useful to network administrators for troubleshooting, but pretty useless to the average user. If you choose "Display routing table information" and click Netstat, you will get a list that contains all the computers on the network. For example, I get Matts-Macbook, Matts-iPhone and ChrisG5.
If you choose "Display the state of all current socket connections" and click Netstat you'll see a list of your computer's network connections. For example, the first items on the list will correspond to any web pages you have open. If you type the numbers under "Foreign Address" into Safari, the web page will sometimes appear.
3. AppleTalk
The AppleTalk tab is very similar to the Netstat tab, but specifically for Apple's proprietary protocol called AppleTalk. It was very popular in the early days of the Mac, but now has been pretty much abandoned and is unsupported in Snow Leopard. You can read more about AppleTalk on its Wikipedia page. [Update: The AppleTalk tab is completely gone in Snow Leopard]
4. Ping
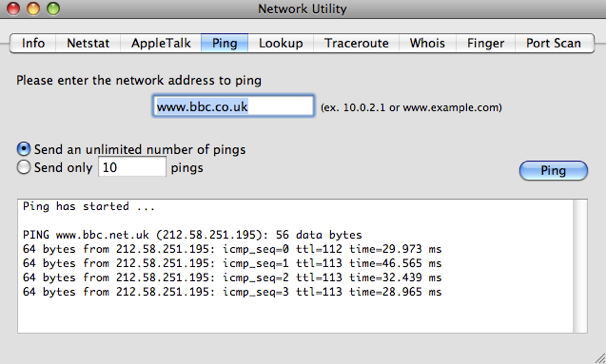
Ping is a tool to check if an internet address is working. When you "ping" an address, you send a small bit of data which it sends back.
You can use this to check if a website is down if it isn't loading in Safari. Alternatively, if you think your internet connection is down, you can try pinging sites that almost never go down like google.com and bbc.co.uk to see if you have a problem on your end.
5. Lookup
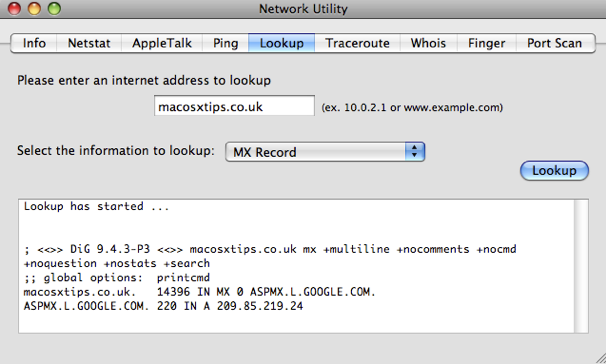
Lookup allows you to get information about a web site or IP address. The drop-down menu allows you to choose from a number of different types of information. For example, performing a Name Server lookup on macosxtips.co.uk will tell you that this site is hosted by Dreamhost, and a MX record lookup will tell you that our email is handled by Google.
6. Traceroute
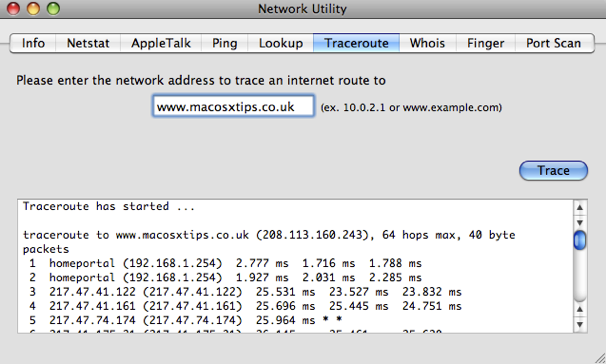
When you enter an address and click Trace, traceroute will show you the route taken by data sent between you and the server. It allows you to see all the servers that your data goes through along the way.
You can use this to troubleshoot connection problems by finding out the point where your data is being blocked.
You can also use it when you are downloading a file and have multiple download mirrors in different locations to choose from. Just type the addresses of the mirrors into traceroute and you can get a good idea of which mirror is fastest.
7. Whois
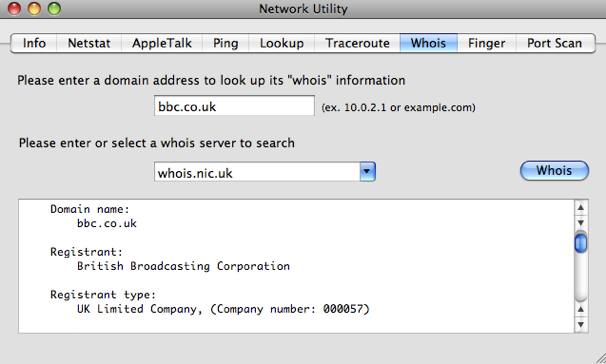
The Whois database gives you information about internet addresses and who has registered them. The default whois server whois.internic.net works quite well for most addresses, but you might have to type "domain apple.com" for example to get it to work. For .co.uk addresses use "whois.nic.uk" as the whois server. You will get information like the registrant, their address, who they registered with, when their registration was started and and when it expires.
8. Finger
Finger, created in 1971, is one of the earliest forms of status updates that are now done using Facebook and Twitter. It's hardly used anymore, but you can use finger to check if your friends are online, and you can post .plan files to your profile similar to blog posts.
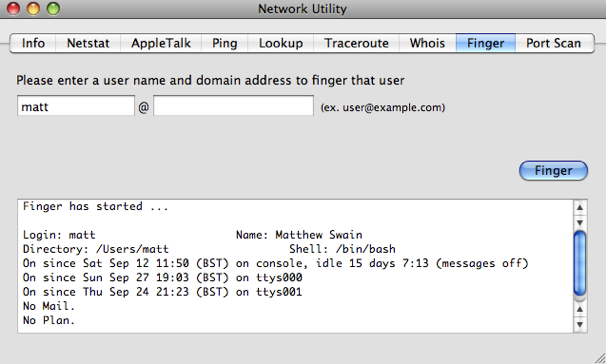
One of the best ways to use finger is to type in your username or the username of another user on your Mac. It will tell you if they/you are currently logged in and how long since they/you last logged in.
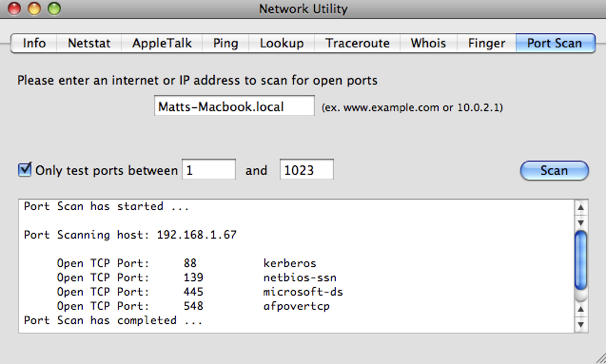
9. Port Scan
The final tab in Network Utility, Port Scan, is for scanning which ports are open at a certain address. These Network ports are a sort of virtual version of the ports on the side of your computer, and each port is for a certain type of network traffic. For example, port 80 is used for web pages.
You can use Port Scan to test your own computer by typing in the name of your Mac followed by ".local". You can find this name in the Sharing section of System Preferences.
Things like iTunes sharing, instant messaging, BitTorrent, AFP and SMB sharing all use different ports. If you find that one of these isn't working, it might be because your firewall is blocking the port that it uses. Instead of turning off your firewall, you can just set it to open that port.
Just run Port Scan with the application or sharing turned off and then again with it turn on to see which port appears. You can then set your firewall to open this port and allow network traffic through. Note that the built in firewall that comes with Mac OS X works on a per application basis rather than a port basis, to keep things simpler for the average user.
Link to Mail messages in Stickies
Stickies is great for keeping notes and reminders on your Mac without having to go to the hassle of opening up iCal and creating a to do list. I've written about some of the great things you can do with Stickies in the past, but here's a quick tip I just discovered.
Often you will receive an email message which you need to respond to or do something with. You can flag it in Mail (Command-Shift-L) but this doesn't allow you to add any extra text to remind you what you actually wanted to do with the email.
If you use Stickies a lot, a great way to keep a reminder of the email is to just drag it to a sticky note. A link will automatically be created that takes you back to the exact message in Mail when you click it.

If the message has a subject, that will be the link text. Otherwise it will be something like message:%2DC4DABB48-CEC9-4301-B56D-249C041CDBEA@mac.com%3E (which is the actual link — try pasting it into Safari). You can change the link text by selecting it and typing something new. However, if press delete at any time while writing the new text, everything you write from then on won’t be linked.
So if you keep a To Do list in Stickies, and you have to do something like “Reply to Bob”, you can now add a link to that To Do item so you don’t have to search through your inbox for the message.
Create a disk image that works in Windows
Disk images have far more widespread uses than this though. They can be used to create a exact copy of any CD, DVD or hard drive and turn it into a single .dmg file. You can then transfer this file around, and then simply double-click on it to mount the disk image. The most common uses of this are to create backups, to create a file for burning to CD/DVD, or to transfer the entire contents of a hard drive from one computer to another.

Unfortunately, the dmg type disk images that Mac OS X uses are not really Windows friendly. The cross-platform standard for disk images is the ISO format. These can be created on your Mac, and can be read by any Mac or Windows PC. This is especially useful if you want to burn a CD or DVD and your Mac doesn't have a burner but your PC does.
The first step in creating an ISO image is to make a folder of all the things you want to be in your disk image. Next, open up Disk Utility, located in the Utilities folder in the Applications folder. In Disk Utility, choose "New... Disk Image from Folder" from the File menu, or hit Command-Shift-N. Choose your folder, and then select a name for your image. Choose "DVD/CD master" from the Image format pop-up menu, and leave the Encryption as none. Click Save, and you're almost done.
You have created an ISO image, but strangely Disk Utility gives it the .cdr extension instead of the standard .iso extension. To avoid confusing Windows PCs, just rename your image with the .iso extension and you're done.
If you already have a normal Mac .dmg disk image, it's just as easy to convert it to .iso using Disk Utility. Just select Convert from the toolbar or the Images menu. Use the same settings as above, and remember to change the file extension to .iso.

For those of you who love the command line, you can convert disk image formats using hdiutil. This has the benefit of not requiring you to change the extension, but probably won't work out any quicker as the process is so straightforward in Disk Utility.
To convert from DMG to ISO, open up Terminal (in Applications/Utilities) and type:
hdiutil convert /path/to/image.dmg -format UDTO -o /path/to/newimage.isoReplace the two paths with the location of the image and the place you want to save the new image. For example I would use /Users/matt/Desktop/image.dmg. To avoid mistakes, you can just drag the image to the Terminal and it will enter the path for you.
To convert from ISO to DMG, just use the following instead:
hdiutil convert /path/to/image.iso -format UDRW -o /path/to/newimage.dmg10 tips for Stickies
If you aren't familiar with Stickies, you'll find it in the Applications folder. Once opened, it will display a number of differently coloured "notes". You can write in each of these, and any that you leave open when quitting will still be there next time you open up Stickies.
Here are 10 tips for getting the most out of Stickies.
1. Make Stickies float above all windows
With the note you want to float selected, press Command-Option-F. This will cause the Sticky note to appear above all other windows no matter which application you are in. This is great if you are switching between multiple windows and application while writing or referring to a single sticky note. If you can't remember this keyboard shortcut, you'll find the command in the Note menu.
2. Make Stickies translucent
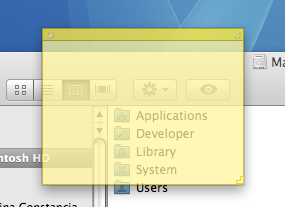
If you look in the Note menu, you will also see an option for a translucent window, with the keyboard shortcut Command-Option-T. This goes well with the floating window option, as it stops the floating sticky note getting in the way too much.
3. Add scroll bars to Stickies
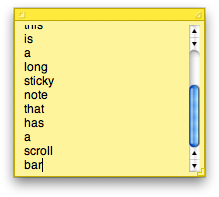
One thing that may annoy you is the inability to quickly scroll through long notes, as you have to use the arrow keys to move through the text line by line. The way to fix this is to modify the Stickies application by using Interface builder to add scroll bars to the side of long Sticky notes.
First make sure Stickies isn't running, and make a backup of it by holding the option key and dragging it to another folder (just in case anything goes wrong). Next, right-click (Control-click) on the Stickies icon and choose "Show Package Contents" from the menu that appears. Inside the contents navigate to Resources/English.lproj and double click on StickiesDocument.nib to open it on Interface Builder.
If you are using Interface Builder for the first time, welcome to the wonderful world of how applications are made. A window called StickiesDocument.nib should be open. In this window there are a number of icons with various names including "File's Owner" and "First Responder". Double-click on the icon called "Window" which should open up a mostly empty, white window called "Stickies". Also, open the Inspector by pressing Command-Shift-I or by choosing it from the Tools menu.
 -->
-->
The title of the Inspector window should be "Stickies Window Attributes". Clicking ONCE on the Stickies window will change the title of the Inspector window to "Scroll View Attributes". Amongst the options in the inspector, you want to check the checkbox that says "Show Vertical Scroller" and the checkbox that says "Automatically Hide Scrollers".
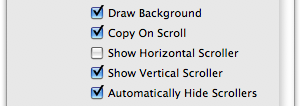
That's it, you're done. Save the file (Command-S) and quit Interface builder. Next time you open Stickies, long Stickies notes should have scroll bars.
There are a lot more things you can do to modify Stickies using Interface Builder, but they are beyond the scope of this tip. If you want to do more, check out this old article on Modifying Stickies. Note that it uses an old version of Interface Builder, so a lot of the screen shots and descriptions are different to the current version.
4. Place other media in Stickies
Not many people know that the contents of Stickies is not restricted to text. You can put almost anything in them. Dragging a Quicktime movie onto a Sticky note will embed the movie in the note, complete with the usual play/pause controls. You can do the same for images and PDFs too. Sometimes Stickies will ask if you want to create an alias rather than a copy of the file within the Sticky. An alias will stop your Stickies database getting too big (especially with movies) and will mean that the contents of the Sticky will automatically be updated if the embedded file is updated.
5. Back up your Stickies library
If you use Stickies a lot, or you keep any important information in your Sticky notes, it is worth keeping a backup of the Stickies database in case anything goes wrong. All your Stickies are stored in one file that, as noted above, is fairly small unless you have embedded lots of movies in your notes. The file is named StickiesDatabase, and is located inside the Library folder in your user folder. Simply create a copy of this file somewhere else to make a backup.
6. Change default new note settings
To set the default font, text size, note size, note colour and translucency, create a new note and customize it to what you want. Then choose"Use as Default" from the Note menu. You can change even more settings by editing the Stickies preferences plist. Go to your user folder and navigate to Library/Preferences and find com.apple.Stickies.plist. The most interesting thing here is the WindowFlags item. Setting it to different values gives the following default notes:
0 - standard Sticky note
1 - minimized note (just title bar)
2 - floating note
3 - floating minimized note
4 - translucent note
5 - translucent minimized note
6 - floating translucent note
7 - floating translucent minimized note
7. Search
Using Command-F you can search for words in a single note or all notes. You can also perform a Find and Replace.
8. Dashboard Stickies
If you frequently use the Dashboard, then the widget version of Stickies might be more useful for you than the application version. Note that you can create as many different sticky notes as you want, simply by dragging another one up from the bottom bar. You can also change the fonts and colours by clicking the i button, however you are more limited than in the Application version.
9. Discover a Sticky note's creation and modification dates
This is a simple one - just hold your mouse still over any part of a sticky note to see a tooltip containing the Creation and Modification dates and times of the note.

10. Create a Sticky note from selection
Due to the Services menu in Mac OS X, you have access to Stickies whatever application you are in. Simply select any block of text anywhere and hit Command-Shift-Y to create a Sticky note with that selection.
To be honest, this is quite possibly the most powerful feature of Stickies. Never mind the ability to embed movies and have translucent windows. Being able to create a quick note of any text with one keyboard shortcut is the easiest and most useful aspect of Stickies there is.
The Ultimate Mac Screenshot Guide
Keyboard Shortcuts
The quickest way to take a screenshot is to use a keyboard shortcut. Annoyingly, these aren't particularly intuitive. There are two main ones:Command-Shift-3 - Take a screenshot of the entire screen.
Command-Shift-4 - Allows you to click and drag around the area you want a shot of.
Each of these will save a file to the desktop named Picture 1.png, or a higher number if that file already exists.
Now there are a few extra things you can do. If you press Space after pressing Command-Shift-4, you will notice that the cursor changes to a picture of a camera. You can now just click on a window, icon, widget or almost any other interface element to take a screenshot of it. You can also add Control into the keyboard shortcut to put the image in the clipboard instead of saving it to the desktop. For example, pressing Command-Control-Shift-3 would allow you to then paste the image into another document.
The Grab Application

You can create a timed screenshot by going to the Capture menu, or by pressing Command-Shift-Z. Using this, you can achieve screenshots that are supposedly “impossible”. One example is the login window.
To change the pointer type, go to the Preferences. See the image below for the different options.
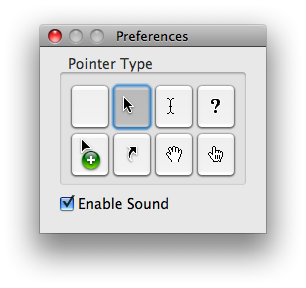
Disable Shadow
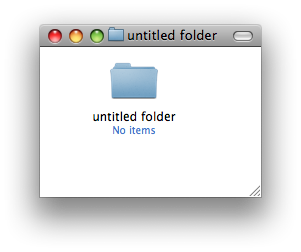
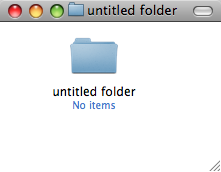
If you use the Command-Shift-4 Space method to take a screenshot of an entire window, you will find that the shadow is in the screenshot. This was added in Leopard because without the shadow, windows don't actually have a border if they have no scrollbars. However, if you prefer no shadows, you can disable them with a Terminal command. Simply open up Terminal (located in Applications/Utilities), paste in the following line and hit return.defaults write com.apple.screencapture disable-shadow -bool trueAfterwards you will need to log out and in again for changes to take effect. To enable shadows again, simply repeat the command but with false at the end. The two images below show a before and after shot.
Change Image Format
The default image format for screenshots is png, which gives a nice, high quality picture. However you can change this if you want. As before, use the following Terminal command:defaults write com.apple.screencapture type pngSimply replace png with your file format of choice. The available options are jpg, tiff and pdf. Changing to jpg gives a lower quality but smaller file. Some people prefer this for quick snaps, but others dislike the slightly blurry results it gives. As before, log out and in again for changes to take effect.
Advanced Screenshot Applications
If widgets are your thing, Screenshot Plus will probably be the method of choice for you. It's free, and allows you to do everything that you can achieve with keyboard shortcuts. It also allows you to view a preview image, before saving it to the desktop or importing it into Preview.If you really want to go all out on your screenshots, you might want to consider buying an application like Snapz Pro. It allows you to do all of the things above, as well as record movies of your screen.
Finally, if you want to get screenshots of long webpages that don't fit on the screen, Paparazzi! is your solution. It gives allows you to set the size of the image, set a delay, choose the file name and choose the file format. Of course, if you want a PDF of the web page, that functionality is already built into Mac OS X.

Also, the MacTipper Blog pointed out one more thing I forgot. Using another Terminal command, you can change the default save location to somewhere other than the Desktop. The command is as follows:
defaults write com.apple.screencapture location /Full/Path/To/FolderFor full instructions, check out the MacTipper Blog.
Automatically Insert the Date and Time
How can I set my MacBook to insert today's date, short version or long version, into whatever I'm keyboarding in??? QuicKeys is too expensive for Mac OS X and this Mac should do that!
The best way to do this is using an application called WordService. You can download it for free from the Devon Technologies site.
To install it, create a new folder in your Library folder called "Services" and drag the the WordService.service file into it. Log out then back in again to enable the service.
WordService is now accessible form the Services menu. This is under the Application menu in the top left, next to the Apple menu. You will probably have a lot of things in this menu, even if you have never installed any services before. This is because many applications will add things in that they think are useful. The new entries that WordService has added are Insert, Format and Convert. Each of these has a submenu with multiple options. The full features are outlined at the bottom of this page.
To insert the current date or time, you want to look at the options in the Insert submenu. There are different options for inserting the short date, long date, time and combinations of these. Each one has a keyboard shortcut to speed things up.

Inserting the date and time is just one thing WordService is capable of. One of the more fun features is the Rotate13 option in the Convert menu. This allows you to "encode" the selected text with a simple substitution cypher. You can also speed up many repetitive tasks like removing double spaces and setting all caps or lowercase.
WordService works in all Cocoa applications (TextEdit, Mail, Safari etc.) and many Carbon Applications. As a result, you can use it almost everywhere. One notable place where it doesn't work is in Microsoft Word. Luckily, all of the Microsoft Office applications have their own way to insert the date and time. You'll find it under the Insert menu.
5 Login Window Tips
1. Add a message to the login window
You can add a string of text above the list of users in the login window. To do this, start by opening up Terminal. This is located in the Utilities folder, inside the Applications folder. Once it has loaded, paste in the following line and press return:
sudo defaults write /Library/Preferences/com.apple.loginwindow LoginwindowText "Hello There”Replace "Hello There" with your text. To remove the text, type the following line:
sudo defaults write /Library/Preferences/com.apple.loginwindow LoginwindowText “”2. Hide accounts
If you find yourself with an overly long list of users in the login window or you just want to get rid of that annoying scroll bar down the side, you can stop accounts appearing in the login window.
Start by go to the Accounts pane in System Preferences, and find the "short name" of each user you want to hide. Once you have these, open up Terminal and enter the following:
sudo defaults write /Library/Preferences/com.apple.loginwindow HiddenUsersList -array-add shortname1 shortname2 shortname3Replace shortname1 2 and 3 with the short names of the user accounts you wish to hide. You can hide as many as you like, just separate each with a space.
To make a hidden name appear again, type the command with no names in it, therefore resetting the list of hidden users.
sudo defaults write /Library/Preferences/com.apple.loginwindow HiddenUsersList -array-addNotice that doing this adds an extra option to your login window - "Other..." When you select this, you will be presented with text boxes to enter a username and password.
If you aren't running OS X 10.4, this doesn't work. Another option is to replace the list of users with username and password text boxes. Go to the Accounts pane in System Preferences and click on Login Options. There you will find an option to display the login window as name and password fields. This isn't as pretty, but saves time if you have lots of users, and is also more secure.
3. Change the Apple logo
You can replace the large Apple logo that appears at the top of the login window with any tiff image that is 90x90 pixels. In the Finder, choose Go to Folder from the Go menu or press Command-Shift-G. In the dialog box that appears, type the following line:
/System/Library/CoreServices/SecurityAgent.app/Contents/Resources/
To change back to the Apple Logo, just drag the copy that you made back to the Resources folder.
4. Get useful system stats
The name of you Mac is displayed in the login window below the words "Mac OS X". Since Mac OS X 10.4.3, you can click on the name of your Mac to show different statistics about your machine. Each time you click, it will cycle through different bits of information that are particularly useful when troubleshooting problems.
The order of the statistics are as follows:
One click: Your OS X version number (e.g. Version 10.4.9)
Two clicks: Your OS X build number (e.g. Build 7M271)
Three clicks: Your mac's serial number (e.g. WN1511LHKNW)
Four clicks: Your mac's IP address (e.g. 196.254.0.1)
Five clicks: The status of any networked account
Six clicks: The date and time (e.g. Saturday, January 20 2007 4:02:31 AM GMT)
Seven clicks: Back to where you started, the name of your computer.
So you click a few times and set the information line to your favourite thing, but next time you log in, it has changed back to the name of your mac. To change the bit of information that appears first, you need to do a bit of tinkering in the Terminal (Applications/Utilities). Open Terminal and type the following command:
sudo defaults write /Library/Preferences/com.apple.loginwindow AdminHostInfo HostName Depending on which piece of information you want displayed, replace HostName with one of the following:
SystemVersionSystemBuildSerialNumberIPAddressDSStatusTime
After doing this, hit return, and the next time you view your login window the information you chose will be displayed. To change it back to normal, simply repeat the command with
HostName at the end.5. Change the background image
There are ways to change the background image by replacing the Aqua Blue image, but that is slightly crude. A better way to do it is using the Terminal. Type the following command and press return:
sudo defaults write /Library/Preferences/com.apple.loginwindow DesktopPicture /Users/Shared/mynewbackground.jpg
/Users/Shared/mynewbackground.jpg is the location of the image you want to use. You don't have to type it out. Just paste the command as far as DesktopPicture and put a space after it. Then find your image in the Finder, and drag it onto the Terminal window. The address to your image should just appear. As far as I can tell, you have to place the image in a place that all users have access to (the shared folder is a good place).To change back to the normal Aqua Blue image, type the following command and press return:
sudo defaults write /Library/Preferences/com.apple.loginwindow DesktopPicture /Library/Desktop\ Pictures/Aqua\ Blue.jpg Reset a Lost OS X Account Password
If you still know the Administrator Password
If you still know the password to an administrator account, it is very simple to reset any standard or managed user's password. While logged in as the administrator, open up System Preferences and click on the Accounts section. All the accounts on the computer should be listed down the left hand side. Under each account name it should say Admin, Standard or Managed. If the lock at the bottom of the window appears locked, click on it to allow changes to the preferences.
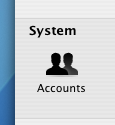
Resetting an Administrator Password
Obviously, if you don't have access to an administrator account, you can't carry out any of the above steps. If you have forgotten the Administrator password or you can't log into your Mac at all, you will need to use the Mac OS X Install Disc.
Enter the Mac OS X Install Disc that is the closest version to that running on the Mac. For example, if you are running Mac OS X 10.6 Snow Leopard, you should enter the Snow Leopard install disk, not any earlier ones. Restart the computer, and hold the C key as it starts up. This might take longer than usual, and you can release the C key as soon as the Apple logo appears on the screen. When the window appears, choose your language and click the right arrow.
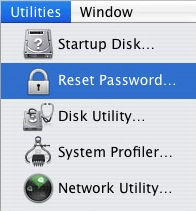
The next step depends on what version of Mac OS X you are using. Generally you need to choose Reset Password from the Utilities menu. For earlier versions of Mac OS X, choose Reset Password from the Installer menu.
Choose your Hard Drive from the top and then choose the Account from the drop down menu. Be careful not to select System Administrator, as this is actually the root user, not the administrator account on your Mac. Now enter the new password, click Save, quit the Installer and restart the computer.
Note that there are a few issues with this method. Firstly, it does not reset your keychain password. You will have to do this separately. Secondly, do not attempt this if you have FileVault enabled. To reset an FileVault protected account, you need the master password.
Resetting a FIleVault Protected User's Password
If you have enabled FileVault to encrypt your Account, you need to know the master password that you set when you enabled it. This is the password that the administrator should know that allows you to reset any password on the computer. If you have forgotten the master password, unfortunately your data is lost forever.
If you know the master password, start by attempting to log into your account. When you get the password wrong three times, you will be able to click “Forgot Password”. Now you will have to enter the master password and then a new login password for your account.
If you have lost the Mac OS X install Disc
If you have lost the install disc, don't try and use one from an earlier version as this might permanently block you out of your account. You really have two options: Firstly, you could buy a new copy of Mac OS X (try Amazon). Secondly, there is a way of resetting an administrator password without the disc if you are running Mac OS X 10.4 Tiger. Note: Do NOT do this with a FileVault protected account, or your data will be lost forever.
First, note the short name of the account. This is the same as the name of its home folder, but not necessarily the name that appears in the login window. Restart your computer, and while it is starting up, hold Command-S. This will start up your Mac in Single User Mode. Once it has started up, you will need to enter three lines of code. Enter
sh /etc/rc and press return. Then enter passwd yourusername and hit return. Now you will have to enter a new password twice. What you type won't appear on screen, but it is working. Once you have done this, type reboot and hit return.Similarly to the Install Disc method,this will not reset your Keychain password. You will have to do this separately.
More Hidden Settings for Google Notifier
Google Notifier is a menu bar item that alerts you when new mail arrives in your Gmail inbox. Back in February I wrote a tip on Google Notifier's hidden features that showed you how to access two hidden settings. Recently, someone at Mac OS X Hints found a third hidden setting in addition to the ones I mentioned in my tip.
![]()
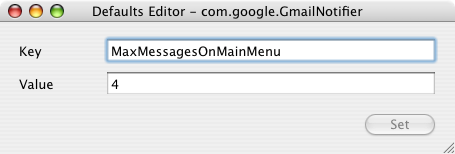
All of these settings can be accessed through Google Notifier. Bring down the notifier menu and hold Command and Option while clicking on Preferences. This brings up a hidden settings editor where you can easily edit the notifier preferences file. The three settings are as follows:
1. Change the number of unread messages displayed.
By default, the menu shows the last four unread messages received (or the last three received and an additional "View More" submenu). To change this, enter "MaxMessagesOnMainMenu" in the key field and enter the number of messages you want on the main menu in the value field.
2. Filter messages by label.
If you only want the notifier to fetch mail with a certain label, you can create a filter. To do this, enter "Label" in the key field and enter the name of the label you want to receive in the value field. To receive all mail, leave this field blank.
3. Use a secure connection.
This is the new tip, submitted by an anonymous poster to Mac OS X Hints. It seems that Google Notifier normally transfers your account details and email in the clear so that other people can potentially read it. If you want to use a secure connection instead, enter "SecureAlways" in the key field and "1" in the value field. To reverse this, repeat the process but enter "0" instead of "1" in the value field.
For all of these settings you will need to quit and reload Google Notifier for the changes to take effect.
Encrypt and Hide your Private Files
Encryption
If you just want to protect a single iWork or PDF document, you can do this from within the specific iWork application or from within Preview. In Pages, Keynote and Numbers '09 you can choose “Require password to open” from the Document section of the Inspector window. In Preview, when choosing “Save As...” on a PDF there is a checkbox to encrypt.If you want to password anything else, you have to password protect an entire folder. The way this is done is using encrypted disk images. Once created these appear as a single file on your hard drive with a dmg extension. When you double-click on one, it will ask you for the password. If you enter the password correctly, it will mount a disk image on your desktop. So while unlocked, the disk image is just like a temporary folder on your desktop. You can copy files to it and delete files from it, and as soon as you eject it, the contents will be password protected again.
The files won't show up in Spotlight searches and it is almost impossible to decrypt the data without that password, even with data recovery tools.
To create an encrypted disk image, open up Disk Utility (located in Applications/Utilities), go to the File menu and choose New, Blank Disk Image. In the dialog box that appears choose a name for your disk image and where you want to save it. The size is a maximum that the disk image can hold, so the preset sizes for CDs and DVDs are useful for if you want to burn the contents when it gets full. Choose AES-128 encryption and sparse disk image from the Format drop down menu.


Hiding
For some people there is no need to encrypt data. For a quick, temporary solution you can just hide away your files on your Mac. This is much less secure and far from foolproof, but quite often it is as much as you need.Probably the best place to put your files is in the Library folder. The main benefits of this are that it isn't searched by Spotlight, and that there are hundreds of other files in there already. The Application Support folder in you Library is a good place, as there are all sorts of random files in there. You might also want to rename your file if it has a name that stands out ( super-secret-file.doc for example).
DigitalColor Meter Tips
You can get the color details in many different ways, the most common being RGB values. In web design it is useful to have the RGB as an 8-bit Hex value, and in the Mac OS X color picker you can type in the actual 8-bit RGB values.
Using the DigitalColor meter is pretty straightforward - Move the cursor over the pixel you want to sample, and read off the values. There are some extra tools to help you do this however.
You can change the size of the area sampled by sliding the "Aperture Size" slider. On the far left it looks at each single pixel, but to the right it averages multiple pixels to give the overall effect.

When you are using the mouse to choose the color from an area of the screen, you obviously can't go up to the menus at the top to choose any options. Therefore everything has to be done with keyboard shortcuts. (The options are still located up in the menubar, so you can check what shortcut does what if you forget). They are as follows:
- Command-X : Lock Horizontal Position
- Command-Y : Lock Vertical Position
- Command-L : Lock Position
- Command-Shift-H ; Hold Color
Once you have chosen the colour you want, you can use the following shortcuts to copy it:
- Command-C : Copies the Image in large box on the left
- Command-Shift-C : Copies the RGB values as text
- Command-Option-C : Copies the solid color as an image
It is also possible to save the image as a TIFF file by pressing Command-S.
Calculator Modes

Google Notifier's Hidden Features
![]()
One of the greatest benefits of this piece of software is its simplicity - just put in your Google ID and password and everything works. At times this makes the notifier look somewhat limited, however this couldn't be further from the truth.
The first hidden feature is to customise the number of messages shown in the notifier menu. By default, the menu shows the last four unread messages received (or the last three received and an additional "View More" submenu). To change this, pull down the notifier menu and hold Command and Option while clicking on preferences. This brings up a hidden settings editor where you can easily edit the notifier preferences file.
In the "Key" field, enter "MaxMessagesOnMainMenu" and in the "Value" field enter the number of messages you want on the main menu. Click Set, and then quit and reload Google Notifier. Now when you click on the notifier menu bar item, you will see the number of messages that you set. To return to the default setting, repeat the prcoess, putting 4 in the value field instead of the number you entered last time.

The second trick can be done in much the same way. If you only want the notifier to fetch mail with a certain label, you can create a filter. As before, click on the notifier menu and Command-Option-Click on preferences. This time, in the key field enter "Label" and in the value field enter the name of the label you want to receive. To receive all mail, leave this field blank. And again as before, quit and reload the notifier for changes to take effect.
When you set these preferences, you are actually editing Google Notifier's preference file (Library/Preferences/com.google.GmailNotifier). If you want, you can load up this file with Property List Editor or TextEdit and changes things yourself (be careful!) or you can achieve the same effect using the Terminal (Applications/Utilities). For example the previous trick could be done by typing the following into the Terminal:
defaults write com.google.GmailNotifier Label -string “YOURLABELHERE”Finally you can extend Google notifier using plugins. I found the following on the Official Google Blog:
The Gmail Notifier supports plugins written in AppleScript, or full-blown Cocoa Bundles in Objective-C. Details about the Objective-C plugin API can be found inside the Gmail Notifier application bundle in the required header file, GGPluginProtocol.h (control+click Gmail Notifier.app -> Show Package Contents -> Contents -> Headers).
AppleScript plugins are written by simply implementing a handler like:
on NewMessagesReceived(messages, fullCount)
-- Your code goes here...
end NewMessagesReceived
To install, simply copy the script (plugin) to Library/Application Support/Gmail Notifier (create the directory if it doesn't exist), and restart the Gmail Notifier. An example of a great plugin for the Gmail Notifier for MacOS X is the Gmail+Growl plugin, which sends Growl notifications when new mail arrives.
Zero-Out Free Space
First open Disk Utility in /Applications->Utilities. Then select the hard drive partition on the left of the screen, select the erase tab, then click "Erase Free Space". Choose which option you want (the first option is usually enough) and click the "Erase Free Space" button. The process can take anywhere from an hour to quite a few hours depending on your hard drive size, and the amount of free space.
During the process a "You are running low on disk space" warning may pop up, just click OK on this and ignore it. That message is suppose to pop up. Disk Utility zeros out the free disk space by simply making a giant file that is nothing but zeros.
Warning: If you become impatient or worried and cancel the process when it is being done, you may have to restart and empty your trash in order to recover disk space. This will delete the giant file Disk Utility creates in order to zero the disk space. Despite what numerous forums claim, this process is very safe, and will not harm your data under normal circumstances.
Taking Screenshots
To take a screen shot, hold down the following keyboard shortcuts.
- shift + command (the Apple key) + 3 for a shot of the entire screen.
- shift + command + 4 for a way of clicking and dragging around the area you want a shot of.
- shift + command + 4 then press space to be able to click on a window or other interface element (menubar, dock, icons etc.) to take a screen shot of that.
Easy enough. Each of these saves a file to your desktop named "Picture 1.jpg" (or a higher number if the file already exists).
If you want to take a screenshot using the Terminal (Macintosh HD/Applications/Utilities) here is how. Just type the commands in (except the quotes).
- "screencapture ~/Desktop/screen.jpg" Takes a full screen shot and save it to screen.jpg on your Desktop.
- "screencapture -iW ~/Desktop/screen.jpg" Same thing as #3 above, just click a window to take a screenshot. If you push space it will go into mouse selection mode (same thing as #2 above).
Grab (Macintosh HD/Applications/Utilities) can also be used to take screenshots. It provides an easy user interface, as well as a way of doing timed screen shots and changing the mouse pointer style (option located in the preferences).
Easy Dictionary Access
It is possible to access the Mac OS X Dictionary and Thesaurus from any Cocoa application (Mail, TextEdit, Safari, etc.) using a simple keyboard shortcut.
To access the dictionary, place the mouse cursor over the word you want to look up., and press Command-Control-D. a small window pops up giving you a quick definition, and you can easily select thesaurus or Morefor more information on a word.
To look up multiple words you can just move the mouse whilst keeping command and control held down (you can release D).
Preview Multiple Fonts
If you work with lots of Fonts, sometimes you might want to preview them before installing.
Do this by double clicking on them in the finder or dragging them to the Font Book icon (in the Applications folder). Font book will open a new window for each one, with a large sample of the font. However these windows will cascade and overlap, so you can only see one at a time.
Using exposé (F10), you can spread out all the windows and preview all the fonts side by side. To install a font, click on its window to bring it to the front, then click install.