10 tips for Stickies
04 November 2008 - Filed in: Utilities
If you aren't familiar with Stickies, you'll find it in the Applications folder. Once opened, it will display a number of differently coloured "notes". You can write in each of these, and any that you leave open when quitting will still be there next time you open up Stickies.
Here are 10 tips for getting the most out of Stickies.
1. Make Stickies float above all windows
With the note you want to float selected, press Command-Option-F. This will cause the Sticky note to appear above all other windows no matter which application you are in. This is great if you are switching between multiple windows and application while writing or referring to a single sticky note. If you can't remember this keyboard shortcut, you'll find the command in the Note menu.
2. Make Stickies translucent
If you look in the Note menu, you will also see an option for a translucent window, with the keyboard shortcut Command-Option-T. This goes well with the floating window option, as it stops the floating sticky note getting in the way too much.

3. Add scroll bars to Stickies
One thing that may annoy you is the inability to quickly scroll through long notes, as you have to use the arrow keys to move through the text line by line. The way to fix this is to modify the Stickies application by using Interface builder to add scroll bars to the side of long Sticky notes.
First make sure Stickies isn't running, and make a backup of it by holding the option key and dragging it to another folder (just in case anything goes wrong). Next, right-click (Control-click) on the Stickies icon and choose "Show Package Contents" from the menu that appears. Inside the contents navigate to Resources/English.lproj and double click on StickiesDocument.nib to open it on Interface Builder.
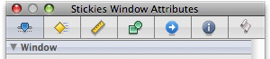
If you are using Interface Builder for the first time, welcome to the wonderful world of how applications are made. A window called StickiesDocument.nib should be open. In this window there are a number of icons with various names including "File's Owner" and "First Responder". Double-click on the icon called "Window" which should open up a mostly empty, white window called "Stickies". Also, open the Inspector by pressing Command-Shift-I or by choosing it from the Tools menu.
 -->
-->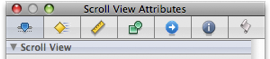
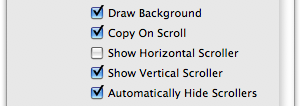
The title of the Inspector window should be "Stickies Window Attributes". Clicking ONCE on the Stickies window will change the title of the Inspector window to "Scroll View Attributes". Amongst the options in the inspector, you want to check the checkbox that says "Show Vertical Scroller" and the checkbox that says "Automatically Hide Scrollers".
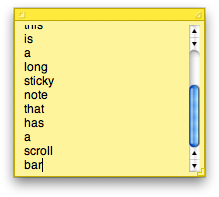
That's it, you're done. Save the file (Command-S) and quit Interface builder. Next time you open Stickies, long Stickies notes should have scroll bars.
There are a lot more things you can do to modify Stickies using Interface Builder, but they are beyond the scope of this tip. If you want to do more, check out this old article on Modifying Stickies. Note that it uses an old version of Interface Builder, so a lot of the screen shots and descriptions are different to the current version.
4. Place other media in Stickies
Not many people know that the contents of Stickies is not restricted to text. You can put almost anything in them. Dragging a Quicktime movie onto a Sticky note will embed the movie in the note, complete with the usual play/pause controls. You can do the same for images and PDFs too. Sometimes Stickies will ask if you want to create an alias rather than a copy of the file within the Sticky. An alias will stop your Stickies database getting too big (especially with movies) and will mean that the contents of the Sticky will automatically be updated if the embedded file is updated.
5. Back up your Stickies library
If you use Stickies a lot, or you keep any important information in your Sticky notes, it is worth keeping a backup of the Stickies database in case anything goes wrong. All your Stickies are stored in one file that, as noted above, is fairly small unless you have embedded lots of movies in your notes. The file is named StickiesDatabase, and is located inside the Library folder in your user folder. Simply create a copy of this file somewhere else to make a backup.
6. Change default new note settings
To set the default font, text size, note size, note colour and translucency, create a new note and customize it to what you want. Then choose"Use as Default" from the Note menu. You can change even more settings by editing the Stickies preferences plist. Go to your user folder and navigate to Library/Preferences and find com.apple.Stickies.plist. The most interesting thing here is the WindowFlags item. Setting it to different values gives the following default notes:
0 - standard Sticky note
1 - minimized note (just title bar)
2 - floating note
3 - floating minimized note
4 - translucent note
5 - translucent minimized note
6 - floating translucent note
7 - floating translucent minimized note
7. Search
Using Command-F you can search for words in a single note or all notes. You can also perform a Find and Replace.
8. Dashboard Stickies
If you frequently use the Dashboard, then the widget version of Stickies might be more useful for you than the application version. Note that you can create as many different sticky notes as you want, simply by dragging another one up from the bottom bar. You can also change the fonts and colours by clicking the i button, however you are more limited than in the Application version.
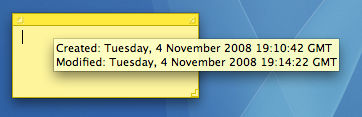
9. Discover a Sticky note's creation and modification dates
This is a simple one - just hold your mouse still over any part of a sticky note to see a tooltip containing the Creation and Modification dates and times of the note.
10. Create a Sticky note from selection
Due to the Services menu in Mac OS X, you have access to Stickies whatever application you are in. Simply select any block of text anywhere and hit Command-Shift-Y to create a Sticky note with that selection.
To be honest, this is quite possibly the most powerful feature of Stickies. Never mind the ability to embed movies and have translucent windows. Being able to create a quick note of any text with one keyboard shortcut is the easiest and most useful aspect of Stickies there is.
blog comments powered by Disqus