Quickly add to do items to iCal's Reminders from anywhere with a keyboard shortcut
Until recently, my favourite task management (to do list) app for Mac and iPhone/iPad has been Things. It has just the right balance of Apple-like simplicity and powerful features that makes managing tasks quick and easy and not yet another task in itself. Unfortunately, the developers, Cultured Code, have been very slow at getting the cloud sync sorted out, meaning you still have to manually sync your tasks between your different devices and on top of this it’s still not even possible to sync tasks between multiple Macs.
With that in mind, I’ve been trying out some alternatives, including Wunderlist, but I’ve finally settled on using Apple’s own solution. With the release of iOS 5, Mac OS X Lion and iCloud, finally iCal Reminders on the Mac and the Reminders app on the iPhone are good enough to rival these third party solutions.
One piece of Things functionality I find myself missing, however, is the Quick Entry window. This allowed you to quickly create a new To Do item using a simple keyboard shortcut that worked in any application. This meant I could be reading an email, press the keyboard shortcut and Things would bring up a new To Do item dialog, autofilled with the details of the current email message.
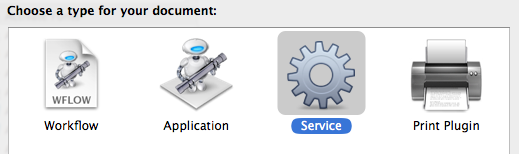
Fortunately, we can go some way to replicating this functionality using an Automator service. Don’t worry if you’ve never used Automator before, this is a really easy workflow containing only a single “Automator action.” Start by opening Automator (located in the Applications folder), and choose the Service type for your new document.
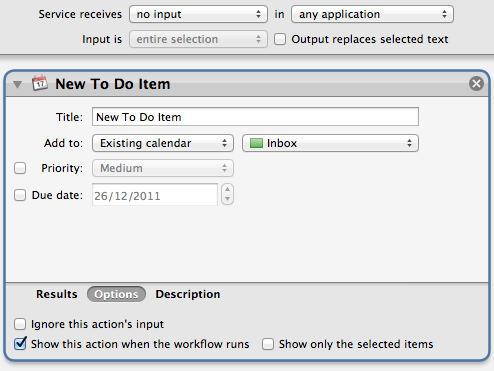
From the Calendar section of the Library, drag the New To Do Item action over into the workflow area on the right. This is the only action we’ll need! Using the fields and drop-down menus, you can customise the default values that will appear when the Quick Entry window is invoked. Before we save, there are two more things we need to set. Firstly, change the drop-down menus above the workflow to specify that the service receives no input in any application. Secondly, click the Options button at the bottom of the action, and check the box Show this action when the workflow runs. When you’re finished, it should look something like this:
To finish, choose Save from the File menu and give it a name like “New To Do Item.”
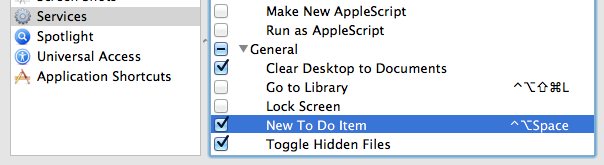
The next step is to add the keyboard shortcut so that we can easily bring up the Quick Entry window without having to go to the Services menu. To do this, open up System Preferences and go to the Keyboard section. Under the Keyboard Shortcuts tab, click Services in the list on the left, and scroll down to the bottom of the list on the right to find your new service. To add the keyboard shortcut, double-click on the area to the right of your service and press whatever shortcut you want. I went for Control-Option Space.
Finally, all that’s left is for you to test it out. Open up Safari or Mail or any of your usual applications, and start going about your normal business. Then try pressing your chosen keyboard shortcut, and the Quick Entry window should appear. iCal doesn’t even have to be open.
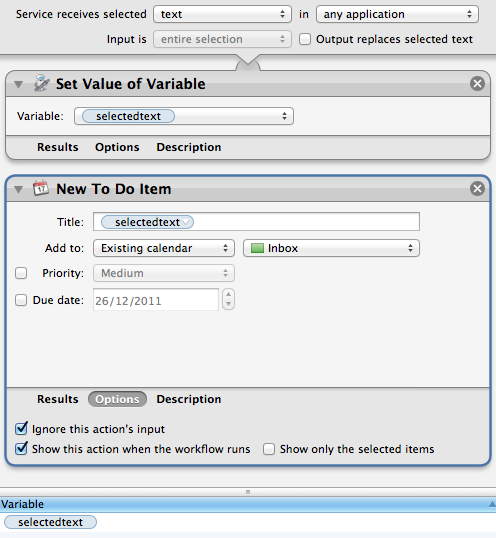
Bonus Tip: If you’re feeling adventurous, try creating a second service that automatically takes the currently selected text as the title of the to do item by changing the Service receives drop-down menu to text. Check out the screenshot below for some ideas on how to do this.
Create your own EPUB ebook files using Automator
A handy new addition in Mac OS X Lion makes it a piece of cake to create your own EPUBs that can be viewed in iBooks on an iPhone or iPad, or on any other eBook reader. Using a simple Automator action, it’s possible to take text from anywhere, for example from a web page or a PDF file, and convert it into EPUB format that displays beautifully on whatever device you use to read ebooks.
To do this, we need to set up an Automator workflow that does the conversion for us. Once this is done, creating EPUB files will be as simple as selecting some text, right-clicking on it and choosing “Create ePub book with selected text.”
Start by opening Automator, which is located in the Applications folder. If you haven’t used Automator before, don’t worry, it’s just a really simple app that allows you to automate repetitive tasks by building “workflows” using building blocks called “actions.” The type of workflow we are going to build is called a Service, which means it will be accessible via the Services menu when right-clicking on selected text.
To create the workflow, drag the following two actions from the Library onto the workflow area on the right:
- New Text File
- Text to EPUB file
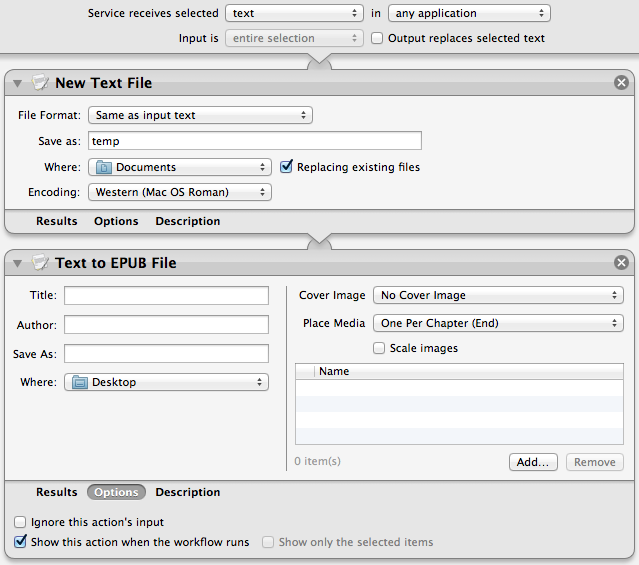
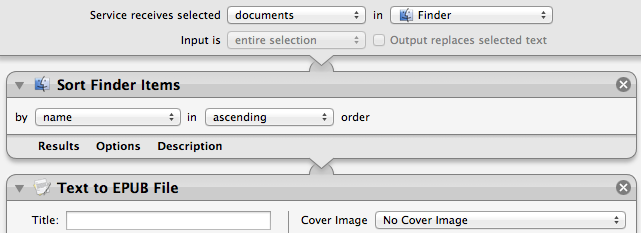
Change the settings to match the following screenshot. The main things to note are changing the file name to temp, ticking the Replace existing files checkbox, and ticking Show this action when the workflow runs on the Text to EPUB action.
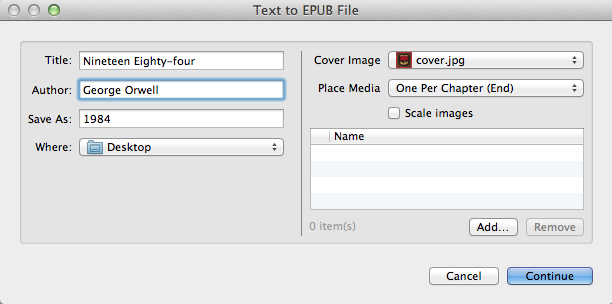
Choose Save from the File workflow and name it “Create ePub book with selected text.” To test it out, select some text (this article for example) and right-click on it. Under the Services menu, choose Create ePub book with selected text. The following dialog should appear, allowing you to specify the title, author, filename, and cover image for the book.
Once saved, simply drag the EPUB file into iTunes to add it to your Library. When you next sync your iPhone or iPad, it will be copied across and will appear in the iBooks app on your device.
Retain text formatting
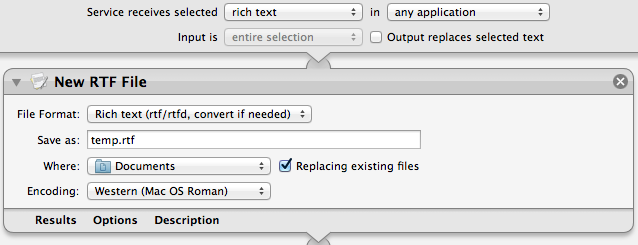
If your text contains a lot of formatting like different text colours and bullet point lists, you can modify the workflow slightly to retain this in the EPUB. Simply change the Service receives selected drop-down menu to rich text, and do the same for the File Format drop-down menu in the New Text File action. When you are finished it should look something like this:
Multiple Chapters
The above method creates an ebook with only one chapter. If we want to divide up the ebook into separate chapters and include a table of contents, we have to do things slightly differently.
In your Automator workflow, replace the first action with a Sort Finder Items action. You will also need to change the Service receives selected drop-down menu to documents.
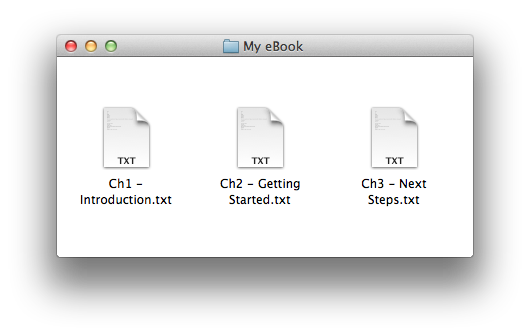
Next, prepare your text by saving each chapter as a separate text file, all in the same folder. The names of the files determine the order, so make sure they start with something like “Ch1”, “Ch2”, “Ch3” etc.
Finally, select all the files (Command-A), right-click on them, then choose your service from the menu.
Adding images, audio and video
One last cool feature is the ability to embed media such as images, audio and video in your EPUBs. Unfortunately there’s not a lot of flexibility in how you do this — you can either place one item at the start or end of each chapter, or group them all together in a chapter at the end called “Illustrations”.
To do this, simply click the Add… button on the dialog that appears when your service runs, and choose the files you want to embed. Note that videos need to be encoded in a format that is compatible with the iPhone — you can do this using the great tool HandBrake.
Every conceivable way of accessing the Library folder in Lion
A lot of noise has been made about the fact that the Library folder inside your user home folder is now hidden by default in Lion. Even though you can’t just go to your home folder and click on it any more, there are still loads of other ways to access it. Here’s every single method we could think of to show the Library folder, either on a temporary or permanent basis.
What is the Library folder for?
First, a quick recap of what the library folder is and why you might want to access it. Mac OS X actually has three different Library folders:
- One located at the root of your hard drive
- One located in a folder called System at the root of your hard drive
- One located in every user’s home folder
The purpose of all three Libraries is to store files that are used by applications and the system that users generally doesn’t interact with directly. The System Library contains all the core parts of OS X that are needed for it to function — there are very few reasons to ever change anything in it. The other two Libraries are very similar, both containing things like fonts, saved preferences and Dashboard widgets. These are all things that you interact with through other applications, so it makes sense to file them out of the way in a Library folder.
The only difference between these two libraries is that things in the hard drive Library are for all users of the computer, while things in the user folder Library are just for that specific user. If you’ve ever had to enter your administrator password while installing an application, chances are it was putting something in the hard drive Library that needed to be accessible to all users of the Computer.
The Library in your user folder is the one that you are most likely to want to access at some point. If an application is playing up, deleting its preference file in the Preferences folder in this Library is a good troubleshooting step. If you ever have to manually install a plugin for any application, this is most likely where you will have to put it.
With this in mind, it might seem a little odd that Apple decided to hide this Library folder. However, it’s also the most obviously visible of the three libraries, and therefore the most susceptible to accidental changes and deletions that cause problems. Now it’s hidden, if you ever need to get to it, simply take your pick from following methods.
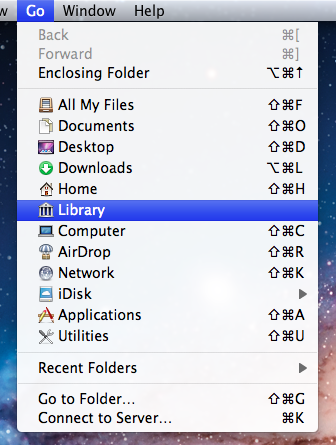
Option-click the Go menu
In the Finder, the Go menu offers lots of handy shortcuts to common places like your Documents and Applications folders. The Library folder doesn’t normally appear here, but if you hold down the Option key, it should pop up in the middle of the list. This is probably the best method for most people. It’s great if you only occasionally want to access the Library, as it stays hidden in your home folder but is still accessible fairly quickly.
Go to Folder…
While in the Finder, simply press Command-Shift-G to bring up the Go to Folder dialog. To access the Library, type in ~/Library and click Go. It is possible to type the path to any folder into this dialog. The ~ character is just a shortcut to your home folder. A more verbose alternative would be /Users/matt/Library.
Assign a keyboard shortcut (works in Finder only)
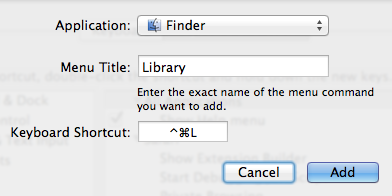
As long as an item appears in a menu somewhere, it’s fairly straightforward to add a keyboard shortcut for it. So as the Library appears in the Go menu, this isn’t too difficult. Simply open up System Preferences, and go to the Keyboard section. Click on the Keyboard Shortcuts tab, then select Application Shortcuts from the list and click the plus (+) button.
In the dialog that appears, choose Finder from the drop-down menu, type Library for the menu title and then choose whatever shortcut you want.
There are two small problems associated with this method: Firstly, for some reason this stops the Library from appearing in the Go menu, even when the Option key is pressed. Secondly, the shortcut will only work when Finder is the active application. To get around these problems, see the next method.
Assign a global keyboard shortcut (works in all apps)
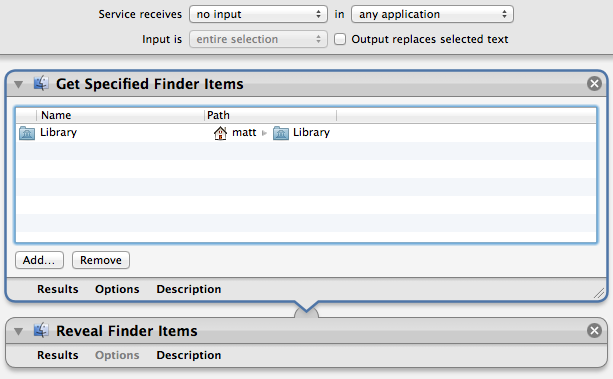
The easiest way to assign a global shortcut is by using an Automator Service. Start by opening up Automator (located in the Applications folder) and choosing the Service template. Drag the following two actions across from the library into the workflow area:
- Get Specified Finder Items
- Reveal Finder Items
Click the Add button in the Get Specified Finder Items action, and navigate to your home folder. Press Command-Shift-. (period) to show the hidden files, select the Library folder and click Add. Finally, change the drop-down menus at the top of the window to no input and any application, then Save the Service.
To add the keyboard shortcut, go to the Keyboard section of System Preferences as above, but instead choose Services from the list. Find your new Service, double click to the right of it and press your shortcut.
Access via the Terminal
If you are comfortable working in the Terminal, it’s still fine to navigate to the Library folder with cd ~/Library and then list its contents with ls.
Alternatively, you can use the Terminal as a way to open up the folder in the Finder. Simply type open ~/Library and press Return.
Add an alias to the Finder sidebar or toolbar
Once you have accessed the Library folder using one of the methods above, it’s easy to drag the folder into the sidebar or toolbar for easy access. This creates an alias to the Library folder that will permanently stay in the sidebar or toolbar until you remove it, while the Library folder remains hidden in your home folder.
Make it permanently visible
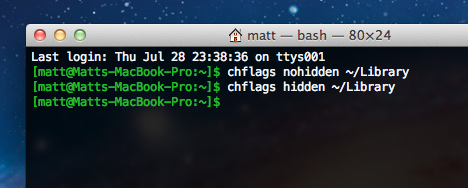
If you think all the above methods are just a waste of time and you want your Library back the way it was in Snow Leopard, it is possible to make it visible again. Open up Terminal (located in Applications/Utilities), paste in the following line and press Return:
chflags nohidden ~/Library
There’s no need to restart the Finder — the change should occur instantly. If you change your mind and want to hide the Library again, use the following command:
chflags hidden ~/Library
Make all hidden files visible
This is probably overkill if the Library folder is the only hidden item you want to access, but there is a simple Terminal command to make all hidden files visible in the Finder:
defaults write com.apple.finder AppleShowAllFiles YES
For more information on this command and how to set a keyboard shortcut to toggle hidden files, check out our article on how to quickly show and hide hidden files.
Add any text to iTunes as a spoken track
There’s a great feature in Mac OS X that allows you to take any block of text and transfer it into iTunes as a spoken track, which you can then easily sync to an iPhone or iPod. This is done using a ‘Service’ that comes built into your Mac, but is disabled by default in Snow Leopard. This article explains how to enable it, and, for those who are interested, I’ve also included a short tutorial on how to add some improvements to make it more like the new version that will be included with Lion.
First, to enable the Service, go to the Keyboard section of System Preferences. This may sound like a bit of a weird place to have the Services settings, but it makes more sense when you consider pretty much the only setting for Services apart from turning them on and off is assigning keyboard shortcuts.

Click the “Keyboard Shortcuts” tab, and then choose “Services” from the list on the left. There are loads of great little features hidden away in here that are worth checking out, but for now just find “Add to iTunes as a Spoken Track” in the list on the right and make sure the checkbox next to it is checked. You might also want to add a keyboard shortcut if you think you might be using this often.
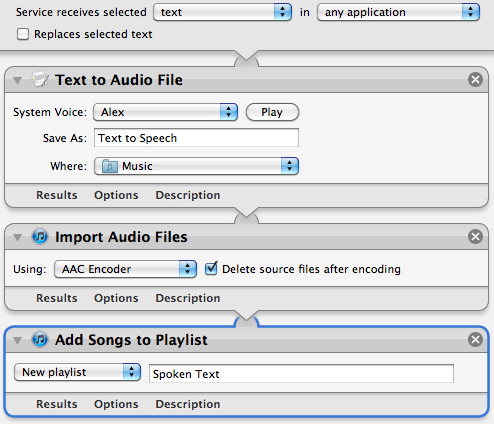
Now, whenever you have a block of text selected, just right-click on it and choose “Add to iTunes as a Spoken Track.” iTunes should open up, and a new track called “Text to Speech” should have appeared in your music library.
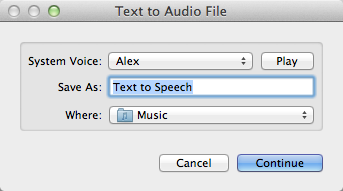
In Mac OS X Lion (coming out next month), this Service is enabled by default, and has been upgraded to give you the option to choose the voice used and the name and location of the track in iTunes. The screenshot below gives a little sneak preview of what to expect.
In the meantime until Lion is available, we can do a bit of tinkering to make our current Snow Leopard version almost as good as the upcoming Lion version. Like many Services, it is actually just an Automator workflow that you can easily modify yourself using ready-made building blocks. To see how this works, open up Automator (located in the Applications folder) and click “Open an Existing Workflow.” Navigate to
Macintosh HD/System/Library/Services/
and choose “Add to iTunes as a Spoken Track.”
First lets familiarise ourselves with how this workflow operates. The selected text input comes in from the top into the “Text to Audio File” action. This creates an audio file with the specified voice and file name, and saves it in your Music folder. This file is then used as the input to the “Import Audio Files” action. This takes the file, adds it to iTunes, then deletes the original file. Finally, the “Add songs to Playlist” action takes this song and puts it in the specified playlist.
It’s quite clear that we can change the playlist, file name and voice from here, but with a bit of work we can make the Service work like the Lion version, where you are prompted to choose these values each time you run it.
First, if the Library isn’t visible, click the “Show Library” button in the top left of the window. This shows all the available actions we can add to the workflow. To start off, our main aims are to:
- Display a popup window that asks us what we want to call our track.
- Put that value in the “Save As” text field in the “Text to Audio File” action.
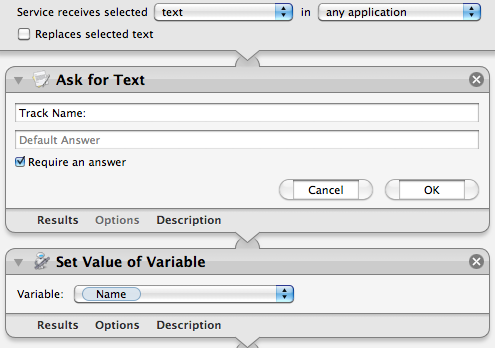
To do this, we need to add two actions to the start of the workflow. Drag across the “Ask for Text” action and the “Set Value of Variable” action, and place them above all the existing actions in the workflow. In the “Ask for Text” action, set the question to “Track Name:” and tick the checkbox “Require an answer.” In the “Set Value of Variable” action choose “New Variable...” from the drop-down menu, and call it “Name.”
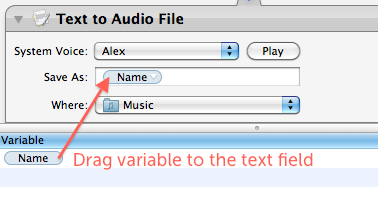
So what exactly is this thing called a “variable” that we’ve just created? Basically it just gives us a way to store a value (in this case the chosen file name) and then use it later in a different place. Once you have created the “Name” variable, you should see it in a new list that has appeared at the bottom of the workflow area. Using this variable in other places is simply a case of just dragging it there. So select “Name” in the list at the bottom, and drag it onto the “Save As” text field in the “Text to Audio File” action.
Great, it looks like we’re all done! But wait — there’s actually a small problem with our workflow. Look carefully at the order of the actions in the workflow, and think about how the output of each action acts as the input to the next action. The selected text comes in from the top, but the first action (“Ask for Text”) just ignores this, and outputs the chosen file name. This is passed on through the subsequent actions, meaning that the text that is spoken is actually just the file name instead of the selected text!
So the two new actions that we have added have got in the way, and don’t allow us to pass the selected text through to the “Text to Audio File” action. What we need is some way of storing the selected text somewhere safe, then retrieving it later to use in another place ... luckily that’s exactly what variables are for!
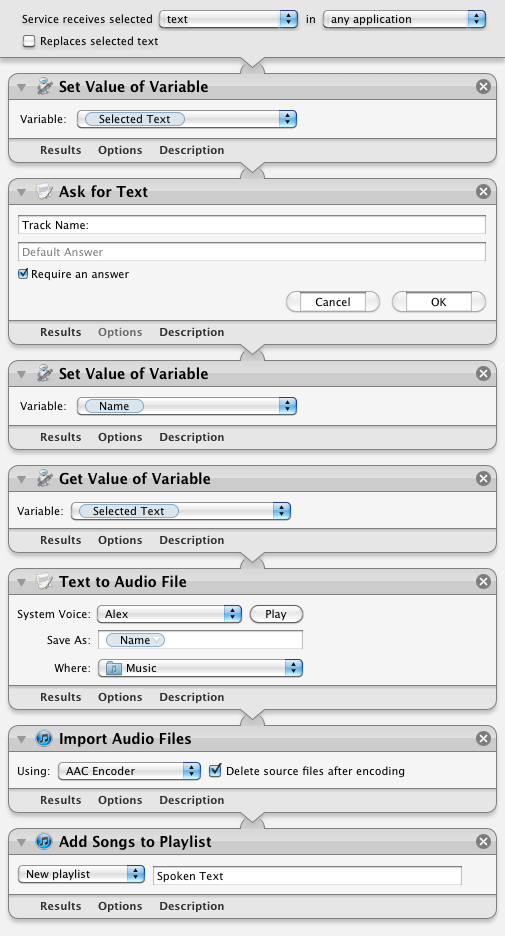
It just takes another two actions to save and then retrieve a variable. First, add a “Set Value of Variable” action right at the start of the workflow, before all the existing actions. Once again, choose “New variable...” from the drop-down menu, but this time call it “Selected Text.” Now the selected text is stored away safely in a variable while we do other things. To retrieve the value later on when we need it, add a “Get Value of Variable” action just before the “Text to Audio File” action. Finally, make sure “Selected Text” is chosen in the drop-down menu, and also right-click on the “Get Value of Variable” title and choose “Ignore input.” The final result should look something like the following screenshot:
Note: You will find that Automator won’t let you save over the built-in Service, so you will have to choose “Save As” and give this Service a new name. Further extending the workflow to allow the user to also choose the name of the playlist is really easy and can be done in exactly the same way, but choosing the voice is a bit more complicated, and can probably only be achieved using a bit of AppleScript.
Facebook feeds on the desktop with GeekTool
I recently posted a tip over at Geeklets on how to display your Facebook news feed or recent notifications on your desktop using GeekTool. The whole process is a little bit complicated, but here’s a summary of what you have to do:
1) Get your Facebook feed address This is just an RSS feed you can get from the Facebook site.
2) Create an Automator workflow You need to create a short automator workflow that runs regularly and saves the recent items to a text file.
3) Optional: Make your workflow run in background You can disable the Dock icon so the Automator workflow doesn’t bother you every time it runs.
4) Set up the GeekTool Geeklet Finally you can just download the geeklet files that display the feed on your desktop.
Head over to the Geeklets site to see the full instructions. If you are new to GeekTool you might want to check out this introduction.
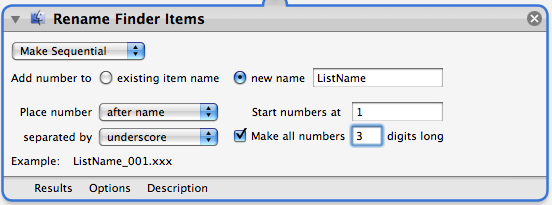
Batch rename multiple files
Often you might find you have a folder containing hundreds of files, and you want to rename them all, for example to create a numbered list. In the Finder this would take ages, but luckily you can use the Automator app that comes free with every make to save yourself time and effort.
Start by opening up the Automator app (in the Applications folder) and create a new workflow. Add the following actions by dragging them from the list on the left. First add “Get Specified Finder Items” followed by “Sort Finder Items” followed by “Rename Finder Items”. Your workflow should look something like the screenshot below. When you add the “Rename Finder Items” action, you will be asked if you want to create a copy of the files. Generally you won't want to do this, so click the "Don't Add” button.
Also, once added, the name of the “Rename Finder Items” action will change to “Add Date or Time to Finder Items” - don’t worry, this is normal. This is just the default setting, which you can change by choosing a different option from the first drop-down menu inside the action.

What the workflow does is pretty straightforward. When you click Run in the top right, it gets the files you have added to the list in the first action. You can add the files by clicking the Add button below the list before you run the workflow. The second action then sorts the files by name, size, kind, or whatever you specify. The final action takes this list of files and modifies their file names.
There are a huge amount of options in the “Rename Finder Items” action. The first drop-down menu allows you to choose between adding a date or time, adding text, changing uppercase/lowercase, making a sequential list or performing a find and replace for a string of text.
The second action, “Sort Finder Items” is really optional and only makes a difference if you have the renaming action set to “Make Sequential”. This takes the list in the order it is given and places sequential numbers before or after the file names depending on the files position in the list.
There are a couple of alternative actions that you can use instead of the first “Get Specified Finder Items”. One option is to use “Get Selected Finder Items” instead, which will perform the renaming on whatever files you currently have selected is in the Finder. Another is “Ask for Finder Items”, which will open up a dialog prompting you to choose the files each time you run the workflow. This is a good choice if you want to regularly perform the same renaming on different batches of files. You can then save the workflow as an application (File, Save As... and then choose Application from the File Format menu) that simply runs the workflow when you open it. This gives you a shortcut so you don’t have to open up Automator every time.
Access hidden Preview features through Automator
One topic that came up in the comments of that tip was Preview's inability to scale and resize images. I explained a trick involving zooming and using the Mac OS X Screen shot tools, but this is far from ideal.
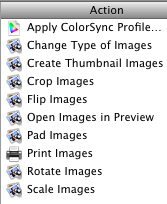
If you have Mac OS X 10.4 Tiger, you will find Automator in your Applications folder. It is an application designed to do repetitive and time consuming tasks for you. You simply create a workflow by dragging and dropping "action" blocks, and then you can set it going whenever you want to perform that action. It's great for doing batch tasks like renaming a long list of files or resizing a large group of images.
If you look in the left hand column, you will find a section titled Preview. Clicking this will bring up a list of Automator actions that you can use. Some are familiar and accessible from the menus in Preview, but some are new.
Let's start with the simplest possible workflow. Say you want to resize an image (or lots of images) to half its size. To do this, drag the Scale Images action over to the right hand side. A dialog box will appear asking if you want the workflow to keep a copy of the original image or not. If you click Add, the workflow will make a copy of your image on the Desktop and resize that instead of the original. Otherwise, it will simply replace the image with its resized version.
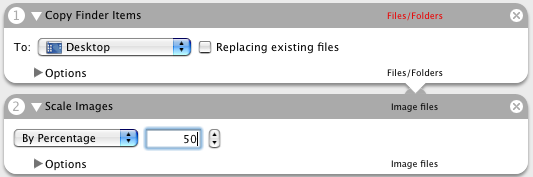
The next step is to choose how you want to scale your image. You can set it to a certain width or a percentage of its original size. Once you have chosen, choose Save As from the File menu and give it a name like Resize Images. From the File Format pop-up menu choose Application. The Desktop is a good place to save it.
![]()
Now we can try it out. Find an image file and drag it onto the Resize Images icon. A copy of the image at half the size should appear on the Desktop - Preview doesn't even need to open. You can even drag a large selection of photos. If you find yourself using

You can even extend your workflows to make them more like applications. For example, try adding "Ask for Finder Items" (from the Finder section) to the start of the work flow. Now, once you have saved the workflow as an application, when you double-click it to open, it will bring up a dialog, asking you to choose the images that you want to resize.
Also, take a look at the PDF actions that Automator has. Some of these are really useful if you often use PDF documents in Preview.