Quickly show and hide hidden files
In Mac OS X, files with names that start with a dot (.) are hidden. You may have noticed some of these before, for example when copying files from your Mac to a PC where they aren’t hidden. The most common one you might bump into is the .DS_Store file that Mac OS X puts in every folder (to save various view settings), but there are all sorts of other hidden files used by all sorts of applications.
These files are hidden by default for good reason — the average user almost never needs to change them, so keeping them visible would just cause useless clutter. But every now and again you may find that you need to view the hidden files, for example to browse the UNIX filesystem, to work with .htaccess files or to find a file that you accidentally (or purposefully) hid by naming it with a dot.
Using the Terminal
The easiest way to show hidden files is using the Terminal. Just open up Terminal (located in Applications/Utilities), paste in the following line and press Return.
defaults write com.apple.finder AppleShowAllFiles -bool YES
The Finder needs to be relaunched before the changes take effect, so type killall Finder and press Return. To hide the files again, use the following line instead.
defaults write com.apple.finder AppleShowAllFiles -bool NO
While this method is fine if you only want to change the visibility of hidden files occasionally, it is a bit cumbersome if you find yourself having to do it regularly. Read on for some quicker ways to access hidden files.
In open and save dialogs
In open and save dialog boxes, there is a handy keyboard shortcut to toggle the visibility of hidden files. While the dialog is open, just press Command-Shift-. (dot). Just press it again to hide the files again.
For some keyboard layouts, normally in ones where a comma is used as a decimal point, you may find that this shortcut is Command-Shift-, (comma) instead.
Setting up a keyboard shortcut
While Apple helpfully provided a keyboard shortcut for use in open and save dialogs, they didn’t do the same for normal Finder windows. Luckily, it’s not too tricky to set up a keyboard shortcut yourself.
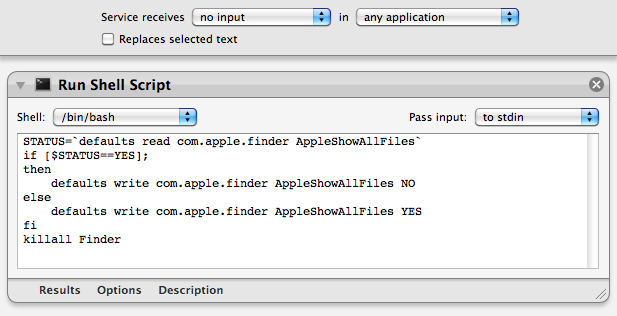
To start, open up Automator (in the Applications folder) and choose a Service template. From the library choose "Run Shell Script" and drag it across to the workflow area. In the text box paste the following command:
STATUS=`defaults read com.apple.finder AppleShowAllFiles`
if [ $STATUS == YES ];
then
    defaults write com.apple.finder AppleShowAllFiles NO
else
    defaults write com.apple.finder AppleShowAllFiles YES
fi
killall Finder
Finally, change the "text" drop-down menu to “no input” and then save you workflow as “Toggle Hidden Files”.
Now if you go to the Finder menu and look under Services, you should find a “Toggle Hidden Files” option. To add the keyboard shortcut, go to the Keyboard section of System Preferences and click the Keyboard shortcuts tab. Select Services from the list on the left, then scroll down to the bottom of the list on the right to find “Toggle Hidden Files”. Double-click on the area to the right of it, then press the keyboard shortcut you want. I used Command-Shift-. (dot).

Setting up a context menu item
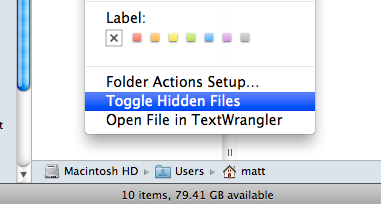
To use a context menu instead of a keyboard shortcut you just need to follow the same instructions as above, but make some slight changes in Automator. Instead, change the “text’ drop-down menu to “Files and Folders” and the “any application” drop-down menu to “Finder”. Now when you right-click on a file or folder in the Finder, a new “Toggle Hidden Files” option should appear.
