Use Facebook Chat in iChat
It is now possible to connect to Facebook Chat through a desktop client using the Jabber protocol. This means that you can chat with your Facebook friends without having to log into Facebook. The instructions here are for iChat, but it works with loads of other messaging applications too, such as Adium and Pidgin.
Start by opening up iChat, then go to the iChat menu and select "Preferences." In the Accounts tab, click the plus button (+) and enter the following settings:

Account Type: Jabber
Account Name: [username]@chat.facebook.com
Password: Your Facebook password
Server: chat.facebook.com
Port: 5222
Uncheck "Use SSL" if it is checked.
Your Facebook username is the name that appears in the address bar when you go to your Facebook profile page. If you can't figure it out, go to this page on the Facebook site to find it.
Finally, click Done, and a new buddy list should appear with all your Facebook friends. It should also sort them into the correct groups if you have set them up in Facebook.
Find out where a file came from
If you have a Downloads folder full of junk like I do, it can be useful to know where some files have come from. Luckily this information is displayed in the Get Info window. Just right-click on the file and choose "Get Info" or press Command-I.
In the Get Info window, click the "More Info" disclosure triangle and some extra fields should appear. If you look in the list you should find one called "Where from."
If you downloaded the file using Safari, this field will show you the web address of the page you downloaded the file from. If you received the file via iChat or a Mail attachment, the name of the person who sent it to you should appear.
Sometimes two web addresses are shown if the page with the download link is on a separate site to where the file was actually stored. See the screenshot below for an example.

How To Send or Share a File With iChat
First, open up iChat and log into your messaging program. Once you’ve done that, select the person you wish to talk to by either clicking the icon by their name in your buddy list or going to the File menu and selecting New Chat With Person. At this point you can begin video chatting as you normally would. The person you’re talking to won’t need a webcam for this or any other part of this guide to work – they will still be able to see you and the files you share as long as you have a webcam installed, iSight or otherwise. Just right click on their name in your buddy list and invite them to a “One-Way-Video-Chat” and you’re all set.
Next, locate the file you wish to send or share and simply drag it onto the Video Chat window. It can be a document, a picture, a movie – anything. A prompt with two boxes will come up asking you if you want to send the file or open it with iChat Theater. If you just want to send them a copy, this is where the guide ends for you – simply drag the file to the first box and it will transfer instantly. If you wish to share the file with them so that you can both look at the file at the same time, drag it to the second box. You can also select the File menu and click “Share a File With iChat Theater”.

Sharing a Keynote Presentation
Now that you’re sharing your file with the person you’re chatting with, a window will open alongside the Video Conference window with your file in it. This is the same exact image that the person on the other side can see. As the initiator, you have complete control over how the file looks. That means you can scroll down a document to a certain point, zoom in on a picture to emphasize a particular section, or breeze through a movie to the exact clip you want to show them. The other person can “look but not touch”, meaning they will see all your changes but can’t change anything themselves. This can be useful for illustrating exact points that might be tough to describe in words.
And that’s it! Sharing files with friends and colleagues has never been easier. When you close the window you can go back to video chatting as normal, or you can start the process all over again with another file.
[Matt adds: As far as I know, you don’t even need a webcam yourself. Just go to “Share a File with iChat Theater” in the File menu to start the process from outside a video chat. You’ll see that iPhoto has a separate option to allow you to access photos within your iPhoto library. Also, note that only files that work with Quick Look will work in iChat Theater.]
Data Detectors in Mail
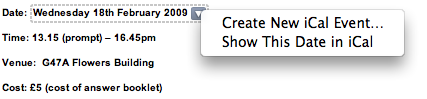
To use the data detectors feature, simple hold your mouse over a date or time in an email message. A dashed box should appear around the item, with an arrow that you can click to bring up a drop-down menu. The two options available are "Create New iCal event" and "Show This Date in iCal". If you create a new event, a dialog box just like the one in iCal pops up, ready filled with the information. This all happens within Mail, so there is no need to even open iCal.
While this is a great timesaving trick, unfortunately the Mail dialog lacks some of the features that the iCal one has. You can only add a single alarm, and you can't add attendees or attachments. However, it is still possible to use data detectors to fill out your event information and have access to these more advanced options.
Simply hold down the Option (alt) key when clicking on the data detector drop-down arrow. The menu item should now read "Create New Event in iCal". Selecting this will load up iCal and create a new event with the information in the Mail message.
If you already started creating an event in Mail, and then decide you want to add multiple alarms or attendees, simple hold down the Option (alt) key. The "Add to iCal" button at the bottom should change to "Edit in iCal", allowing you to make the changes you want.
Enable Data Detectors in iChat
Apple also built data detector functionality into iChat, but chose to disable it for some reason. Luckily, enabling it again can be done by a simple Terminal command. Start by opening up Terminal (/Applications/Utilities). In the window that appears, paste the following line, and hit enter.
defaults write com.apple.iChat EnableDataDetectors 1Next time you open iChat, data detectors should be enabled. To disable them again, repeat the command with a 0 at the end instead of a 1.
Disable Data Detectors in Mail
If you never use data detectors, you might want to disable them. This can be done using the following Terminal command:
defaults write com.apple.mail DisableDataDetectors YESNext time you open Mail, data detectors shouldn't appear. If you want them back, just repeat the command with NO at the end.
Address Book Tips
Add Contacts to your Safari Bookmarks
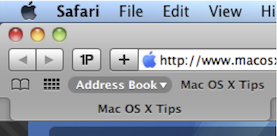
If lots of your contacts have their own web sites, you might be interested to know that you can automatically add these to your Safari bookmarks bar. Open up Safari go to the Preferences (in the Safari Menu). In here click the Bookmarks tab and check the box that says “Include Address Book” in the Bookmarks Bar. Now a new folder will appear at the far left of your Bookmarks bar. In here will be the web sites of all you contacts who have a home page set in their Address Book entry.
Address Book integrates quite well into iChat, the Mac OS X instant messenger. If a person in your Address Book is online and using iChat, a little green dot will appear next to their picture. Clicking on the dot will open up iChat, where you can start a new conversation with the person.
Put your Contacts in the Spotlight
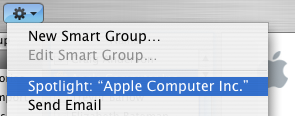
In Address Book, select which contact you want to search, right-click on their name and choose “Spotlight [name]”. The spotlight window will pop up, and show documents, photos, iCal events, mail messages and iChats related to this person. This is one of my favourite features of Spotlight — it allows you to use it as a personal organiser and links together Address Book, iCal, Mail and iChat.
If you don't have Address Book open, you don't need to bother opening it up to Spotlight search someone. Simply type their name into Spotlight for the same results.
Moreover, Spotlight remembers files that people have sent you. When searching for one of your contacts, Spotlight will list any files they sent as attachments to you, providing you received them in Mail.
Highlight Groups
If you hold down the Option key while you are viewing a contact, all the groups that they are in are highlighted in a lovely yellow.
Merge two contacts
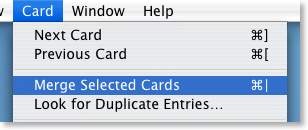
If somehow you end up with two entries in your address book for the same person, you can easily merge the two. Select the two entries by clicking on one in the list and then Command-clicking on the other. Now click on the Card menu and choose “Merge Selected Cards”. If you have a huge contact list and you suspect some duplicate entries, you can also choose “Look for Duplicate entries” from the Card menu.
Large Type
If you want to read a person's phone number off the screen while dialing it across the room, you can make it display in large numbers across the screen. To do this, click on the number and choose “Large Type” from the pop-up menu.
Address Book Sharing
If you want to share your address book (for example with your family or secretary) you can do so via MobileMe, Yahoo!, Google or an exchange account. In Address Book just go to the Preferences and click on the Accounts tab. Be careful with the Google and Yahoo synchronisation though, you might end up accidentally adding everyone you ever sent an email to into your address book.
Using vCards
In reality, most people don't have .Mac, so the standard way to share contacts is using vCards. A vCard is a file containing a contact's information that you can attach to an email and send to whoever you want. Luckily, vCards work really well with Address Book.
To create a vCard for a specific contact, select them from the list and right-click (Control-click) on their name. From the pop-up menu choose "Export vCard...".
To create a vCard that contains the information for all the people in a certain group, select the group you want from the list, right-click on it and choose "Export Group vCard...".
If you receive a vCard from someone else as an email attachment, you can add it to your address book in a couple of ways. If you received it in Mac OS X's Mail application, simply drag it from the email message across to Address Book. If not, save it to your Hard Drive and then choose Import vCards (Command-O) from the File Menu in Address Book.
Make Your Own Card
Restrict Private Information
If you don't want to share all of your contact information with everyone you send your vCard to, you can choose to keep certain parts private. Go to the Address Book Preferences and check "Enable Private Me Card". Now when you edit your own card, you can use the check boxes to choose which information is exported as your vCard.
Printing Envelopes
You can print an envelope addressed to a contact by choosing Print from the File menu with the chosen person selected. In the print dialog you might have to click the blue disclosure triangle to show all the settings, and choose Envelopes from the Style drop-down menu.
Send SMS messages from iChat
Then enter the mobile phone number, which requires the country code. For example, type +1 followed by the number. I am unsure whether numbers from outside the USA are supported. Once this is entered, chat away.
After sending the SMS, you will receive a confirmation that it was sent.