Print the Clipboard without Pasting into an Application
After selecting all text with Command-A, is there away to print it from memory to the printer without pasting it to an application? If I'm on a website I don't want to have to paste it into TextEdit to print it.
The best way to achieve this is using an AppleScript written by Chris from Macs in Chemistry.
You can download the script by clicking here. Double-click the downloaded file to un-zip it. You will now have a file called "Print Clipboard.scpt". Now go to the Library folder inside your user folder. Look in here for a folder called "Scripts". If it isn't there, create it by choosing New Folder from the file menu. Copy the "Print Clipboard.scpt" file to this folder by dragging it across.
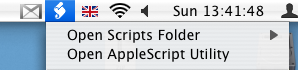
Now Navigate to Macintosh HD/Applications/AppleScript and open up AppleScript Utility. Near the bottom of the window that appears, check the box that says "Show Script Menu in Menu Bar" (if it isn't already checked). A menu will appear near the right hand side of the menu at the top with an icon that looks like a script. If you open this menu you will notice the Print Clipboard Option at the bottom.
To see if it works, go to Safari (or your normal web browser) and select some text. Press Command-C to copy it. Now instead of pasting it into TextEdit, just go to the Script menu and choose the Print Clipboard script. If all is well, a dialog will appear confirming you want to print.
You must have a default printer set for the script to work. If you are having trouble, go to the Print and Fax section of System Preferences. If the "Selected Printer in Print Dialog" is set to "Last Printer Used", change it to the specific name of the printer you want to print with.
If you are feeling really adventurous you can even try editing the script. If you go to the Scripts menu and Option-click on "Print Clipboard" it will open up the script in Script Editor. Now you can make changes.
For example, if you want to remove the dialog that confirms what you are printing, put "--" (without the quotes) before the start of the 4th line. It would look like this:--display dialog the_clip buttons {"Cancel", "Print"} def...
Address Book Tips
Add Contacts to your Safari Bookmarks
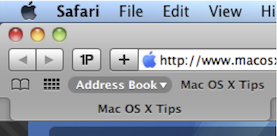
If lots of your contacts have their own web sites, you might be interested to know that you can automatically add these to your Safari bookmarks bar. Open up Safari go to the Preferences (in the Safari Menu). In here click the Bookmarks tab and check the box that says “Include Address Book” in the Bookmarks Bar. Now a new folder will appear at the far left of your Bookmarks bar. In here will be the web sites of all you contacts who have a home page set in their Address Book entry.
Address Book integrates quite well into iChat, the Mac OS X instant messenger. If a person in your Address Book is online and using iChat, a little green dot will appear next to their picture. Clicking on the dot will open up iChat, where you can start a new conversation with the person.
Put your Contacts in the Spotlight
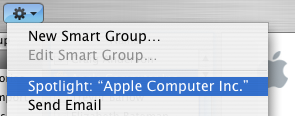
In Address Book, select which contact you want to search, right-click on their name and choose “Spotlight [name]”. The spotlight window will pop up, and show documents, photos, iCal events, mail messages and iChats related to this person. This is one of my favourite features of Spotlight — it allows you to use it as a personal organiser and links together Address Book, iCal, Mail and iChat.
If you don't have Address Book open, you don't need to bother opening it up to Spotlight search someone. Simply type their name into Spotlight for the same results.
Moreover, Spotlight remembers files that people have sent you. When searching for one of your contacts, Spotlight will list any files they sent as attachments to you, providing you received them in Mail.
Highlight Groups
If you hold down the Option key while you are viewing a contact, all the groups that they are in are highlighted in a lovely yellow.
Merge two contacts
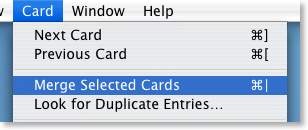
If somehow you end up with two entries in your address book for the same person, you can easily merge the two. Select the two entries by clicking on one in the list and then Command-clicking on the other. Now click on the Card menu and choose “Merge Selected Cards”. If you have a huge contact list and you suspect some duplicate entries, you can also choose “Look for Duplicate entries” from the Card menu.
Large Type
If you want to read a person's phone number off the screen while dialing it across the room, you can make it display in large numbers across the screen. To do this, click on the number and choose “Large Type” from the pop-up menu.
Address Book Sharing
If you want to share your address book (for example with your family or secretary) you can do so via MobileMe, Yahoo!, Google or an exchange account. In Address Book just go to the Preferences and click on the Accounts tab. Be careful with the Google and Yahoo synchronisation though, you might end up accidentally adding everyone you ever sent an email to into your address book.
Using vCards
In reality, most people don't have .Mac, so the standard way to share contacts is using vCards. A vCard is a file containing a contact's information that you can attach to an email and send to whoever you want. Luckily, vCards work really well with Address Book.
To create a vCard for a specific contact, select them from the list and right-click (Control-click) on their name. From the pop-up menu choose "Export vCard...".
To create a vCard that contains the information for all the people in a certain group, select the group you want from the list, right-click on it and choose "Export Group vCard...".
If you receive a vCard from someone else as an email attachment, you can add it to your address book in a couple of ways. If you received it in Mac OS X's Mail application, simply drag it from the email message across to Address Book. If not, save it to your Hard Drive and then choose Import vCards (Command-O) from the File Menu in Address Book.
Make Your Own Card

Restrict Private Information
If you don't want to share all of your contact information with everyone you send your vCard to, you can choose to keep certain parts private. Go to the Address Book Preferences and check "Enable Private Me Card". Now when you edit your own card, you can use the check boxes to choose which information is exported as your vCard.
Printing Envelopes
You can print an envelope addressed to a contact by choosing Print from the File menu with the chosen person selected. In the print dialog you might have to click the blue disclosure triangle to show all the settings, and choose Envelopes from the Style drop-down menu.
Reduce Preview's PDF zoom after Spotlight
When you click on the PDF in the Spotlight results, it opens up in Preview with the search term highlighted throughout the document. This is pretty useful, however the PDF is actually zoomed in 280 percent. This means you can read the word you searched for pretty easily, but you can't see anything else.

Luckily, by changing one line in the Preview preferences, you can change the zoom level to something less extreme. The easiest way to do this is using the Terminal.
First, quit Preview if it is running and open up Terminal from the Utilities folder in the Applications folder. Type the following line and press return:
defaults write com.apple.Preview Preview -dict-add PVPDFSpotlightSelectionSize 10The 10 at the end corresponds to a 100% zoom level. By default, this number is set to 28, or 280% zoom. If you want some zoom, but not quite as much, try a number like 15 for 150% zoom.
If you don't want to use the Terminal, or you are curious to see what the command actually does, you can open up the preference file in Property List Editor (which you will only have if you have installed the Developer Tools from the Mac OS X install Disk). Go to your user folder and navigate to Library/Preferences and open up com.apple.Preview.plist using Property List Editor.

Use the expansion Triangles to navigate to Root/Preview/PVPDFSpotlightSelectionSize. Here you can see the number is 28 (or 10 if you have already changed it in the Terminal).
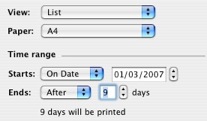
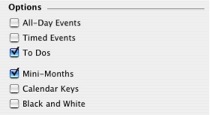
Printing To Do lists in iCal
Super-fast Printing in OS X
However, right now I have just read this tip on the Apple Pro tips site, explaining how to print even more quickly. It can be done by Right-Clicking (Control-Clicking) on the file, and choosing Print from the contextual menu. This won't allow you any of that drag 'n' drop goodness that the other method gave, but it definitely is quicker, especially if you have a two button mouse. What's more, it doesn't require you to set anything up.
The one drawback of this method I can see is how multiple printers are handled. If you have more than one printer, say a colour inject and a b/w laser, you might prefer the desktop printer method, which allows you to drag you file onto the printer of your choice. I don't have multiple printers so I can't confirm this, but I imagine that the contextual menu will just print from your default printer.
Drag 'n' Drop Printing
The settings to do this are in the Printer setup Utility, which is accessible through System Preferences. Load up System preferences (from the Dock or in the Apple Menu) and choose Print and Fax. Once this preference pane has loaded, click the Printer Setup button, which will load up a Printer Info dialog. Now press Command-L to show the printer list.
Your printer(s) will be listed here. Select the printer you want to use, Go to the Printers menu and choose "Create Desktop Printer..." This will bring up a dialog asking where you want to save it. An ideal place is the desktop, which allows easy access, or a folder containing all your printers if you have more than one.
Clicking save will create an icon for your printer in the loaction you have chosen. To print a file, just drag and drop it onto the icon. Many documents will just instantly print, however others will launch the application and open up the Print dialog for you.
Note: Some stages of this process can be very slow if you are using shared printers. Be aware you could be waiting with a spinning beachball for a while if your network is a little slow.
Web Receipts PDF Services
The Save to Web Receipts option in the print dialog box overwrites other documents with the same website name. There is an easy way around it however, there is an automator action controlling this function.
Save PDF to Web Receipts Folder.workflow is located in the /Library/PDF Services folder of the root of the hard drive. I added two lines to this file that would append the date and time to the filename. Now, pdf files of websites with the same site title, will have unique files in the web receipts folder.
You can easily modify all of the scripts in that folder to add additional functionality to your print dialog boxes.
Here's the modified file: http://www.braninjohnson.com/downloads/Save PDF to Web Receipts Folder.workflow.zip
The automator workflows are stored in the Library at the root level of your hard drive, not in your individual user library. As a result, this will change the way the web receipts function works for all users on your mac, and will require a administrator password to change. As usual I recommend creating a backup copy of the old file before you replace it with anything, just incase everything goes pear-shaped.
PDF Services
By now, most people know about the PDF button in the Print dialog box. It allows you to "print" web pages, receipts, recipes etc. to a PDF file, a useful way of archiving things.
This is useful, but the PDF services are even more extendable. You can create aliases to folders to go in the menu that appears when you click the button, allowing you to automatically archive items to specific folders without navigating through your entire file system.
First set up folders, possibly within your documents folder. For example have one for web receipts, one for recipes, one for important emails etc. Next, go to your library folder, located within your user folder, and create a new folder named "PDF Services" (if you don't already have one).
Now add an alias of each of the storage folders within this PDF services folder. This can be done quickly by holding command-option and dragging the folders to the PDF services folder.
Now if you select print in any application, clicking the PDF button will reveal options to save in each of your folders.
For the more adventurous users, try adding aliases of applications such as Mail or Preview, and see what happens!