Browse man pages in Lion's Terminal
Here’s a handy new feature tucked away in the Terminal in Lion. To quickly view the man page for any command, just right-click on it and choose Open man Page from the context menu. A new window will pop up, displaying the manual for that command.
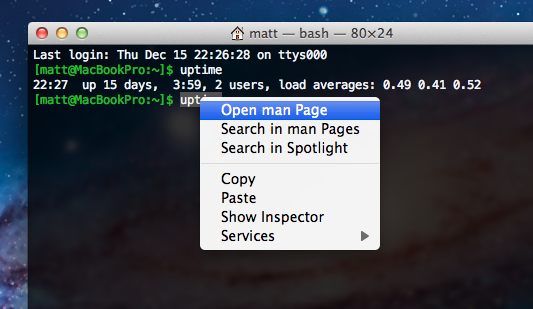
This can save you a little bit of time, especially if you like to open up man pages in a new window alongside whatever you are currently working on. This way, you no longer need to open up a new window and type man <command> every time. It also displays the man pages with a distinctive yellow background, so its easier to distinguish if you have a lot of Terminal windows open.
As with a normal Terminal window, the colour scheme is also customisable. In the Terminal Preferences, just look under the Settings tab and choose the Man Page theme from the list.
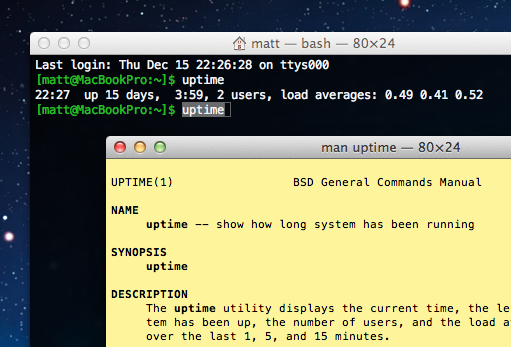
The Open man Page menu item is also available from within the yellow man page windows. I find this really useful when I get to the “See Also” sections that are common at the end of many man pages. Instead of having to remember all the related commands and look at their man pages one at a time, I can simply right-click on each and simultaneously open up man pages for all of them.
Finally, there’s another menu item, Search in man Pages. This uses the apropos command to display a list of all the available man pages for commands that contain the keyword you have clicked on. As you’d expect, you can just right-click on any of the search results and choose Open man Page to view the relevant page.
Replace DigitalColor Meter in Lion
I encountered my first major annoyance with Lion today: For no apparent reason, it seems Apple have decided to remove some of the most useful features from the DigitalColor Meter utility. For anyone who does any web development, DigitalColor Meter was great for quickly getting the hex value of any colour displayed on the screen, simply by hovering the cursor over it.
While it’s annoying that DigitalColor Meter is now pretty useless, it’s not too tricky to build our own replacement using a tiny bit of AppleScript with the built in OS X colour picker and a free downloadable plugin.
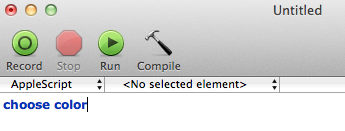
First we’ll start by creating our colour meter application. Open up AppleScript Editor (located in Applications/Utilities) and type choose color in the window that appears. This is actually all the AppleScript we need! To test if it works, click the Run button. Hopefully the familiar OS X colour picker should appear. Close it, choose Save As... from the File menu and give it a name like “Colour Meter.” Also, be sure to change the file format drop-down menu to Application. Now, whenever you double-click on this new application, the colour picker will open.
To get hex values in the colour picker, go to Color Palettes tab (the third one along), and change the Palette drop-down menu to Web Safe Colors. To “choose” a colour from somewhere on the screen, just click the magnifying glass, then click on the colour you want.
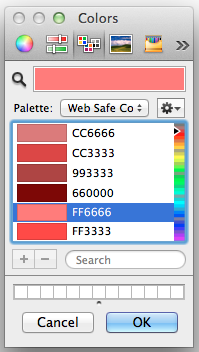
Straight away you might notice a small problem with the hex values that appear: They aren’t all there! This palette only contains “Web Safe Colors,” which basically means R, G and B values of 00, 33, 66, 99, CC and FF. To get the full range of colours, we will need to install a new colour picker plugin.
The two options are RCWebColorPicker from rubicode, and Hex Color Picker from waffle software. They each have their pros and cons, so it’s worth downloading them both and trying them out before deciding on one (or both).
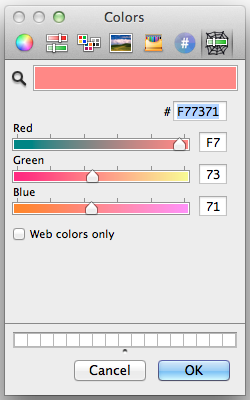
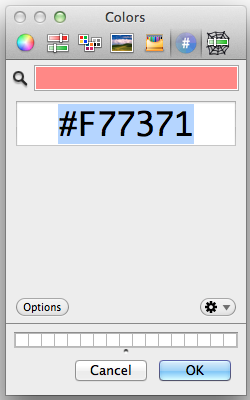
Installation is fairly straightforward, apart from one quirk you might not be aware of — the Library folder within your user folder is now hidden in Lion. The easiest way to get to it is to hold down the Option key while clicking on the Go menu in the Finder, and choose Library from the list. Inside the Library, find the ColorPickers folder and drag the plugin files there. You will need to log out and in again before the new colour pickers will appear.
One final touch for your colour meter application is to give it a proper icon — by stealing the one from DigitalColor Meter. Find both applications in the Finder and choose Get Info for each of them. Select the DigitalColor Meter icon in its Info window and press Command-C to copy it. Then select the icon for your colour picker application, and press Command-V to paste.
![]()
Fix "Please close iTunes" Xcode installer problem
With Lion, Xcode 4.1 is now free from the Mac App Store. While this is great, lots of people (myself included) have encountered a small problem during the installation.
Once the installer gets to the stage “Updating files…”, the following dialog appears:
In order to continue installation, please close the following application:
iTunes
No matter how many times you quit and re-open iTunes, the dialog refuses to disappear, and the installation is stuck.
It seems this must be a common problem, as Apple have posted a solution right at the top of the Xcode Developer Support Center. It turns out that the background process “iTunesHelper” is still running, and also needs to be quit. To do this:
- Open Activity Monitor (located in Applications/Utilities)
- Start typing “iTunes” into the filter box in the top right
- Select iTunesHelper from the list and click the Quit Process button.
As soon as you do this, the dialog should close, and Xcode should continue to install.
If you are wondering what actually iTunesHelper does, it’s simply a small background process that watches out for when an iPhone, iPod or iPad is connected and automatically launches iTunes. When you install iTunes, it gets set as a login item, meaning it automatically starts up every time you log in. Unfortunately, after installing Xcode, I went to my login items (under Users and Groups in System Preferences) to find this:

It seems something (either the Xcode installation or the upgrade to the latest version of iTunes) had broken the login items link to iTunesHelper. Luckily this is easy to fix. Go find iTunes in the Applications folder, and right-click it and choose Show Package Contents. You’ll find iTunesHelper in the MacOS folder. Simply drag it across into your login items and everything should be back to normal.
How To Build Your Own Safari Extensions
I’ve just written a tutorial over at Macs in Chemistry on how to create a Safari Extension. It’s aimed at beginners, with no prior knowledge required. A bit of experience with JavaScript will be useful to really understand what you are doing, but this is something you can pick up along the way.
The tutorial guides you through making an extension that searches the PubChem database, but you can easily adapt it to work with any search engine you want. If there is interest I can write a follow up that addresses some more advanced concepts like automatic updating and injecting content into web pages.
If you are interested in Safari Extensions check out the Mac OS X Tips Safari Extensions collection, and feel free to copy any of my code.
Extract the code from any Safari Extension
If you have been using any of the new Safari Extensions you might want to peek inside them to see how they work. Fortunately this is really easy because .safariextz files are just xar archives that can be extracted using the Terminal. Here's how you do it.
Start by downloading the Safari extension. It should come in the form of a file with a .safariextz extension. If you wanted to install the extension to use it in Safari you would just double-click it, but don't do that now as the file will disappear from your Downloads folder.
Instead open Terminal, located in the Utilities folder inside the Applications folder. In the window that appears, type the following line and then press return.
cd ~/Downloads/
This should be the path to the folder where the .safariextz file is located. You will need to change this if you have saved the extension somewhere else. For example you might use cd ~/Desktop/Extensions or /Users/matt/Documents/safariextensions/
If you are new to using the Terminal, note that starting with ~/ is a shortcut to inside your user folder, and starting with / is for inside your hard drive. The cd command is for changing directory, i.e. 'moving' to a folder.
Next paste in the following line and press return.
xar -xf 'TheExtensionName.safariextz'
You need to replace TheExtensionName with the filename of the extension. The quotes around the filename are only really important if it contains spaces. If you want to avoid typing in the name, you can just drag the file into the Terminal window from the Finder and it will be entered for you.
After you press return, a new folder will appear with the same name as the extension. This folder contains all the javascript, plist and HTML files that make up the extension. You can then go to the Extension Builder in Safari and click the plus (+) button to add the extension and edit it.
Try this out with some of the extensions I've made. Feel free to use any of my code for your own extensions. If you are feeling nice, leave a link back to http://www.macosxtips.co.uk/extensions.
Extensions in Safari 5
For me, yesterday’s most exciting announcement was the release of Safari 5. If you haven’t yet downloaded it, you can get it by going to Software Update in the Apple menu, or by downloading it from the Apple site. It has a whole load of great new features like Reader and Extensions, and we get our nice blue loading bar back and animated GIFs actually load in less than an hour.
Arguably one of the best new features is the support for Extensions. If you’ve ever used Firefox or Chrome you might be familiar with these. While the Safari Extensions gallery isn’t opening until “later this summer,” it is possible to enable Extensions right away.
To do this, first go to Preferences in the Safari menu. In the Advanced section, click the checkbox at the bottom to enable the Develop menu. Go to this menu (it should just appear in the menubar) and the select third item in the list, “Enable Extensions.” Now, when you go back to the preferences there is a new Extensions section. Considering the complexity of this process, I’m sure it won’t be long before Extensions are enabled by default.
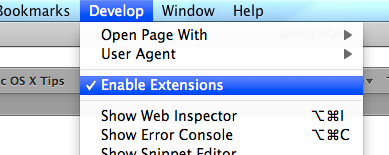
So now Extensions are enabled, where can you get them from?
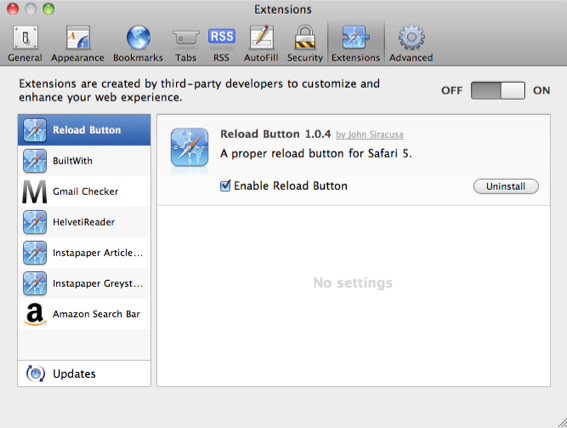
Well, before Safari 5 was even available, Panic managed to announce their Coda Notes extension. It looks great, but unfortunately it’s still “Coming Soon.” Almost as quick was John Siracusa, who has posted a simple extension on his Twitter feed that you can actually download. All it does is add a Reload button to the toolbar, something that many people have been asking for since it moved into the address bar in Safari 4. After you download the file, just double-click on it and it will be installed. It will actually be deleted from your downloads folder after it is installed, so don’t get confused when it disappears. Note that the button won’t be added to the toolbar automatically, you have to go to the View menu and choose “Customize Toolbar” to add it.
There are a whole load of other Extensions listed at this page. Currently there are things like a Gmail unread messages checker and an Amazon search bar, and it looks like new ones will be added as they are released. It is probably worth noting that as far as I know these haven’t been screened by Apple, so there might be an element of risk in downloading them. As always, you should only really download things from sources that you trust, so if you want to be really safe you might want to wait until the official Apple Extension Gallery is live.
[Update: There’s another great list of extensions over at reddit]
Once each Extension is installed, it should show up in the Extensions section of the preferences. From here you can enable and disable all Extensions, turn on automatic updates and uninstall any Extensions that you no longer want.
Display multiple inspector windows at once
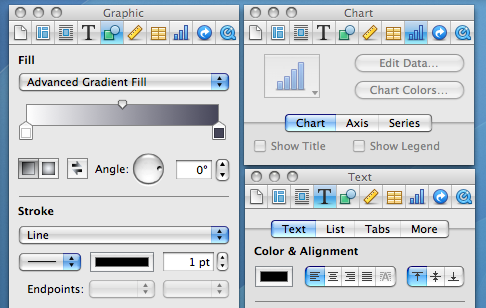
Inspector windows are small windows that allow you to change settings for whatever happens to be the currently selected object. They are the ones that have a thinner title bar, they always hover above other windows and they disappear when you change to a different application.
In most applications they contain information and settings about whatever object is selected. As you select different things, the contents of the inspector window will change, so you can always go to the same place to change the properties of that object.
Now you don't want multiple inspectors popping up, containing settings for different objects, because they are designed to keep all the information and properties in one location, so you always know where to find it. However, you might want multiple inspectors that contain different sections of the settings. For example, you might want one inspector for text settings, and one for graphics settings.
In most Apple applications, there is a single inspector with tabs along the top that allow you to change between different groups of settings. If you find yourself constantly jumping between different tabs while you work, there is a simple way to separate each tab out into its own inspector. Simply hold the Option key while clicking on a tab, and another inspector window will appear with the contents of that tab.
Using this, you can arrange the different inspectors around your screen for easier access. For example, in Pages you might want to keep separate Graphic, Text and Table inspectors always open.
Change the default text for pretty much anything in OS X
Change the default new folder name

First, navigate to Macintosh HD/System/Library/CoreServices. In here, locate the Finder application. Right-click (Control-click) on it, and choose "Show Package Contents" from the contextual menu. In the window that appears, navigate through to Contents/Resources/English.lproj. A quick way of navigating here (you might end up doing it a few times) is to use the "Go to Folder" option in the Go menu. In the box that appears, paste the following line:
/System/Library/CoreServices/Finder.app/Contents/Resources/English.lproj/Find the file named "Localizable.strings" and drag it to the Desktop to make a copy. We are going to edit this copy on the desktop, and then copy it back into the English.lproj folder to replace the original version. You might want to make an additional copy of the file as a backup, just in case anything goes wrong.
Open up the desktop version of the localizable.strings file using TextEdit. Scroll down to the line that starts with N2. it should say the following:
"N2" = "untitled folder";Now you can change the words "untitled folder" to anything you want. For something at the start of the alphabet, you could simply put "*untitled folder*".
Once you are done, save the file on the desktop and quit TextEdit. Finally, drag the file back to the English.lproj folder that you copied it from. Click Authenticate and type in your administrator password.
For changes to take place, you will have to relaunch the Finder, which can be done by holding down Control and Option, clicking the Finder icon in the Dock, and choosing Relaunch from the menu.
Suffixes for duplicates and aliases
These are done in exactly the same way as the new folder tip above. Only this time, change line N3 for aliases, or N4 for duplicates.In these cases, "^0" takes the place of the original file name. So, for a duplicate, the default is "^0 copy", meaning the duplicate of "file.doc" is "file copy.doc". As above, you can change this to anything you want. "copy of ^0" would mean the duplicate would work better with file extensions, giving "copy of file.doc". However, it wouldn't be next to the original file alphabetically.
Remember to relaunch the Finder when you are done.
Shorten the Finder's 'Show Item Info' text
One of the features I like about Mac OS X is the "Show item info" check box located in the View Options of the Finder. This works for all windows in icon view, and is therefore especially useful on the desktop. However, one problem with it is the text for Hard Drives is too long, unless you make the text size really small.You can solve this problem by editing the same localizable.strings file as above. Carry out the steps exactly the same, but search for the line "IV9" = "^0 free";. The best way to change this is to get rid of the word free, just leaving "IV9" = "^0";. You can see the result below.


Remove default Genres in iTunes
iTunes comes with a long list of genres, some of which many people will never use. Occasionally this may become annoying, for example when using the autofill feature.To remove some of the genres, you have to edit the localizable.strings file within iTunes, rather than within the Finder. You can find this by going to iTunes in the applications folder, right-clicking and choosing "Show Package Contents". In here, navigate to Contents/Resources/Englihs.lproj where you will find the localizable.strings file. As before, you will have to copy it to your desktop before editing.
Open up the file in TextEdit. You'll find the list of genres under the line
/* ===== Genres ===== */. To remove a genre, don't bother deleting it, just in case you ever want it back. Simply "comment" out the line, by putting a /* at the start, and a */ at the end. For example, to remove Techno, you will simply replace the line with /* "9200.019" = "Techno"; */.As always, quit and reopen iTunes for changes to take effect.
Change the iTunes sidebar labels
The most obvious reason for wanting to do this is if you would prefer the labels to be lowercase. Using the same localizable.strings file as in the genre tip above, find the following lines:"135.011" = "LIBRARY";
"135.012" = "DEVICES";
"135.013" = "STORE";
"135.014" = "PLAYLISTS";
You can change these to anything you want, or simply remove the capitalization.
Change the Finder's sidebar labels
You can do exactly the same thing in the Finder's sidebar. The file you need to edit is localizableCore.strings, located in exactly the same place as the localizable.strings file inside the Finder application. The lines you want to change are the following:"SD5" = "DEVICES";
"SD6" = "SHARED";
"SD7" = "SEARCH FOR";
"SD8" = "PLACES";
Customize System Preferences
All the System Preferences panes are grouped into five categories - Personal, Hardware, Internet and Network, System and Other. It is quite easy to change these category names by going inside the System Preferences package, which is in the Applications folder. Inside it, navigate to the English.lproj folder inside the Resources folder. In here, find a file named NSPrefPaneGroups.strings and drag it to your desktop. Now open this file up in TextEdit and you'll see the following lines:"personal" = "Personal";
"digitalHub" = "Digital Hub";
"hardware" = "Hardware";
"net" = "Internet & Network";
"system" = "System";
"addons" = "Other";
Don't change the words on the left, these are the ones used by System Preferences. You can change the words on the right. These are the ones displayed in the System Preferences window. Just make sure you don't delete any quotes or semicolons. Also, ignore the "Digital Hub" entry. This isn't used anymore and is probably just left over from a previous version of the operating system.
Now save the file and drag it back to the English.lproj folder from the Desktop. You will have to Authenticate this action with your administrator password.
Dock Menu items
For a bit of fun (I can't see why else) you can change the items in the menus you get when right-clicking on icons in the Dock. The Dock application is located in /System/Library/CoreServices. Right-click on it and choose "Show Package Contents". In the window that appears, navigate to Contents/Resources/English.lproj where you will find DockMenus.strings. Copy this file to the desktop to edit it.Some of the lines you might want to edit are the "Application Not Responding" and "Force Quit" lines to something more reflective of the feeling you get when you see them.
Change Unexpectedly Quit message
With some tinkering it is possible to customize Mac OS X alert messages and dialog box text. For a bit of fun, you can change the message that appears when an application crashes to something more humorous.Open up your hard drive and navigate to /System/Library/CoreServices. Find the Crash Reporter package and open it by right-clicking and choosing Show Package Contents.
In the window that appears, navigate to Contents/Resources/English.lproj and find Localizable.strings. Copy it to your Desktop and open it up in TextEdit. Near the bottom of the file you will see the line -
/* Unexpectedly quit dialog */
In the lines that follow this it is fairly obvious how to change the message. The symbol "%@" will make the message display the crashed Application's name, and "\n" will make a line break. Save the file and then copy it back to the package to replace the old version. You will have to enter your administrator password.

Peek inside Mac OS X Packages
Packages are great because they allow the developer to store all the important related files inside the application. They are also great because they make it very easy to tinker with the way applications work.
To view or edit a package's contents, Control-click (or Right-click) on the application and select Show Package Contents from the context menu. This will bring up a finder window containing a folder named Contents. Inside here is the actual package contents.
The following are a few examples of what you can do inside Mac OS X packages.
Warning: It is a good idea to keep a backup of any file you modify. To do this, just Option-drag the file to copy it to a safe place before making any changes to the original.
1. Change Unexpectedly Quit message
With some tinkering it is possible to customize Mac OS X alert messages and dialog box text. For a bit of fun, you can change the message that appears when an application crashes to something more humorous.
Open up your hard drive and navigate to /System/Library/CoreServices. Find the Crash Reporter package and open it by Control-clicking (or right clicking) and choosing Show Package Contents.
In the window that appears, navigate to Contents/Resources/English.lproj and find Localizable.strings. Copy it to your Desktop and open it up in TextEdit. Near the bottom of the file you will see the line -
/* Unexpectedly quit dialog */
In the lines that follow this it is fairly obvious how to change the message. The symbol "%@" will make the message display the crashed Application's name, and "\n" will make a line break. Save the file and then copy it back to the package to replace the old version. You will have to enter your administrator password.

2. Change an application's default icon
You probably know how to change an application's icon by opening up its Get Info window (Command-I), clicking on the icon and pasting a new one over it. You can use the Cut tool (Command-X) to remove this icon and return to the default. To change this default icon, you have to delve into the package. The icon file is stored in the Resources folder within the package contents, and normally has the same name as the application with the .icns extension. You can replace this file with any other icon file, whether it is downloaded from the Internet or taken from another application.
If you dislike the way the iCal icon always displays the date as July 17 when it isn't open, there is an alternative icon inside the iCal package. If you look inside the Resources folder you will find two icons - App.icns and App-empty.icns. To change which one iCal uses, simply rename App.icns something like AppJul17.icns and make a duplicate of App-empty.icns named App.icns.
Some people also dislike the iTunes 7 icon. This Mac OS X Hints article describes how to change it back to the one used in iTunes 6.
3. Open help files in a Web browser
Anyone who has ever used the Mac OS X help browser will admit that it is a little on the slow side. Annoyingly, it also lacks a Save command, meaning you have to go through the slow process of loading it up and finding what you want every time. Luckily, the help pages are just HTML files stored away inside the application's package. This means you can open them up in Safari, which is much quicker for browsing and allows you to save bookmarks and Save pages.
For example, to open up the iPhoto help, open up the iPhoto package in your Applications folder. Then navigate to the English.lproj folder inside the Resources folder. Here you'll find a folder called iPhoto Help with a file named iPhoto Help.htm inside. Double-click on this file to open it up in Safari.

Annoyingly, every now and again a link will open up in Help Viewer, but generally you can browse the help files from within Safari.
Things like Airport, Applescript, Bluetooth, iPod and Mac OS X itself don't have an Application package to store the help files in, so these are located in the Library folder. To find them, go to your Hard drive and look inside Library/Documentation/Help. Each of the .help files in here is a package.
4. Change Text Clipping Behaviour

5. Customize System Preferences
All the System Preferences panes are grouped into five categories - Personal, Hardware, Internet and Network, System and Other. It is quite easy to change these category names by going inside the System Preferences package, which is in the Applications folder. Inside it, navigate to the English.lproj folder inside the Resources folder. In here, find a file named NSPrefPaneGroups.strings and drag it to your desktop. Now open this file up in TextEdit and you'll see the following lines:
"personal" = "Personal";
"digitalHub" = "Digital Hub";
"hardware" = "Hardware";
"net" = "Internet & Network";
"system" = "System";
"addons" = "Other";
Don't change the words on the left, these are the ones used by System Preferences. You can change the words on the right. These are the ones displayed in the System Preferences window. Just make sure you don't delete any quotes or semicolons. Also, ignore the "Digital Hub" entry. This isn't used anymore and is probably just left over from a previous version of the operating system.
Now save the file and drag it back to the English.lproj folder from the Desktop. You will have to Authenticate this action with your administrator password.
6. Modify iCal alarm message
