Peek inside Mac OS X Packages
Packages are great because they allow the developer to store all the important related files inside the application. They are also great because they make it very easy to tinker with the way applications work.
To view or edit a package's contents, Control-click (or Right-click) on the application and select Show Package Contents from the context menu. This will bring up a finder window containing a folder named Contents. Inside here is the actual package contents.
The following are a few examples of what you can do inside Mac OS X packages.
Warning: It is a good idea to keep a backup of any file you modify. To do this, just Option-drag the file to copy it to a safe place before making any changes to the original.
1. Change Unexpectedly Quit message
With some tinkering it is possible to customize Mac OS X alert messages and dialog box text. For a bit of fun, you can change the message that appears when an application crashes to something more humorous.
Open up your hard drive and navigate to /System/Library/CoreServices. Find the Crash Reporter package and open it by Control-clicking (or right clicking) and choosing Show Package Contents.
In the window that appears, navigate to Contents/Resources/English.lproj and find Localizable.strings. Copy it to your Desktop and open it up in TextEdit. Near the bottom of the file you will see the line -
/* Unexpectedly quit dialog */
In the lines that follow this it is fairly obvious how to change the message. The symbol "%@" will make the message display the crashed Application's name, and "\n" will make a line break. Save the file and then copy it back to the package to replace the old version. You will have to enter your administrator password.

2. Change an application's default icon
You probably know how to change an application's icon by opening up its Get Info window (Command-I), clicking on the icon and pasting a new one over it. You can use the Cut tool (Command-X) to remove this icon and return to the default. To change this default icon, you have to delve into the package. The icon file is stored in the Resources folder within the package contents, and normally has the same name as the application with the .icns extension. You can replace this file with any other icon file, whether it is downloaded from the Internet or taken from another application.
If you dislike the way the iCal icon always displays the date as July 17 when it isn't open, there is an alternative icon inside the iCal package. If you look inside the Resources folder you will find two icons - App.icns and App-empty.icns. To change which one iCal uses, simply rename App.icns something like AppJul17.icns and make a duplicate of App-empty.icns named App.icns.
Some people also dislike the iTunes 7 icon. This Mac OS X Hints article describes how to change it back to the one used in iTunes 6.
3. Open help files in a Web browser
Anyone who has ever used the Mac OS X help browser will admit that it is a little on the slow side. Annoyingly, it also lacks a Save command, meaning you have to go through the slow process of loading it up and finding what you want every time. Luckily, the help pages are just HTML files stored away inside the application's package. This means you can open them up in Safari, which is much quicker for browsing and allows you to save bookmarks and Save pages.
For example, to open up the iPhoto help, open up the iPhoto package in your Applications folder. Then navigate to the English.lproj folder inside the Resources folder. Here you'll find a folder called iPhoto Help with a file named iPhoto Help.htm inside. Double-click on this file to open it up in Safari.

Annoyingly, every now and again a link will open up in Help Viewer, but generally you can browse the help files from within Safari.
Things like Airport, Applescript, Bluetooth, iPod and Mac OS X itself don't have an Application package to store the help files in, so these are located in the Library folder. To find them, go to your Hard drive and look inside Library/Documentation/Help. Each of the .help files in here is a package.
4. Change Text Clipping Behaviour

5. Customize System Preferences
All the System Preferences panes are grouped into five categories - Personal, Hardware, Internet and Network, System and Other. It is quite easy to change these category names by going inside the System Preferences package, which is in the Applications folder. Inside it, navigate to the English.lproj folder inside the Resources folder. In here, find a file named NSPrefPaneGroups.strings and drag it to your desktop. Now open this file up in TextEdit and you'll see the following lines:
"personal" = "Personal";
"digitalHub" = "Digital Hub";
"hardware" = "Hardware";
"net" = "Internet & Network";
"system" = "System";
"addons" = "Other";
Don't change the words on the left, these are the ones used by System Preferences. You can change the words on the right. These are the ones displayed in the System Preferences window. Just make sure you don't delete any quotes or semicolons. Also, ignore the "Digital Hub" entry. This isn't used anymore and is probably just left over from a previous version of the operating system.
Now save the file and drag it back to the English.lproj folder from the Desktop. You will have to Authenticate this action with your administrator password.
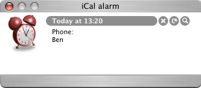
6. Modify iCal alarm message