Speed up iPhoto '09
It turns out you can speed things up by "vacuuming" the database that holds all your photos. This is basically just a Terminal command that does a bit of tidying up. Over time the iPhoto database becomes fragmented, with information scattered in various places around the database file amongst regions of empty space. The vacuum command cleans up the database by removing the unnecessary parts and reorganising the file structure.
To vacuum your iPhoto library, start by making sure iPhoto isn't open, and then open up Terminal (located in Applications/Utilities). Firstly, you have to point the Terminal to where your iPhoto Library is using the cd (change directory) command. By default, this should be:
cd "~/Pictures/iPhoto Library"Paste the above line into the Terminal, then hit return. If your iPhoto Library isn’t in your Pictures folder you will have to adjust the command to your specific needs. Next, to perform the vacuum, use the following command:
for dbase in *.db; do sqlite3 $dbase "vacuum;"; doneAs before, just paste this line in then hit return and you're done.
20 tips and tricks for iLife and iWork '09


iPhoto
1. Enable scrolling zoom in Places maps
The new Places feature in iPhoto allows you to explore your photos on a map. Photos taken on a GPS enabled camera (i.e. the iPhone) will be automatically geo-tagged, or you can enter the location information manually. Annoyingly, by default the maps don't allow you to zoom using the two-fingered scroll on the trackpad or a scroll wheel on your mouse. To enable this, just open up Terminal (in Applications/Utilities), type the following line and hit enter:
defaults write com.apple.iphoto MapScrollWheel -bool YESTo disable the scrolling zoom again, just repeat the command with NO at the end instead.

2. Include location information in uploaded photos
The default setting is for iPhoto to remove the geo-tagging information from your photos when you upload them to the web, presumably so people don't unwittingly broadcast their location to the world. If you want to keep the location information in uploaded photos, go to the Web section of iPhoto preferences and check the box next to "Include location information for published photos."
Changing a person's key photo is exactly the same as changing the key photo for an event. Just move your mouse from left to right over their photo on the corkboard to cycle through all the photos of that person. When one you like is displayed, just hit the space bar to make that the new key photo. If you can't find the one you want this way, just go into that person's photos, right click on the new key photo and choose "Make Key Photo" from the contextual menu.
4. Enter information about a person
When you hold your mouse over someone in Faces, an small i appears. Clicking on this will allow you to enter a full name and email address for that person. It will also show you the number of photos with that person in, and the range of dates of photos they're in.
5. Batch accept or reject faces
If you look at a person's photos in Faces, there will be a group of unconfirmed faces that iPhoto has identified for you. To confirm a large group of faces at once, just drag across all the photos. To reject a group of photos, hold the Option key while doing this. You can also just Option-click on photos to reject them individually.
6. Corner-achored resize when adding faces
iPhoto's default behaviour when adding a missing face is a centre-anchored resize. To change this to the usual corner-anchored resize, just hold down the option key when dragging over a face.
7. Easily switch between multiple libraries
iPhoto libraries are now double-clickable from the Finder. If you want to open a different library in iPhoto, just open up your Pictures folder and double-click a different library file. iPhoto will then load up with the new library. No need for holding Option on launch anymore.
GarageBand
8. Create iPhone ringtones
To create a free ringtone from any MP3 or AAC file just choose "Example Ringtone" from the iPhone Ringtones section in the New dialog. Delete the example that Apple has provided, then select a song from your iTunes library by clicking on the Media button in the bottom right. Drag your chosen song into your GarageBand project. Move and resize the yellow bar at the top to choose the section of the song you want to loop for your ringtone. Finally, choose "Send to iTunes" from the Share menu.
9. Use Learn to Play on PowerPC or Core Solo Macs
The new Learn to Play lessons in GarageBand require a dual core Intel based Mac to run. If you are running an old PowerPC Mac or Core Solo Mac Mini, you can get around this by going to /Library/Application Support/GarageBand/Learn to Play/Basic Lessons. Once here, double-click on one of the .mwand files to open it in GarageBand. Consider closing all the other applications on your Mac if the lessons run slowly.
iMovie
If the videos you want aren't in the Event Library, just right-click below your list of events to import videos from anywhere on your hard drive or from within an older iMovie file.
11. DVD chapters are back
One feature that disappeared for a while was the ability to add DVD chapters in iMovie. For a while you had to do a laborious work around involving GarageBand. Now you can add chapter markers in iMovie, and they'll be carried across when you export to iDVD.

12. Add a location to travel maps
If you want to use a location in the travel maps feature that iMovie doesn't have listed, you can add it to the locations file. Find iMovie in your applications folder, right-click on it and choose "Show Package Contents." In the Resources folder find WorldLocations.txt and open it up in TextEdit. On a new line, enter the place name followed by a tab, then the region followed by a tab, then the country followed by a tab, and finally the latitude and longitude separated by a comma. For example you could add
Duxford Cambridge UK 52.093851,0.184870iWork
13. Get the free trial
As well as the boxed version, Apple offers a free 30 day trial of iWork to download from their web site. One thing to remember though is if you don't intend to upgrade after 30 days, remember to save any new or changed files back in the iWork '08 format just in case they don't work any more once your trial expires. You can do this by choosing iWork '08 from the "Save copy as" menu in the Save As dialog.
14. Enable hidden picture frames
Pages, Keynote and Numbers all have various different styles of picture frame that you can place around any object by choosing it from the stroke menu in the Graphic Inspector. However, it turns out there are loads of frames that are disabled by default. You just need to edit a single file to enable them.
Choose the application where you want to enable the hidden frames (Pages, Keynote or Numbers), right click and choose "Show Package Contents". Look in the Resources folder for one of the three following files:
For Pages, look for SLGraphicInspectorFrames.plist
For Keynote, look for BGGraphicInspectorFrames.plist
For Numbers, look for LSGraphicInspectorFrames.plist
Open it up in TextEdit, and notice how the names of the different picture frames are listed. The new frames available with iWork '09 are Fine_Artist, Jet Set, Moroccan, Nature, Nature2, Typeset, Venetian, Venetian2, and Venetian3. For example just add <string>Fine_Artist</string> to the end of the list. As well as these new frames available in iWork '09, there are many more that also work in iWork '08 listed here.
http://nemws1.googlepages.com/keynoteframepreview
15. Temporarily disable guide lines
When moving objects around, all the iWork applications helpfully give alignment guides that will snap the objects so they are perfectly in line with each other. Sometimes, when you don't want objects aligned or you want to align them in a different way, this can be quite annoying. The way to temporarily disable the guide lines is to hold down the command key while you are dragging the object. Now your shape, image or text box can be freely dragged to whatever position you want.
16. Password protect iWork documents
This is something that has been annoyingly difficult to do on the Mac for a long time. Generally previous solutions involved creating encrypted disk images, however, now all the iWork applications have a "Require password to open" option in the Document section of the Inspector.
17. Export has moved
The export command that used to be in the File menu has now moved to the Share menu. Also, remember that if you want to export to Microsoft Word format, you can now do this directly from the Save As... option.
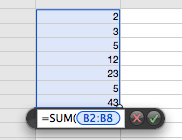
When creating functions and formulas in numbers, you almost always want to refer to another cell or group of cells. In Numbers '08 you had to use the mouse to select these cells, but now you can use the keyboard to select them. Simply hold down the Option key and use the arrow keys to move about. To select a group of cells, hold down Shift as well as Option, and continue using the arrow keys to make the selection. To change the reference from relative to absolute, just hit Command-K to cycle through all the different possibilities.
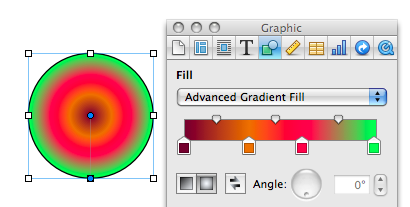
19. Advanced Gradients
The gradient fill options in iWork '08 were fairly limited. In iWork '09 you can now create linear or circular gradients with as many colours as you like by choosing "Advanced Gradient Fill" from the Fill menu.
20. Applescript in Numbers
One of the great new features of Numbers is Applescript support. Here are a few example scripts to give you an idea of what kind of thing is possible.
Export an iPhoto book to movie

Once your book is completed, you can view the slideshow by clicking the play button at the bottom. This will bring up the slideshow options. Make sure the random order check box is unchecked (you don't want your pages appearing in a random order) and choose the amount of time you want each page to appear for. To make the movie more book-like you will probably want to use the "page peel" transition, going left. You might also want to add some background music from your iTunes library.

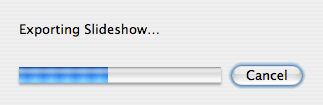
Instead of going to the slideshow, you will now be prompted to choose a location to save your movie. Give it a name and click export. Now your photo book is saved as a Quicktime movie that you can watch and share.
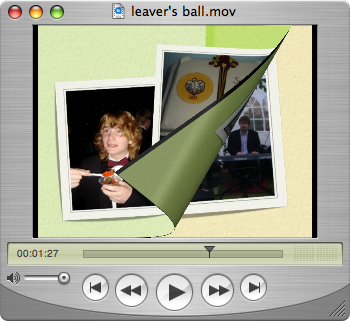
Photo Comparison in iPhoto
To use this photo comparison tool, you need to have iPhoto set to edit in the main window. Go to the iPhoto menu and choose Preferences. Set the drop down menu to edit photos in main window. Now go back to your photo library and decide on two photos to compare. Click the first one, and Command-click the second (i.e. select them both). Now double-click on one to enter the edit mode.
iPhoto will show your images side by side, ready for you to crop, enhance and retouch them. There are a few additional tricks to this as well. You can select more than two photos by just selecting more at the start (by Command-clicking). If you want to replace one of the photos you are comparing, click on it and then choose a different one from the thumbnail browser at the top of the window. If you want to add in a new photo to compare, Command-click on one of the thumbnails in the browser. To remove an image from the comparison, Command-click it in the thumbnail browser again.
A slightly different way of doing this is to edit in full screen mode rather than in the main window. You can do this by Right-clicking (Control-clicking) on you selected photos and choosing edit in full screen mode.
Slim Down iPhoto
If you have decided that you don't want your originals any more, getting rid of them can reduce the amount of hard drive space that your photo library takes up. There are two ways of doing this - using a few terminal commands, or using a free application called iPhoto Diet.
The terminal commands are from this MacRumors forum and come with a brief explanation of what they do. To run them, paste the following into the terminal:
mkdir ~/.Trash/iPhoto-Originals
cd ~/"Pictures/iPhoto Library/Modified/"
find . -type f -exec mv "../Originals/{}" ~/.Trash/iPhoto-Originals/ \;
This gives you a folder in the trash so you can check all the right photos are there before emptying it permanently. A summary of everything in the MacRumors forum has been made by Adriaan Tijsseling on his blog.
iPhoto Diet is a free application by Martin Fuhrer that does the same thing, but with more options and a nice user interface. This may take a little more time than the terminal commands, but it is much more user friendly and gives greater flexibility. It allows you to reduce you photo library size in the following ways:
• eliminate duplicate photos created internally by iPhoto or imported by yourself
• remove iPhoto's backups of rotated or modified photos
• strip the thumbnail icons of your photos
• remove thumbnail photos that have become mixed up with your high resolution photos
• identify photos which have not been added to albums
• weed out unnecessary folders and files from the library
• and more!
Download Links, installation instructions and an FAQ are available from Martin Fuhrer's site.
Secret advanced editing mode in iPhoto
![]()
First off, you need to check your settings are right. Load up iPhoto and go to the Preferences located in the iPhoto menu. You can only access the advanced editing mode if you have iPhoto set for image editing. Also, if you have iPhoto set to edit in a separate window, the advanced editing mode will be reset every time you enter edit mode. Choosing "Edit in Main Window" will make the advanced editing mode stay active until you quit iPhoto.
As usual, you need to double-click any image to enter edit mode. Choose the tool that you need (either retouch or red eye) by clicking on the icon at the bottom. Once this is selected, press Control-Caps Lock-9 at the same time, then release them. At first nothing will happen, but you are now in advanced editing mode. Pressing tab will cycle through the different advanced features, which will be shown by the cursor changing shape.
If you chose red eye, pressing tab once will switch the small cross hairs cursor to a large oval. Now, pressing the [ and ] keyes will allow you to resize the area of red eye correction. Pressing shift while clicking to apply the red eye correction will result in a lighter fill than with the normal tool.
If you chose retouch, pressing tab once will change the cursor to a circle with a number below it. This shows the size of the retouch tool. To resize it, press the [ and ] keys as with the red eye tool. To change the strength of the retouch, press Shift-[ and Shift-] and the number will change to show this. If you press tab a second time, the retouch tool changes into the lighten tool, which just lightens the area under the circle. As with the other tools, press [ and ] to resize it. Pressing tab again will bring you back to the normal retouch tool.
Quitting and re-launching iPhoto will return you to the normal editing mode, so you need to redo the Control-Caps Lock-9 keyboard shortcut if you want to enter the advanced mode again.
Speed up iPhoto
Open up iPhoto and go to the Preferences. Choose Appearance. If you uncheck Outline and Drop shadow, then slide the background all the way to white, you should notice that iPhoto starts up a lot quicker. This mainly helps with iPhoto 5's performance, as iPhoto 6 is already much snappier.
If you still find iPhoto to be slow, try holding down the command and option keys while its starting up. A diolog box should load up, asking if you want to rebuild your photo library. This has the greatest effect if you have a very large photo libary.
One final tip is to press 0, 1 or 2 while in your library. This sets your photos to one of the 3 default sizes, which load a lot quicker than the custom sizes you get when dragging the slider.
Now your iPhoto library should scroll like butter!
Multiple Desktop Images
In the System Preferences it is easy to make your desktop cycle through a series of images. Just open up System Preferences and click the desktop and screen saver section.
At the bottom of the desktop tab there is an option to change the picture for a given amount of time. With this selected, your desktop will cycle through the images in the iPhoto album or folder you have selected.
But what if you want a selection of photos that aren't in an album together, or want to use multiple albums? Open up iPhoto and click on any image. Clicking on the "desktop" button at the bottom will set this image as your desktop background. Select multiple images using shift-click (if they are in a row) or command-click (if they are separated by other photos), and click the desktop button. If you open up system preferences now, you can see that your desktop is set to cycle through these images.
An added quirk is that your screen saver is also set to make a slideshow of these pictures.