Add columns to Spotlight search results
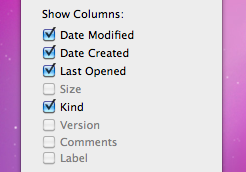
A major complaint about Snow Leopard is that you cannot add the Size column to Spotlight search results window. This is the window that you get by choosing “Show All” in Spotlight or by pressing Command-F in the Finder. When you go to add columns to it by choosing “Show View Options” from the View menu, you’ll find that Size, Comments, Version and Label are all greyed out.
These options used to be available in previous versions of Mac OS X, so it’s unusual that they are now disabled. You might assume that Apple disabled these columns for a reason, so bear this in mind before following these instructions to enable them again.
If you have the developer tools installed, you can enable the columns again using the included Property List Editor. If you don’t already have the developer tools then it’s not worth installing them for such a small task. Instead, you can download and use TextWrangler (free) instead.
Using Property List Editor
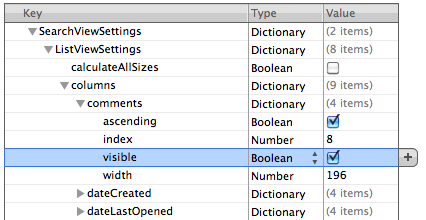
If you are using Property List Editor, start by going to your user folder and then navigate to Library/Preferences. In the Preferences folder find the file named “com.apple.finder.plist.” Double-clicking on this file should open it up in Property List Editor. If not, just right-click on it and choose “Open With - Property List Editor.”
Once the file is open, scroll down the list to “SearchViewSettings.” Click the disclosure triangle next to it, and then do the same for “ListViewSettings” and then “columns.” Now you should see a list of all the available columns. Click the triangle next to the column you want to add, i.e. size, and then check the box next to “visible.”
Once you are done, save the file by pressing Command-S. Finally, you will need to restart the Finder for the changes to take effect. The easiest way to do this is top hold down the Control and Option keys, click on the Finder icon in the Dock and choose “Relaunch.”
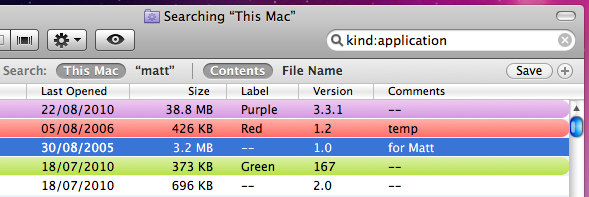
Now just press Command-F to bring up a search window and you should have your extra columns enabled.
Using TextWrangler
With TextWrangler, the process is very similar, but just a tiny bit more complicated. Firstly, make sure you have downloaded and installed TextWrangler. Next, go to your user folder and then navigate to Library/Preferences. In the Preferences folder find the file named “com.apple.finder.plist.” Right-click on this file and choose “Open With - TextWrangler.” Once the file is open, you want to find the line that says
<key>SearchViewSettings</key>
Don’t bother scrolling through the file looking for it - for me it is on line 4973! Instead, just press Command-F and type “SearchViewSettings” into the find field. Once you have found the line, look about 8 lines below it. You should see something like this:
<key>comments</key>
<dict>
    <key>ascending</key>
    <true/>
    <key>index</key>
    <integer>8</integer>
    <key>visible</key>
    <false/>
    <key>width</key>
    <integer>196</integer>
</dict>
This should then be followed by a similar 11 lines for each of the other possible columns. Find the one you want to enable (Size, Comments, Version or Label) and look for this:
<key>visible</key>
<false/>
Replace this with:
<key>visible</key>
<true/>
and you’re done! Just save the file by pressing Command-S, then restart the Finder by holding down the Control and Option keys, clicking on the Finder icon in the Dock and choosing “Relaunch.”
Terminal commands for improving Spotlight
Spotlight works great most of the time, but occasionally you may need to do a bit of tinkering to get it to work properly. Most of us have probably had a problem where Spotlight won’t find a file you know is there. Here are a few Terminal commands for changing hidden Spotlight settings, performing more complicated searches and updating the index.
Add a file to the Spotlight index
In theory, all files are added to the Spotlight index when they are created. However, every now and again something goes wrong and a stubborn file might refuse to show up. To manually add it to the index, you can use the following command. Start by opening up Terminal (located in Applications/Utilities). Type in mdimport and then hit the space bar. Next, find the file you want to add in the Finder, and drag it onto the Terminal window. Terminal should automatically type in the path to the file for you. Of course, if you know the path you can type it in manually yourself. Finally, hit return and the file should now show up in you Spotlight searches.
Add a folder to the Spotlight index
Adding a folder works in exactly the same way as with a file. However, in Mac OS X 10.4 Tiger and earlier, the command is slightly different if you want the contents of the folder to be indexed too. In that case use mdimport -f instead. You might want to use this to add the System folder with mdimport -f /System as it isn't searchable by default.
Search Spotlight from the Terminal
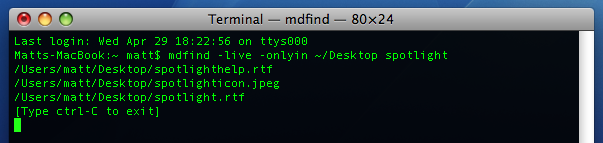
Considering Spotlight is so quick and easy to access, you will probably only use this if you are already working in the Terminal and want to find a file, or if you want some extra options. To do a search, just type mdfind query where query is what you want to search for. To limit this to a specific folder, instead use mdfind -onlyin ~/Desktop query replacing ~/Desktop with the path to your folder. To run a “live” search which will update the results as users add files, use mdfind -live query. Control-C will stop it updating. To see all the other options, look at the man page by typing man mdfind into Terminal.
Re-index an entire drive
If you are having problems with your Spotlight index, you might want to start over and re-index your hard drive. In the Terminal, type sudo mdutil -E / and hit return. You may have to enter your password. The existing Spotlight index will be deleted, and Spotlight will start creating a new index in the background. You can re-index other hard drives by changing the command to include their name, like sudo mdutil -E /Volumes/OtherHardDrive.
Re-index a specific file format
When Spotlight adds a file to the index, it checks to see if it recognises the file type and then uses an mdimporter plugin to index the contents if it does. Each file format has its own plugin, and most are located in Macintosh HD/System/Library/Spotlight or Macintosh HD/Library/Spotlight. Double clicking on a plugin will give you the option to re-index all the files associated with it. Alternatively, you can do this from the Terminal with the command mdimport -r. For example, mdimport -r /System/Library/Spotlight/Chat.mdimporter would cause all of your chat files to be re-indexed.
Add a new file format to the Spotlight index
One of the great things about Spotlight is that it will index the contents of many types of files. For example you can search for a word written in a PDF document or the telephone number of one of your contacts. Many third party applications require plugins to make Spotlight index their file's contents, which are available on the Apple Spotlight plugins page.
Make Spotlight index source code
Apple's developer tools come with a source code mdimporter plugin that allows Spotlight to search the contents of your source code. However, if don't want to install the developer tools (it's a big download) then you can just modify the rich text mdimporter plugin to handle the same job. Go to Macintosh HD/System/Library/Spotlight and find the RichText.mdimporter file. Right-click on it and choose "Show Package Contents". Inside the Contents folder, double-click on the info.plist file to open it in TextEdit. Near the top you will see a list that looks like this:
<string>public.rtf</string>
<string>public.html</string>
<string>public.xml</string>
<string>public.plain-text</string>
<string>com.apple.traditional-mac-plain-text</string>
<string>com.apple.rtfd</string>
<string>com.apple.webarchive</string>
<string>org.oasis-open.opendocument.text</string>
<string>org.openxmlformats.wordprocessingml.document</string>
You can add any of the following lines to the end of this list to enable Spotlight to index the contents of the specified format:
<string>public.c-header</string>
<string>public.c-plus-plus-header</string>
<string>public.c-source</string>
<string>public.objective-c-source</string>
<string>public.c-plus-plus-source</string>
<string>public.objective-c-plus-plus-source</string>
<string>com.sun.java-source</string>
<string>public.perl-script</string>
<string>public.python-script</string>
<string>public.csh-script</string>
<string>public.shell-script</string>
<string>public.ruby-script</string>
<string>public.php-script</string>
<string>com.netscape.javascript-source</string>
When you are done, you will want to double-click on RichText.mdimporter to re-index all these file formats.
If you have another file format that is a really just a text file under the hood, you can find out what to add to the info.plist file by running mdimport -n -d1 somefile.ext in the Terminal. The output should contain a "type" that looks something like the items in the list above.
Remove something from the Spotlight index
This is really straightforward, but I thought I'd include it for completeness. Simply go to System Preferences and click on Spotlight. In the Privacy tab, click the plus (+) and choose your file or just drag it from the Finder.
Address Book Tips
Add Contacts to your Safari Bookmarks
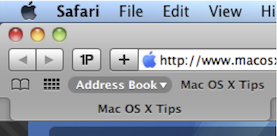
If lots of your contacts have their own web sites, you might be interested to know that you can automatically add these to your Safari bookmarks bar. Open up Safari go to the Preferences (in the Safari Menu). In here click the Bookmarks tab and check the box that says “Include Address Book” in the Bookmarks Bar. Now a new folder will appear at the far left of your Bookmarks bar. In here will be the web sites of all you contacts who have a home page set in their Address Book entry.
Address Book integrates quite well into iChat, the Mac OS X instant messenger. If a person in your Address Book is online and using iChat, a little green dot will appear next to their picture. Clicking on the dot will open up iChat, where you can start a new conversation with the person.
Put your Contacts in the Spotlight
In Address Book, select which contact you want to search, right-click on their name and choose “Spotlight [name]”. The spotlight window will pop up, and show documents, photos, iCal events, mail messages and iChats related to this person. This is one of my favourite features of Spotlight — it allows you to use it as a personal organiser and links together Address Book, iCal, Mail and iChat.
If you don't have Address Book open, you don't need to bother opening it up to Spotlight search someone. Simply type their name into Spotlight for the same results.
Moreover, Spotlight remembers files that people have sent you. When searching for one of your contacts, Spotlight will list any files they sent as attachments to you, providing you received them in Mail.
Highlight Groups
If you hold down the Option key while you are viewing a contact, all the groups that they are in are highlighted in a lovely yellow.
Merge two contacts
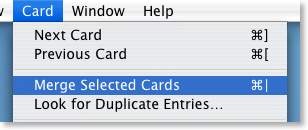
If somehow you end up with two entries in your address book for the same person, you can easily merge the two. Select the two entries by clicking on one in the list and then Command-clicking on the other. Now click on the Card menu and choose “Merge Selected Cards”. If you have a huge contact list and you suspect some duplicate entries, you can also choose “Look for Duplicate entries” from the Card menu.
Large Type
If you want to read a person's phone number off the screen while dialing it across the room, you can make it display in large numbers across the screen. To do this, click on the number and choose “Large Type” from the pop-up menu.
Address Book Sharing
If you want to share your address book (for example with your family or secretary) you can do so via MobileMe, Yahoo!, Google or an exchange account. In Address Book just go to the Preferences and click on the Accounts tab. Be careful with the Google and Yahoo synchronisation though, you might end up accidentally adding everyone you ever sent an email to into your address book.
Using vCards
In reality, most people don't have .Mac, so the standard way to share contacts is using vCards. A vCard is a file containing a contact's information that you can attach to an email and send to whoever you want. Luckily, vCards work really well with Address Book.
To create a vCard for a specific contact, select them from the list and right-click (Control-click) on their name. From the pop-up menu choose "Export vCard...".
To create a vCard that contains the information for all the people in a certain group, select the group you want from the list, right-click on it and choose "Export Group vCard...".
If you receive a vCard from someone else as an email attachment, you can add it to your address book in a couple of ways. If you received it in Mac OS X's Mail application, simply drag it from the email message across to Address Book. If not, save it to your Hard Drive and then choose Import vCards (Command-O) from the File Menu in Address Book.
Make Your Own Card

Restrict Private Information
If you don't want to share all of your contact information with everyone you send your vCard to, you can choose to keep certain parts private. Go to the Address Book Preferences and check "Enable Private Me Card". Now when you edit your own card, you can use the check boxes to choose which information is exported as your vCard.
Printing Envelopes
You can print an envelope addressed to a contact by choosing Print from the File menu with the chosen person selected. In the print dialog you might have to click the blue disclosure triangle to show all the settings, and choose Envelopes from the Style drop-down menu.
Reduce Preview's PDF zoom after Spotlight
When you click on the PDF in the Spotlight results, it opens up in Preview with the search term highlighted throughout the document. This is pretty useful, however the PDF is actually zoomed in 280 percent. This means you can read the word you searched for pretty easily, but you can't see anything else.
![]()
Luckily, by changing one line in the Preview preferences, you can change the zoom level to something less extreme. The easiest way to do this is using the Terminal.
First, quit Preview if it is running and open up Terminal from the Utilities folder in the Applications folder. Type the following line and press return:
defaults write com.apple.Preview Preview -dict-add PVPDFSpotlightSelectionSize 10The 10 at the end corresponds to a 100% zoom level. By default, this number is set to 28, or 280% zoom. If you want some zoom, but not quite as much, try a number like 15 for 150% zoom.
If you don't want to use the Terminal, or you are curious to see what the command actually does, you can open up the preference file in Property List Editor (which you will only have if you have installed the Developer Tools from the Mac OS X install Disk). Go to your user folder and navigate to Library/Preferences and open up com.apple.Preview.plist using Property List Editor.
![]()
Use the expansion Triangles to navigate to Root/Preview/PVPDFSpotlightSelectionSize. Here you can see the number is 28 (or 10 if you have already changed it in the Terminal).
Spotlight Tips
By default, you can access Spotlight by using the keyboard shortcut Command-Space. You can also bring up the Spotlight window by pressing Command-Option-Space. Both of these shortcuts are customisable from the Spotlight pane in the System Preferences. If the chosen combination clashes with another one on your computer a warning symbol will appear next to it. To fix this, click on the warning triangle to go to the Keyboard and Mouse pane that allows you to view all keyboard shortcuts and see which ones are the same.

In all Cocoa apps (Safari, Mail, TextEdit etc.) you can quickly search for selected text in Spotlight. The first way of doing this is to Right-click (Control-click) on a word to bring up the context menu. The first option in the list is "Search in Spotlight". If you want to search multiple words, you will need to select them before bringing up the menu. You can also achieve the same effect by selecting the text and pressing Command-Shift-F (or by going to the Services menu and choosing Spotlight).
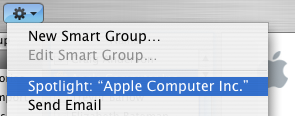
There are two ways of putting your contacts in the spotlight. The simplest method is to just type the person's name into Spotlight. The alternative option is to do it via Address Book. Select which contact you want to search, and from the Action Menu (looks like a cog, located in the top left) choose "Spotlight [name]". The spotlight window will pop up, and show documents, photos, iCal events, mail messages and iChats related to this person. This is one of my favourite features of Spotlight - it allows you to use it as a personal organiser and links together Address Book, iCal, Mail and iChat.
Moreover, Spotlight remembers files that people have sent you. When searching for one of your contacts, Spotlight will list any files they sent as attachments to you, providing you received them in Mail.
To immediately choose the "Top Hit" press Command-Return. This shortcut makes Spotlight a bit better as an application launcher. If you press Command-Return on any other item it will bring up the enclosing folder in the Finder (i.e. Show in Finder). The same thing happens if you Command-click any item.
Spotlight indexes far more than you might expect. In iPhoto, keywords and photo titles are indexed, and in iChat your chat transcripts are as well. In terms of third party applications, Delicious Library indexes your movies and books, Microsoft Office indexes the author, title and description of your documents and Newsfire indexes the titles and contents of feed items.
On the Apple Spotlight downloads page there are loads of plugins to enhance your Spotlight searches. Some add Spotlight functionality to unsupported applications, while others allow access to internet search engines from Spotlight.
You can perform Spotlight searches from the Terminal. the mdfind command will perform a spotlight search with many flexible options. However you don't have to use the Terminal to access these advanced options. Mac Geekery has an article describing how to execute raw Spotlight queries from the Finder http://www.macgeekery.com/tips/how_to_execute_raw_spotlight_queries_in_the_finder
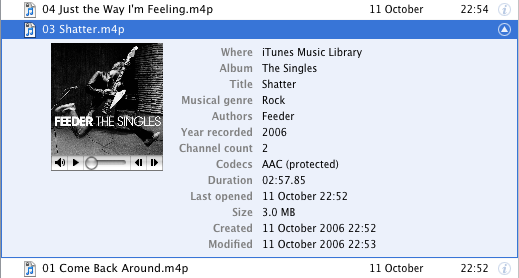
In the Spotlight window there is an info icon next to each search result. Clicking this will give you loads of useful information about that result. It's like choosing "Get info..." on a file in the Finder, only you can do it on iCal events, fonts, music, emails and contacts.
There are loads of keyboard shortcuts for manipulating the Spotlight menu. Most of these correspond to the normal behaviour in other Mac OS X menus. Use the Up and Down keys scroll up and down the menu. Command-Down will move to the first item in the next category, Command-Up Arrow will move to the first item in the previous category. Control-Up or the Page up key will move you to the first item in the menu, and Control-Down or Page down will take you to the last item in the menu. Command-Left and Command-Right will skip to the start or end of the search field, while Tab will select all text in the search field and Escape will clear it. If you press Escape with the search field empty, the Spotlight menu will close.
You can narrow you searches by specifying a kind. For example, to search for "Hello" but only in your music files, you would type "Hello kind:music". This can be done for almost any type of file - applications, movies, images, contacts and mail.
Using the same method as above, you can choose for Spotlight to only display files opened in a certain date range. For example, you would use "date:yesterday" to specify only files opened yesterday. Choosing a future date will display upcoming iCal events and to do items.
From the Spotlight pane in System Preferences you can enable, disable and rearrange categories. In the Privacy tab you can disable searching of specific locations.
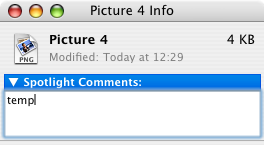
To improve your Spotlight searches you can assign Spotlight Comments to files in the Get Info window. Access this by selecting your file in the Finder and pressing Command-I. Now you can set comments such as "urgent" or "temp" to make that file appear when those keywords are searched in Spotlight.
Reveal in Finder
Less obviously, Command-Clicking on an icon in the Dock will do just the same. But it doesn't end there. Command clicking has a similar effect when clicking icons in other places.
For instance, in the title bar of any cocoa app, you will see the name and icon of the open file. Command-Clicking on the icon brings up a list of all the enclosing folders.
Another example that could save you hours of wasted time, is command clicking spotlight results. This one is especially useful, as the other option (clicking on show all, finding the result, right-clicking and selecting show in finder) takes a long while in comparison.