Create your own keyboard shortcuts

To do this, open up System Preferences and go to the Keyboard and Mouse pane. From the "Keyboard Shortcuts" tab you can view and edit all existing keyboard shortcuts for the system. To change any of them, double click on the current key combination then type your own. If the one you set clashes with any others, a warning icon will appear next to it. To disable a shortcut, uncheck the box next to it on the left.
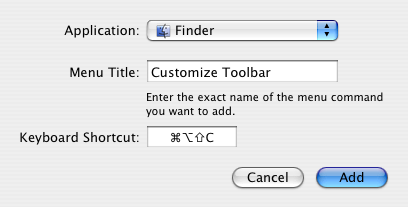
Note that this list does not contain any application specific shortcuts. At the bottom there is a section for "Application Keyboard Shortcuts" but this is probably empty. The only ones that appear here are the shortcuts that you create. Click the small plus (+) button below the list to bring up a dialog box that allows you to choose an application and menu command and assign a keyboard shortcut to it.
The drop down menu contains all the applications in the applications folder, but if you want another one, choose other from the bottom of the list. Next enter the exact name of the menu item you want to create the shortcut for. This can be anything that appears in an application's menus, but don't forget to include the "..." at the end if the item has it (e.g. Customize Toolbar...").

The keyboard shortcut can use a combination of the Command, Control, Option and Shift keys, as well as any of the function keys (F1, F2 etc.). For some of the nested menu items it isn't obvious what to type. For example, to choose the menu item "Arrange by --> Kind" you have to type "By Kind".
After entering all the details, click add and your shortcut will be added to the bottom of the list under "Application shortcuts". You will have to quit and reopen the application for everything to start working. To do this for the Finder, Control-Option click on its Dock icon and choose Relaunch.