Automatically create Calendar events when receiving email
I’m always looking for ways to automate the most repetitive tasks I find myself doing on my Mac. The other day, I realised that I spend a lot of time manually creating Calendar events by copying information from booking confirmation emails. This is exactly the sort of task that can be easily automated to save you a little bit of time and effort every day.
Here’s how you can set up a custom rule in Mail app that runs a short AppleScript to create a new event in Calendar app.
To illustrate how to do this, I’m going to use an example that I’ve set up for myself. I regularly receive booking confirmation emails from my local cinema that look like this:
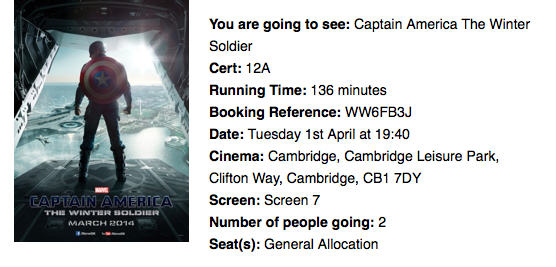
All the information to create a Calendar event is there in the text, but it is annoyingly time consuming to do this manually. Let’s set up a Rule to process these emails automatically.
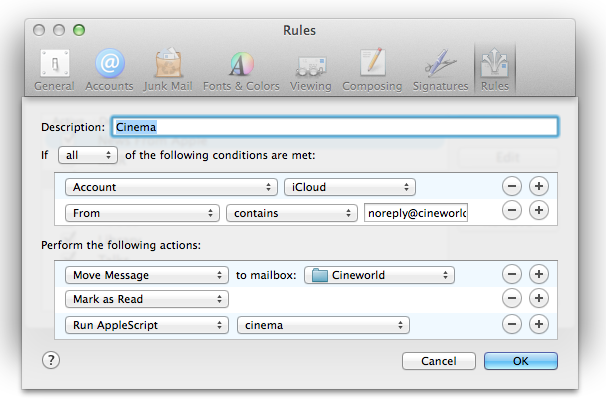
In Mail app, choose Preferences from the Mail menu, and click on the Rules tab. Create a new rule, and adjust the drop down menus to look like the screenshot below. The first section shows the conditions required to apply the rule to a message. In my case, I restrict the rule to only messages from “noreply@cineworldmail.com” in my “iCloud” account. When an email that meets these criteria is received, a series of actions are performed. First the message is moved out of my inbox into another mailbox, and it is marked as read.
The final action is the most complicated. It is a custom AppleScript that reads the email, figures out the name, date, time and location, then creates a Calendar event.
When you first choose Run AppleScript from the drop down menu, there will not be any AppleScripts available for you to run. First we have to create one.
To do this, open up AppleScript Editor. This is located in the Utilities folder in the Applications folder, or you can find it using Spotlight search or Launchpad. In the script window that appears, paste the following script:
-- Triggered by Mail rule.
using terms from application "Mail"
    on perform mail action with messages msgs for rule theRule
        tell application "Mail"
            repeat with msg in msgs
                try
                    set msgcontent to content of msg
                    set msgid to message id of msg
                    set {movie, runtime, cert, bref, starttime, addr, screen} to my parseMsg(msgcontent)
                    my createEvent(movie, runtime, cert, bref, starttime, addr, screen, msgid)
                end try
            end repeat
        end tell
    end perform mail action with messages
end using terms from
This is the general format of all Mail rule AppleScripts. One of the benefits of AppleScript is that it is very close to normal English language, and you can get some idea of what a script does even if you aren’t familiar with AppleScript. The above script takes each email message that the rule matched, and runs a function called parseMsg on it to extract the event details. Then it runs a function called createEvent using those details.
Next, below this paste the following functions:
-- Parse the email content to extract movie details.
on parseMsg(msgcontent)
    set movie to extractBetween(msgcontent, "You are going to see: ", "Cert: ")
    set cert to extractBetween(msgcontent, "Cert: ", "Running Time: ")
    set runtime to extractBetween(msgcontent, "Running Time: ", " minutes")
    set bref to extractBetween(msgcontent, "Booking Reference: ", "Date: ")
    set datestring to extractBetween(msgcontent, "Date: ", "Cinema: ")
    set addr to extractBetween(msgcontent, "Cinema: ", "Screen: ")
    set screen to extractBetween(msgcontent, "Screen: ", "Number of people going: ")
    set starttime to parseDateString(datestring)
    return {movie, runtime, cert, bref, starttime, addr, screen}
end parseMsg

-- Extract the substring from between two strings
to extractBetween(theString, startText, endText)
    set tid to AppleScript's text item delimiters
    set AppleScript's text item delimiters to startText
    set startComps to text items of theString
    set AppleScript's text item delimiters to endText
    set endComps to text items of second item of startComps
    set AppleScript's text item delimiters to tid
    return trim(first item of endComps)
end extractBetween

-- Trim all whitespace from start and end of a string
on trim(theString)
    set theChars to {" ", tab, character id 10, return, character id 0, character id 8232}
    repeat until first character of theString is not in theChars
        set theString to text 2 thru -1 of theString
    end repeat
    repeat until last character of theString is not in theChars
        set theString to text 1 thru -2 of theString
    end repeat
    return theString
end trim

-- Parse date and time from the string given in the email.
on parseDateString(datestring)
    set theDate to current date
    set dateWords to words of datestring
    set day of theDate to text 1 thru -3 of item 2 of dateWords
    set time of theDate to (item 5 of dateWords) * hours + (item 6 of dateWords) * minutes
    set monthList to {January, February, March, April, May, June, July, August, September, October, November, December}
    repeat with i from 1 to 12
        if item 3 of dateWords = ((item i of monthList) as string) then
            set monthNumber to (text -2 thru -1 of ("0" & i))
            exit repeat
        end if
    end repeat
    set month of theDate to monthNumber
    return theDate
end parseDateString
This is the core of the AppleScript, which parses the email to extract the event details. The way it works is to extract the text between two other pieces of text. For example, it extracts the text between You are going to see: and Cert: and sets it as the name of the movie. You will need to modify this to match the exact format of your email. A bit of trial and error may be necessary, so you may want to test the rule on emails you send to yourself.
Finally, paste the following function that creates the Calendar event:
-- Create a calendar event for the specified movie.
on createEvent(movie, runtime, cert, bref, starttime, addr, screen, msgid)
    set endtime to starttime + runtime * minutes
    tell application "Calendar" to tell calendar "Home"
        set theEvent to make new event with properties {start date:starttime, end date:endtime, summary:"Cinema: " & movie}
        set location of theEvent to screen & ", Cineword " & addr
        set description of theEvent to "Booking Reference: " & bref & return & "Run Time: " & runtime & " minutes" & return & "Certificate: " & cert
        set url of theEvent to "message://" & "%3c" & msgid & "%3e"
    end tell
end createEvent
You will also need to modify this to match the exact details in your email messages. Above, I set the name of the even to the title of the movie and I calculate the end time by adding the running time of the movie to the start time. I set the location of the event to the screen number and the cinema address, and I add a few details to the event notes like my booking reference number. Setting the url of the event to the email message id also provides a handy link back to the original email message from within Calendar.
You can find the full script here.
Now all we need to do is save the AppleScript somewhere Mail can see it. Choose Save from the File menu, and then press Command-Shift-G to bring up the Go to folder dialog. In the text field, type ~/Library/Application Scripts/com.apple.mail and press Return. Give the script a memorable name and save it. Now, when you return to Mail, your script should be available in the drop down menu next to “Run AppleScript”.
Automatically save Mail attachments using AppleScript
Here’s a simple AppleScript that’s great for if you regularly receive email attachments that you want to save in the same folder. This is really useful in situations where you receive regular reports via email, or even if you just want to be able to quickly delete emails without worrying about losing the attachments.
The script works in conjunction with “Rules” in Mail, which makes it really easy to filter out the attachments that you want to save. Once it has these attachments, the script simply adds a timestamp to the name and saves them in the specified folder. Here’s a step by step guide on how to set everything up.
First, start by opening up AppleScript Editor (located in Applications/Utilities). Copy and paste the following script into the empty window:
on perform_mail_action(ruleData)

    -- The folder to save the attachments in (must already exist)
    set attachmentsFolder to ((path to home folder as text) & "Documents:Attachments") as text

    -- Save in a sub-folder based on the name of the rule in Mail
    set subFolder to name of |Rule| of ruleData as text
    tell application "Finder"
       if not (exists folder subFolder of folder attachmentsFolder) then
           make new folder at attachmentsFolder with properties {name:subFolder}
       end if
   end tell

    -- Get incoming messages that match the rule
    tell application "Mail"
       set selectedMessages to |SelectedMessages| of ruleData
        repeat with theMessage in selectedMessages

            -- Get the date the message was sent
            set {year:y, month:m, day:d, hours:h, minutes:min} to theMessage's date sent
            set timeStamp to ("" & y & "-" & my pad(m as integer) & "-" & my pad(d) & "-" & my pad(h) & "-" & my pad(min))

            -- Save the attachment
            repeat with theAttachment in theMessage's mail attachments
               set originalName to name of theAttachment
                set savePath to attachmentsFolder & ":" & subFolder & ":" & timeStamp & " " & originalName
                try
                   save theAttachment in savePath
               end try
           end repeat
       end repeat
   end tell

end perform_mail_action

-- Adds leading zeros to date components
on pad(n)
   return text -2 thru -1 of ("00" & n)
end pad
Click the Compile button to check that you have copied everything correctly. If you receive an error, something isn’t right.
Take a look at the script and see if you can figure out what each part does. One of the great things about AppleScript is that even people who have never seen it before can get the gist of what a script does. The third line specifies the folder where the attachments will be saved — you might want to change this. It is currently set to a folder called “Attachments” located in the Documents folder. Whatever folder you choose, you need to go into the Finder and create it if it doesn’t already exist.
Save the script and remember the location. I recommend creating a “scripts” folder in your Documents folder that you can use to store all your scripts.
The final step is to open up Mail and create a new rule. To do this, go to Mail’s Preferences, and click the Rules tab. Click the “Add Rule” button, and give the new rule a name. This name will be used to create a sub-folder within the Attachments folder, meaning you can create multiple rules to filter different types of attachment.
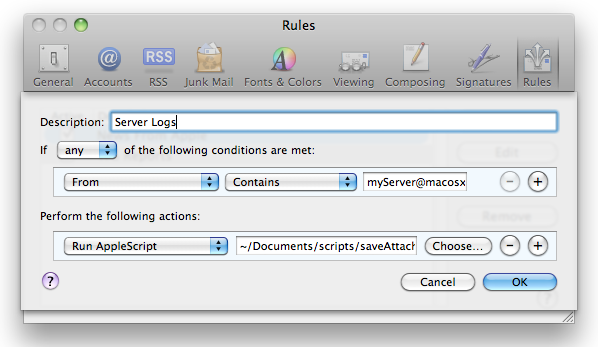
Next, you will need to set the conditions that need to be satisfied for the attachment to be saved. Using the “Any Attachment Name” you can filter attachments of a specific kind using their file extension, for example saving only PowerPoint presentations or only images. Alternatively you can save only attachments from a specific person, or simply save all the attachments sent to your email address.
Once you have set up your conditions, choose “Run AppleScript” from the perform actions drop-down menu, and click the “Choose” button to select the script you saved earlier. You can also add additional actions as well as the script, such as deleting the message or moving it into another mailbox.
One interesting way to use this script would be to put the attachments folder in your Dropbox or iDisk. Then your attachments are automatically synced to the cloud, making them accessible from anywhere.
Fix "Copy Address" in Snow Leopard Mail
Here’s a tip I just read over at the brilliant Hawk Wings blog.
You can copy a person's email address in Mail by clicking on their name and choosing "Copy Address from the contextual menu. For some reason, Snow Leopard will copy the email address in angle brackets, instead of just the address. So when pasting you will get <matt@macosxtips.co.uk> instead of just matt@macosxtips.co.uk.
This might be useful for some people, but I really prefer the previous behaviour. To change the behaviour of Mail back to the old way without angle brackets, just use the following Terminal command:
defaults write com.apple.mail AddressesIncludeNameOnPasteboard -bool NO
To run it, open up Terminal located in Applications/Utilities. Paste in the line, then hit return. Quit Mail if it is open, and now when you next open it you won't get any angle brackets when copying addresses.
Customize default fields for new messages in Mail
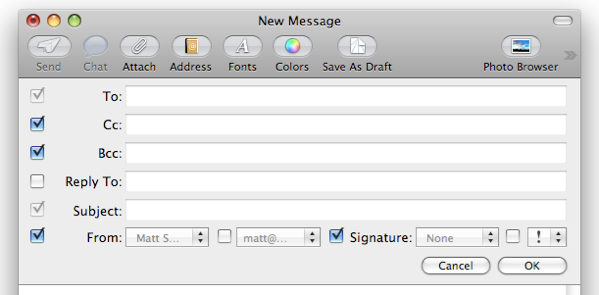
When you create a new message in Mail, you will specify who the message is to and the Subject. However, there are a lot of other fields that aren't enabled by default. You can change what appears by clicking on the button in the bottom left of the toolbar and choosing "Customize..." from the list.
You can enable a signature drop down menu, a priority drop down menu, a Reply to field and drop down menus for choosing which account to send from.
For me, Cc and Bcc were already enabled, and I chose to disable them as I almost never use them.
Get Windows Live Hotmail in Mail.app
Start by opening up Mail and going to the Preferences. Click on the Accounts tab and create a new account by clicking on the plus (+) at the bottom. Enter your name, email address and password, then click continue to set the incoming mail settings. Enter the following:
Account Type: POP Description: Hotmail (or whatever you like) Incoming Mail Server: pop3.live.com Username: Your email address Password: Your password
In the next section, you should leave the Use SSL checkbox checked and Authentication as Password. For the outgoing mail settings, enter the following:
Description: Hotmail (or whatever you like) Outgoing Mail Server: smtp.live.com Check “Use only this server” Check “Use Authentication” Username: Your email address Password: Your password
As before, leave Use SSL checkbox check and Authentication as Password.
Now you should be able to both send and receive email from the Mac OS X Mail app.
Link to Mail messages in Stickies
Stickies is great for keeping notes and reminders on your Mac without having to go to the hassle of opening up iCal and creating a to do list. I've written about some of the great things you can do with Stickies in the past, but here's a quick tip I just discovered.
Often you will receive an email message which you need to respond to or do something with. You can flag it in Mail (Command-Shift-L) but this doesn't allow you to add any extra text to remind you what you actually wanted to do with the email.
If you use Stickies a lot, a great way to keep a reminder of the email is to just drag it to a sticky note. A link will automatically be created that takes you back to the exact message in Mail when you click it.
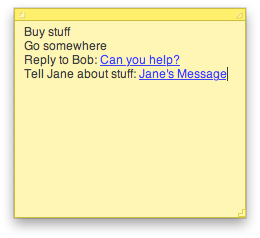
If the message has a subject, that will be the link text. Otherwise it will be something like message:%2DC4DABB48-CEC9-4301-B56D-249C041CDBEA@mac.com%3E (which is the actual link — try pasting it into Safari). You can change the link text by selecting it and typing something new. However, if press delete at any time while writing the new text, everything you write from then on won’t be linked.
So if you keep a To Do list in Stickies, and you have to do something like “Reply to Bob”, you can now add a link to that To Do item so you don’t have to search through your inbox for the message.
Data Detectors in Mail
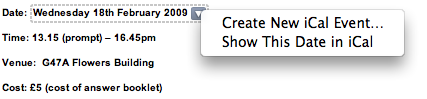
To use the data detectors feature, simple hold your mouse over a date or time in an email message. A dashed box should appear around the item, with an arrow that you can click to bring up a drop-down menu. The two options available are "Create New iCal event" and "Show This Date in iCal". If you create a new event, a dialog box just like the one in iCal pops up, ready filled with the information. This all happens within Mail, so there is no need to even open iCal.
While this is a great timesaving trick, unfortunately the Mail dialog lacks some of the features that the iCal one has. You can only add a single alarm, and you can't add attendees or attachments. However, it is still possible to use data detectors to fill out your event information and have access to these more advanced options.
Simply hold down the Option (alt) key when clicking on the data detector drop-down arrow. The menu item should now read "Create New Event in iCal". Selecting this will load up iCal and create a new event with the information in the Mail message.
If you already started creating an event in Mail, and then decide you want to add multiple alarms or attendees, simple hold down the Option (alt) key. The "Add to iCal" button at the bottom should change to "Edit in iCal", allowing you to make the changes you want.
Enable Data Detectors in iChat
Apple also built data detector functionality into iChat, but chose to disable it for some reason. Luckily, enabling it again can be done by a simple Terminal command. Start by opening up Terminal (/Applications/Utilities). In the window that appears, paste the following line, and hit enter.
defaults write com.apple.iChat EnableDataDetectors 1Next time you open iChat, data detectors should be enabled. To disable them again, repeat the command with a 0 at the end instead of a 1.
Disable Data Detectors in Mail
If you never use data detectors, you might want to disable them. This can be done using the following Terminal command:
defaults write com.apple.mail DisableDataDetectors YESNext time you open Mail, data detectors shouldn't appear. If you want them back, just repeat the command with NO at the end.
Remove Quotes in Email Messages
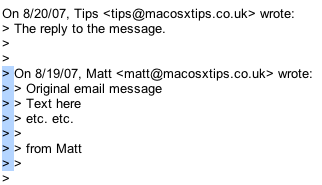
In many email clients (such as Gmail), quotes are shown as a symbol at the start of each line. If the text has been quoted twice, the symbol is repeated.
Now obviously you could click on each line and press delete, but this would take ages if there are multiple quote levels in a long message. The trick to getting rid of this type of quotes is to use the box selection method. To do this, hold Option (Alt) and drag a selection around the quote marks. This makes it so only the quote marks are selected, not the entire line. Annoyingly, this method doesn't work in some applications (such as Firefox). If you find it isn't working, try pasting your message into TextEdit before removing the quotes and then pasting it back into the email.
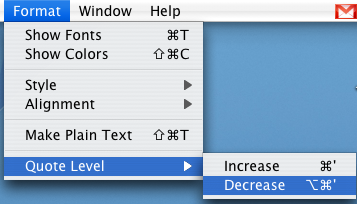
In the Mac OS X Mail program things are slightly different. Quotes are shown by vertical lines instead. While this may look nicer, it's not quite as obvious how to get rid of them. The answer lies in the Format menu, under Quote Level. From here you can increase or decrease the quote level of the selected text.
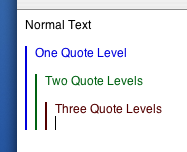
If you have multiple quote levels you want to remove it would be quicker to use the keyboard shortcut instead. To decrease the quote level simply select the text and press Command-Option-' (the apostrophe key). Every time you press this, one quote level will disappear, much faster than navigating the Format menu multiple times.
More Hidden Settings for Google Notifier
Google Notifier is a menu bar item that alerts you when new mail arrives in your Gmail inbox. Back in February I wrote a tip on Google Notifier's hidden features that showed you how to access two hidden settings. Recently, someone at Mac OS X Hints found a third hidden setting in addition to the ones I mentioned in my tip.
![]()
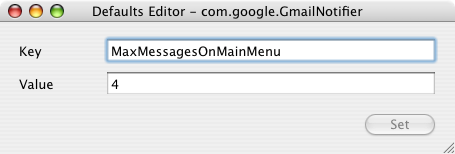
All of these settings can be accessed through Google Notifier. Bring down the notifier menu and hold Command and Option while clicking on Preferences. This brings up a hidden settings editor where you can easily edit the notifier preferences file. The three settings are as follows:
1. Change the number of unread messages displayed.
By default, the menu shows the last four unread messages received (or the last three received and an additional "View More" submenu). To change this, enter "MaxMessagesOnMainMenu" in the key field and enter the number of messages you want on the main menu in the value field.
2. Filter messages by label.
If you only want the notifier to fetch mail with a certain label, you can create a filter. To do this, enter "Label" in the key field and enter the name of the label you want to receive in the value field. To receive all mail, leave this field blank.
3. Use a secure connection.
This is the new tip, submitted by an anonymous poster to Mac OS X Hints. It seems that Google Notifier normally transfers your account details and email in the clear so that other people can potentially read it. If you want to use a secure connection instead, enter "SecureAlways" in the key field and "1" in the value field. To reverse this, repeat the process but enter "0" instead of "1" in the value field.
For all of these settings you will need to quit and reload Google Notifier for the changes to take effect.
Address Book Tips
Add Contacts to your Safari Bookmarks
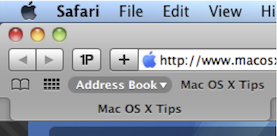
If lots of your contacts have their own web sites, you might be interested to know that you can automatically add these to your Safari bookmarks bar. Open up Safari go to the Preferences (in the Safari Menu). In here click the Bookmarks tab and check the box that says “Include Address Book” in the Bookmarks Bar. Now a new folder will appear at the far left of your Bookmarks bar. In here will be the web sites of all you contacts who have a home page set in their Address Book entry.
Address Book integrates quite well into iChat, the Mac OS X instant messenger. If a person in your Address Book is online and using iChat, a little green dot will appear next to their picture. Clicking on the dot will open up iChat, where you can start a new conversation with the person.
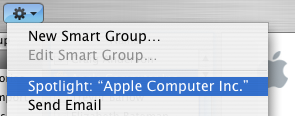
Put your Contacts in the Spotlight
In Address Book, select which contact you want to search, right-click on their name and choose “Spotlight [name]”. The spotlight window will pop up, and show documents, photos, iCal events, mail messages and iChats related to this person. This is one of my favourite features of Spotlight — it allows you to use it as a personal organiser and links together Address Book, iCal, Mail and iChat.
If you don't have Address Book open, you don't need to bother opening it up to Spotlight search someone. Simply type their name into Spotlight for the same results.
Moreover, Spotlight remembers files that people have sent you. When searching for one of your contacts, Spotlight will list any files they sent as attachments to you, providing you received them in Mail.
Highlight Groups
If you hold down the Option key while you are viewing a contact, all the groups that they are in are highlighted in a lovely yellow.
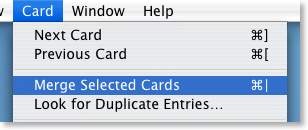
Merge two contacts
If somehow you end up with two entries in your address book for the same person, you can easily merge the two. Select the two entries by clicking on one in the list and then Command-clicking on the other. Now click on the Card menu and choose “Merge Selected Cards”. If you have a huge contact list and you suspect some duplicate entries, you can also choose “Look for Duplicate entries” from the Card menu.
Large Type
If you want to read a person's phone number off the screen while dialing it across the room, you can make it display in large numbers across the screen. To do this, click on the number and choose “Large Type” from the pop-up menu.
Address Book Sharing
If you want to share your address book (for example with your family or secretary) you can do so via MobileMe, Yahoo!, Google or an exchange account. In Address Book just go to the Preferences and click on the Accounts tab. Be careful with the Google and Yahoo synchronisation though, you might end up accidentally adding everyone you ever sent an email to into your address book.
Using vCards
In reality, most people don't have .Mac, so the standard way to share contacts is using vCards. A vCard is a file containing a contact's information that you can attach to an email and send to whoever you want. Luckily, vCards work really well with Address Book.
To create a vCard for a specific contact, select them from the list and right-click (Control-click) on their name. From the pop-up menu choose "Export vCard...".
To create a vCard that contains the information for all the people in a certain group, select the group you want from the list, right-click on it and choose "Export Group vCard...".
If you receive a vCard from someone else as an email attachment, you can add it to your address book in a couple of ways. If you received it in Mac OS X's Mail application, simply drag it from the email message across to Address Book. If not, save it to your Hard Drive and then choose Import vCards (Command-O) from the File Menu in Address Book.
Make Your Own Card
Restrict Private Information
If you don't want to share all of your contact information with everyone you send your vCard to, you can choose to keep certain parts private. Go to the Address Book Preferences and check "Enable Private Me Card". Now when you edit your own card, you can use the check boxes to choose which information is exported as your vCard.
Printing Envelopes
You can print an envelope addressed to a contact by choosing Print from the File menu with the chosen person selected. In the print dialog you might have to click the blue disclosure triangle to show all the settings, and choose Envelopes from the Style drop-down menu.
Drag Chunks of Text onto Dock Icons
Doing this with different applications will produce different results. If the application will accept the text, it will darken when you hold the selection over it. Note that some applications will only accept the text if it is in a certain format (a web address for example). Here are the results with a few common applications. If you know of any more, add them in the comments.
1. Safari - If you drop a web address (i.e. something that starts with http://) on Safari, it will load up that address. If you drag any other bit of text, it will perform a Google Search on it. This is mainly useful if the text is from a non-cocoa app that doesn't have the "Search in Google" item in the right-click context menu.
2. Firefox - If dropped text is a web address, Firefox will load it. This is helpful if you want to view a site in a browser other than your default browser.
3. Mail - A new message will load up with the dropped text as the main message body. Annoyingly the text is placed in the body even if it is an email address.
4. TextEdit - As expected, this loads a new document containing the dropped text.
5. Skype - If the dropped text is a phone number, Skype will call it. This will also work with nicknames in your contact list.
6. Script Editor - A new script window will open up containing the dropped text. Script Editor will then attempt to compile it.
7. iTunes - If you drop a podcast address onto iTunes, it will subscribe to it. If the address isn't a podcast, iTunes will attempt to do it anyway (and fail).
8. Acquisition - Starts a new search with the dropped text.
9. Newsfire - Adds a new feed with the text as the address. (Why not try it out with http://feeds.feedburner.com/macosxtipsfeed )
10. Stickies - This will make a new Stickies note containing the text open up.
11. Dictionary - This will show you the definition of the dropped word. If you drop a selection of words, Dictionary will display the definition of the first. (In cocoa apps, it's probably quicker to use this keyboard shortcut).
Most of these also work if you drag the text to the desktop to create a text clipping first, and then drag it to the Dock icon.
Read new email on your iPod
Alternatively, click this link to automatically open up Script Editor with the script ready typed. Wherever it says <
If you are confident editing the script, you can set it to create the folder on your iPod instead of on the Desktop (This wasn't done in the original because everyone's iPod has a different name and you have to have the iPod connected to run the script). If you want to leave it as it is, all you have to do is plug in your iPod and copy across the folder from the desktop.
To make things even more automatic, you could set up an iCal alarm that runs the script every morning before you leave the house.
Get Custom Audio or Visual Alerts
Whenever Mac OS X wants to get your attention, it plays an alert sound. For example it does this when a dialog box appears, when you receive an email and as an iCal alarm. Your Mac comes with a nice set of alert sounds, but after a while they may get a bit boring.
You can add your own alert sounds by placing audio files in a certain folder. Before you do that however, you will need to convert your sound file to the AIFF format using iTunes. Open up iTunes and choose Preferences from the iTunes menu. In the Advanced section, click on the Importing tab and choose AIFF encoder from the pop-up menu. Click OK.
![]()
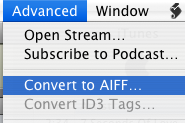
If the audio file you want to use is in iTunes, select it and then click on the Advanced menu. In here choose Convert selection to AIFF. If you audio file is somewhere else, hold Option while clicking on the Advanced menu and choose Convert to AIFF. This will bring up a dialog that will allow you to navigate to your audio file. Once the file is done converting, go back to the preferences and change the "Import Using" pop-up menu back to AAC.
Now we have to get this file to show up in the Alerts list in System Preferences, Mail and iCal. Open up your user folder, look in the Library for a folder called Sounds and drag the sound here from iTunes. Your new alert should now be in the list in the Sounds section of System Preferences.
Make your alerts visual
An alternative to the audio alert is a visual alert, which is basically a screen flash. You can turn this on in the Universal Access section of System Preferences, under the Hearing tab. This will flash the screen as well as playing an alert sound. If you want to get rid of the sound and just have the flash, go to the Sounds section of System Preferences and move the Alert Volume Slider all the way to the left.
![]()
Annoyingly, this will also mute the feedback you get when the volume is changed and the interface sound effects (like when you move something to the trash). If you're fine with this then use the method above. However if you still want these other sound effects, there is a better (but more complicated) solution.
Mac OS X will also flash the screen if for some reason it is unable to play the selected audio alert. To make this happen, open up TextEdit and press Command-Shift-T to convert the document to plain text. Save this empty file as Flash.aiff in the sounds folder inside your Library. If a dialog asks you which extension to use, choose .aiff.
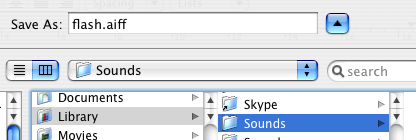
Now if you look in your alerts list in System Preferences there will be an alert called Flash that does exactly that - flash the screen. This is because Flash.aiff isn't really a sound file. When your Mac tries to play it and can't, it flashes the screen instead to make sure you still see an alert.
AddressBookToCSV: Your Address Book in Gmail
Why not just upload your email addresses from Address Book to gmail. Using AddressBookToCSV you can do just that. It will export your Address Book to a format read by the gmail internet application so that no matter where you are, you can have you addresses!
This tip was written by MacTipper, a great blog with loads of tips for Mac OS X. Check it out.
Mail URLs in Brackets
![]()
An easy way to avoid this is to put your URL in
![]()
Google Notifier's Hidden Features
![]()
One of the greatest benefits of this piece of software is its simplicity - just put in your Google ID and password and everything works. At times this makes the notifier look somewhat limited, however this couldn't be further from the truth.
The first hidden feature is to customise the number of messages shown in the notifier menu. By default, the menu shows the last four unread messages received (or the last three received and an additional "View More" submenu). To change this, pull down the notifier menu and hold Command and Option while clicking on preferences. This brings up a hidden settings editor where you can easily edit the notifier preferences file.
In the "Key" field, enter "MaxMessagesOnMainMenu" and in the "Value" field enter the number of messages you want on the main menu. Click Set, and then quit and reload Google Notifier. Now when you click on the notifier menu bar item, you will see the number of messages that you set. To return to the default setting, repeat the prcoess, putting 4 in the value field instead of the number you entered last time.

The second trick can be done in much the same way. If you only want the notifier to fetch mail with a certain label, you can create a filter. As before, click on the notifier menu and Command-Option-Click on preferences. This time, in the key field enter "Label" and in the value field enter the name of the label you want to receive. To receive all mail, leave this field blank. And again as before, quit and reload the notifier for changes to take effect.
When you set these preferences, you are actually editing Google Notifier's preference file (Library/Preferences/com.google.GmailNotifier). If you want, you can load up this file with Property List Editor or TextEdit and changes things yourself (be careful!) or you can achieve the same effect using the Terminal (Applications/Utilities). For example the previous trick could be done by typing the following into the Terminal:
defaults write com.google.GmailNotifier Label -string “YOURLABELHERE”Finally you can extend Google notifier using plugins. I found the following on the Official Google Blog:
The Gmail Notifier supports plugins written in AppleScript, or full-blown Cocoa Bundles in Objective-C. Details about the Objective-C plugin API can be found inside the Gmail Notifier application bundle in the required header file, GGPluginProtocol.h (control+click Gmail Notifier.app -> Show Package Contents -> Contents -> Headers).
AppleScript plugins are written by simply implementing a handler like:
on NewMessagesReceived(messages, fullCount)
-- Your code goes here...
end NewMessagesReceived
To install, simply copy the script (plugin) to Library/Application Support/Gmail Notifier (create the directory if it doesn't exist), and restart the Gmail Notifier. An example of a great plugin for the Gmail Notifier for MacOS X is the Gmail+Growl plugin, which sends Growl notifications when new mail arrives.
Use Email Aliases to Avoid Spam
The greatest benefit of these aliases is their ability to protect your main address from spam. For example, you can use an alias to sign up to websites, forums and newsletters. If the alias becomes flooded with junk mail, it is easy to just delete it and create a new one.
Mail 2.0 (bundled with Mac OS X) provides a simple way to manage your email aliases. In Mail, click on the Mail menu and chooses preferences (Command-,). In the Accounts tab select your .Mac account and click on "Edit Email Aliases." This will open up the .Mac Webmail preferences (You may be prompted for your .Mac password). Scroll down to the bottom where you can add email aliases and change their colours.
After you save the settings here, messages sent to the aliases will be forwarded to your .Mac inbox. Moreover, when composing messages in Mail, you have the ability to send messages from these aliases by selecting the relevant alias from the drop down menu.
Move Outlook Contacts to Address Book
There are 7 methods mentioned:
1. If you have access to a PC, use a windows program called OutPort
2. Do it via Netscape Communicator
3. Use a program called ABFiller, which is very simple a straightforward
4. Converting to vCards if you have Outlook 2003
5. A more complex trick, using terminal to customise things
6. Importing CSV files to Address Book
7. Importing via Thunderbird
Altogether, these tips should allow you to import contacts into address book in just about every situation.
Font Scaling
Most cocoa applications have the ability to scale fonts mathematically. This means that you can resize a selection of text containing different sizes while keeping the relative sizing between fonts. It also means that if you want all the text on a page a little bit bigger, instead of selecting each size and changing it a bit bigger (the 12 point to 14 point, the 16 point to 18 point etc.), you can just do it relatively.
Select all the text in your document and open the Font panel ( Usually Format->Font->Show Fonts) and enter "*1.2" or another mathematical expression. The example given will multiply all font sizes by 1.2, but you can do anything, like "/2" to half the size, "*.0.75" to get 75% of the original size.
Also its worth pointing out you can also use addition and subtraction to change the point size, but that won't make the fonts scale relative to each other.
Word Completion in Cocoa
There are a number of different ways of doing this however. In certain places it isn't possible to press escape, because it does something else (like clearing the Google search box in Safari). In these cases you can use Option-Escape, or just press F5. These two alternatives may take a little longer, but seem to work everywhere.
So now if you can't spell something, you don't have to attempt the whole word, just put in the first few letters and let the system spelling dictionary do the rest.
Sync Junk Mail Training Data
Apple offers a great way to sync all of your data via .Mac, keeping your email messages, keychains and bookmarks up to date on all your computers. However it doesn't allow you to sync or back up your Junk mail filter training data. Moreover, this isn't stored on the IMAP server either, meaning it is very much stuck on one computer.
While you can't keep your junk filter training data syncing automatically, you can manually copy it from one mac to another.
Go to your user folder and navigate to Library -> Mail. Copy the LSMMap2 file to a backup or another mac. Before overwriting the existing LSMMap2 file on the second computer, you may wish to temporarily copy it to the desktop, just in case everything goes pear shaped (i.e. you copy the wrong one).
Quick add to address book
Some people make it a habit of adding everyone who mails them to their address book, something that happens automatically in services such as Gmail. In Mac OS X Mail this is possible through a simple keyboard shortcut.
When reading an email, press Command-Y to add the sender to your address book straight away. Mail will even add the persons name, as it appears in the From field. To add more details like a picture or address you will need to actually open up address book separately though.
Gmail in Mail.app
GMail allows you to use IMAP to access your email using the Mac Mail application. This means that your emails will be synced between your Mac and the GMail servers, so if you read, delete or move an email, the changes will be visible if you log in using another computer.
First you must enable IMAP access in the Gmail settings. Go to your Gmail inbox at http://www.gmail.com and click the Settings link in the top right. Go to the Forwarding and POP/IMAP tab, Enable IMAP, then click Save Changes.

Now switch to Mail and choose “Add Account” from the File menu. Type in your name, email address and email password, then click Create. Mail should do the rest of the work for you, and create your account.
If you want to modify an existing account, these are the settings to use:
Account Type: IMAP
Description: Gmail (or something similar)
Full Name: Your Name
Email Address: Your GMail address
Incoming Mail Server: imap.gmail.com
User Name: Your GMail address
Password: Your Gmail Password
Make sure Use Secure Sockets Layer (SSL) is checked.
For the outgoing mail server:
Server Name: smtp.gmail.com
User Name: Your GMail address
Password: Your Gmail Password
Make sure Use Secure Sockets Layer (SSL) is checked.
Hotmail in Mail.app
This article is old and out of date. There is an updated version here.
Whereas Gmail is fairly open and easy to implement into Mail.app, Hotmail is slightly more complicated if you don't have a Hotmail Plus account. Hotmail Plus offers access to your mail through Mail.app, and there is a workaround for standard Hotmail accounts, using FreePOPs.
If you have an MSN Hotmail Plus account, you can easily access your mail through Mac OS X Mail by installing the HTTP Mail Plugin.
Once installed, open mail and go to Preferences -> Accounts and create a new account with the following details:
Account Type: httpmail
Description: Hotmail (or something similar)
Email Address: example123@hotmail.com (your hotmail address)
Full Name: Your Name
Incoming Mail Server: hotmail.com
User Name: Your hotmail user name
Password: Your Hotmail Password
Outgoing Mail server: None
Close the window and Save the Account.
Email Bookmarklet
Note: Safari now has this feature — just look in the File menu. For more features check out this Safari Extension.
One feature that Safari lacks is the option to email a web page to someone. This can easily be done by creating a bookmarklet to place in the bookmarks bar.
A bookmarklet is a small piece of Javascript that you can save as a bookmark and reuse. For the email page bookmarklet, enter the following into the address bar in Safari:
javascript:location.href='mailto:?SUBJECT='+document.title+'&BODY='+escape(location.href)
Now drag the globe icon at the start of the URL to the bookmarks bar, and name the bookmarklet "Mail this page" or something similar. When you click it, your email client will open with a new message containing the web address and the title of the web page. Now all you need to do is choose who to send it to.
Blocking Senders in Mail
Technically only your ISP can truly block messages from a specific sender, but you can get near enough using Apple's Mail app. This can be done by creating a rule that deletes messages from a particular sender.
Open Mail and go to the Preferences, located in the Mail menu, then click on the Rules section. Add a rule and give it a name (Blocked, Barred etc.) in the description field. Then use the pop-up menus to select all mail from an email address and set it to delete.
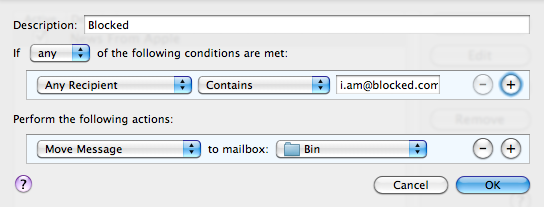
Alternatively make the rule move the message to another mailbox, so you can check though the emails just in case you ever change your mind.
Character Swap
In all cocoa applications (TextEdit, Mail etc.), two adjacent characters can be swaped by positioning the cursor between them and pressing Control-T.
This can be useful if you often end up typing "teh" and "becuase".