Automatically save Mail attachments using AppleScript
Here’s a simple AppleScript that’s great for if you regularly receive email attachments that you want to save in the same folder. This is really useful in situations where you receive regular reports via email, or even if you just want to be able to quickly delete emails without worrying about losing the attachments.
The script works in conjunction with “Rules” in Mail, which makes it really easy to filter out the attachments that you want to save. Once it has these attachments, the script simply adds a timestamp to the name and saves them in the specified folder. Here’s a step by step guide on how to set everything up.
First, start by opening up AppleScript Editor (located in Applications/Utilities). Copy and paste the following script into the empty window:
on perform_mail_action(ruleData)

    -- The folder to save the attachments in (must already exist)
    set attachmentsFolder to ((path to home folder as text) & "Documents:Attachments") as text

    -- Save in a sub-folder based on the name of the rule in Mail
    set subFolder to name of |Rule| of ruleData as text
    tell application "Finder"
       if not (exists folder subFolder of folder attachmentsFolder) then
           make new folder at attachmentsFolder with properties {name:subFolder}
       end if
   end tell

    -- Get incoming messages that match the rule
    tell application "Mail"
       set selectedMessages to |SelectedMessages| of ruleData
        repeat with theMessage in selectedMessages

            -- Get the date the message was sent
            set {year:y, month:m, day:d, hours:h, minutes:min} to theMessage's date sent
            set timeStamp to ("" & y & "-" & my pad(m as integer) & "-" & my pad(d) & "-" & my pad(h) & "-" & my pad(min))

            -- Save the attachment
            repeat with theAttachment in theMessage's mail attachments
               set originalName to name of theAttachment
                set savePath to attachmentsFolder & ":" & subFolder & ":" & timeStamp & " " & originalName
                try
                   save theAttachment in savePath
               end try
           end repeat
       end repeat
   end tell

end perform_mail_action

-- Adds leading zeros to date components
on pad(n)
   return text -2 thru -1 of ("00" & n)
end pad
Click the Compile button to check that you have copied everything correctly. If you receive an error, something isn’t right.
Take a look at the script and see if you can figure out what each part does. One of the great things about AppleScript is that even people who have never seen it before can get the gist of what a script does. The third line specifies the folder where the attachments will be saved — you might want to change this. It is currently set to a folder called “Attachments” located in the Documents folder. Whatever folder you choose, you need to go into the Finder and create it if it doesn’t already exist.
Save the script and remember the location. I recommend creating a “scripts” folder in your Documents folder that you can use to store all your scripts.
The final step is to open up Mail and create a new rule. To do this, go to Mail’s Preferences, and click the Rules tab. Click the “Add Rule” button, and give the new rule a name. This name will be used to create a sub-folder within the Attachments folder, meaning you can create multiple rules to filter different types of attachment.
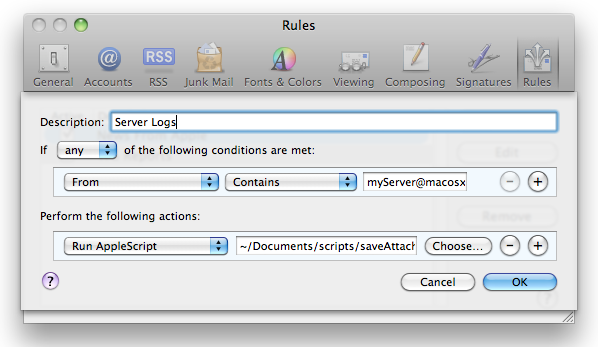
Next, you will need to set the conditions that need to be satisfied for the attachment to be saved. Using the “Any Attachment Name” you can filter attachments of a specific kind using their file extension, for example saving only PowerPoint presentations or only images. Alternatively you can save only attachments from a specific person, or simply save all the attachments sent to your email address.
Once you have set up your conditions, choose “Run AppleScript” from the perform actions drop-down menu, and click the “Choose” button to select the script you saved earlier. You can also add additional actions as well as the script, such as deleting the message or moving it into another mailbox.
One interesting way to use this script would be to put the attachments folder in your Dropbox or iDisk. Then your attachments are automatically synced to the cloud, making them accessible from anywhere.