Bring back “Save As” in Lion
The autosave functionality in Lion takes some getting used to. It’s arguably a better way to do things, but after decades of manually saving files, it can take some time to get comfortable with how the new system works.
One change that particularly irritates me is the way the old Save As workflow has been replaced with Duplicate. The old system worked like this: After opening up an existing document and making changes, choosing “Save As” from the file menu allowed you to save those changes in a new file, instead of overwriting the existing one.
Of course this workflow isn’t really compatible with the autosave system, and as a result it has been replaced with Duplicate. There are two main problems I have with Duplicate:
The first is that it has no keyboard shortcut assigned by default, meaning it requires a time-consuming trip to the File menu. Fortunately, this is easily solved by assigning the shortcut yourself in the Keyboard section of System Preferences. Under the Keyboard Shortcuts tab, click on Application Shortcuts in the list on the left, then click the plus (+) button to add a new shortcut. Leave the drop-down menu as All Applications, set the Menu Title to “Duplicate” and assign a shortcut of Command-Shift-S, the same as the old Save As shortcut.

The second problem is that if you duplicate your file after you’ve already made changes (like you would do commonly with Save As), then you are presented with the following cumbersome dialog:
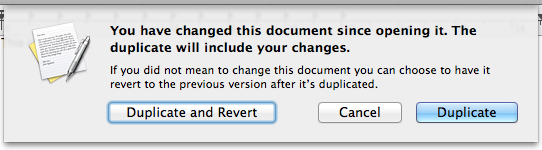
The default option, Duplicate, updates the existing file with the changes you have made as well as creating a duplicate, while Duplicate and Revert is more like the old Save As functionality. While there’s no perfect solution to this problem, there are two ways to avoid this dialog: Firstly, you could always remember to duplicate your files before you start making changes that you don’t want overwrite the existing file. This is probably the safest (and Apple-preferred) way, but will probably take me years to get used to. For those who really can’t stand the new way of doing things, Shawn Blanc has written a hack using Keyboard Maestro that automatically chooses Duplicate and Revert in the dialog for you.
Preview's new "Magnifier"
Preview has an interesting new feature in Lion - the magnifier tool. Bringing it up allows you to take a closer look at a certain area of an image without having to zoom in the entire thing. There are two different ways to activate it: Either choose “Show Magnifier” from the Tools menu, or simply press the ` (backtick) key.
Once activated, the magnifier follows your cursor, allowing you to move to to different areas of the image. It seems to be yet another feature that is iOS-inspired — it feels very like the iPhone text selection “loupe”.
You can adjust the size of the magnifier using the pinch in and out gestures, allowing you to zoom in further and further until the magnifier occupies the whole screen.

Using the magnifier on PDF files brings up a slightly different, rectangular magnifier. Its size and position also subtly adjust to the content it is magnifying. For example, it will “lock” to the width of a paragraph, which is really useful when scrolling down a page.

Add signatures to PDFs using Preview and your Mac's built in camera
A new feature in Lion’s Preview application means an end to the tedious and fiddly task of scanning, cropping and pasting signatures into PDF documents. “Signature Capture” allows you to simply sign your name on a piece of paper and hold it up to your Mac’s camera, while Preview takes care of the rest and automatically inserts it into the PDF. Here’s a quick guide on how to do this.
Start by opening up the PDF you need to sign using Preview. Look in the toolbar for the Annotate button (looks like a pencil) and click it to bring up the Annotations Bar. There are a couple of new additions to this bar in Lion, but the one we are looking for is the Signature button. Click this button, and select “Create Signature from Camera” from the menu.

The instructions in the Signature Capture window are fairly self explanatory, but it’s worth emphasising that it’s definitely best if you use a fairly thick pen with black ink. Hold the paper up close to your Mac’s camera, and then click the Accept button when you are satisfied with the Preview. It can be a bit tricky to do all this simultaneously, so it helps if you use a small piece of paper that you can hold with one hand.

Once you have clicked Accept, it’s simply a case of clicking in the PDF document where you want the signature to appear. If you hover the cursor over different element in the document, you should notice that lines and boxes highlight blue, indicating Preview has detected a suitable place to put your signature.
Any signatures you add using Signature Capture are stored in Preview and are accessible from all your documents, meaning you only have to go through this process once. Clicking the Signature button will show all the signatures you have already imported, and choosing “Manage Signatures” allows you add new ones and remove any you no longer need.
Crop multiple pages in Preview
If you find you have a multi-page PDF with huge margins on every page, you can use Preview to crop those margins down.
With the PDF open in Preview, make sure that the sidebar is visible (in the View menu) and set it to display thumbnails using the button at the bottom.
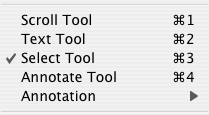
Change to the select tool using the toolbar button, the Tools menu or by pressing Command-3. Drag a box around the region you want to keep, then click in the sidebar and press Command-A to select all pages.
If you have some pages that are a different orientation (i.e. landscape), you can hold Command and click on these pages to de-select them.
Finally, choose Crop from the Tools menu, or just press Command-K.

Annotate non-PDF images in Preview
With an image open in Preview, go to the View menu and choose Customize Toolbar. In the window that appears, drag the Annotate button up onto your toolbar, then click Done. Now, the Annotate options in the Tools menu may be inactive, but the toolbar button still works.
As usual, you can choose Show Fonts and Show Colors from the Tools menu to edit the look of your annotations. In addition, the - (minus) and + (plus) keys will change the thickness of your lines.
There are a few little quirks with this though. Firstly, I sometimes had problems re-opening the Fonts window after closing it. If this happens, quitting and reopening Preview seems to fix it. Secondly, note that saving the file makes the annotations permanent, meaning you can't edit them. Thirdly, the options like shadow and underline in the Fonts panel don’t seem to work. The changes happen, but revert back to normal as soon as you close the Fonts window. Finally, you can't copy and paste your annotations like you would do to other objects. Instead, this just copies and pastes the entire image.

These small flaws aside, this is a great way to quickly make rough changes to images without having to resort to third party software. It's great for adding quick notes to screenshots, and I even made my Twitter Background using it.
Access hidden Preview features through Automator
One topic that came up in the comments of that tip was Preview's inability to scale and resize images. I explained a trick involving zooming and using the Mac OS X Screen shot tools, but this is far from ideal.
If you have Mac OS X 10.4 Tiger, you will find Automator in your Applications folder. It is an application designed to do repetitive and time consuming tasks for you. You simply create a workflow by dragging and dropping "action" blocks, and then you can set it going whenever you want to perform that action. It's great for doing batch tasks like renaming a long list of files or resizing a large group of images.
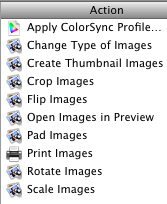
If you look in the left hand column, you will find a section titled Preview. Clicking this will bring up a list of Automator actions that you can use. Some are familiar and accessible from the menus in Preview, but some are new.
Let's start with the simplest possible workflow. Say you want to resize an image (or lots of images) to half its size. To do this, drag the Scale Images action over to the right hand side. A dialog box will appear asking if you want the workflow to keep a copy of the original image or not. If you click Add, the workflow will make a copy of your image on the Desktop and resize that instead of the original. Otherwise, it will simply replace the image with its resized version.
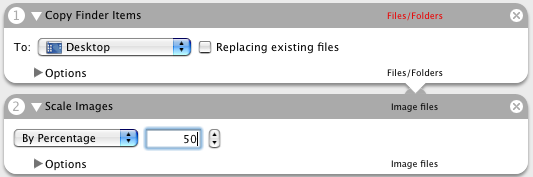
The next step is to choose how you want to scale your image. You can set it to a certain width or a percentage of its original size. Once you have chosen, choose Save As from the File menu and give it a name like Resize Images. From the File Format pop-up menu choose Application. The Desktop is a good place to save it.
![]()
Now we can try it out. Find an image file and drag it onto the Resize Images icon. A copy of the image at half the size should appear on the Desktop - Preview doesn't even need to open. You can even drag a large selection of photos. If you find yourself using

You can even extend your workflows to make them more like applications. For example, try adding "Ask for Finder Items" (from the Finder section) to the start of the work flow. Now, once you have saved the workflow as an application, when you double-click it to open, it will bring up a dialog, asking you to choose the images that you want to resize.
Also, take a look at the PDF actions that Automator has. Some of these are really useful if you often use PDF documents in Preview.
13 things you didn't know about Preview
If a number of images are open in Preview at the same time, you can view a full screen slideshow by choosing Slideshow from the View menu or by pressing Command-Shift-F. Once the Slideshow has started, press I or click the "Index page" button in the toolbar. This make a contact sheet of all the images, with exposé style animation. Shift-click for slow motion as usual.
2. Sort Order in Sidebar
Normally images appear in alphabetical order in the sidebar (although PDFs appear in page order) but you can choose a different sort order by right-clicking on one of the thumbnails. This brings up a contextual menu with path, kind, size, date and keyword sort options. For your own custom order, just drag the images up and down.

3. Quickly Trash Images
While viewing an image in Preview, pressing Command-Delete will move it to the Trash, just as if you had selected its icon in the Finder. This is useful if you want to cycle through a collection of photos using the Up and Down arrows, and press Command-Delete to Trash the unwanted ones. You can also drag the thumbnail from the sidebar to the Trash.
By default, the rotate buttons don't appear in the toolbar when viewing PDFs. To add them, Command-Option-click the Show/Hide toolbar button to bring up the Customise toolbar options. When you click rotate, it will rotate every page in the PDF document. If you Option-Click rotate, only the page you are currently viewing will be rotated.
5. Open a Folder of Images
Dragging a folder onto Preview's icon will cause it to open up every image in the folder. You will have to hold Command-Option while dragging onto the icon to force Preview to accept it. Be careful when doing this with a folder with lots of images in. If you do this with your Pictures folder for example, it will open your entire iPhoto Library. If you are adventurous, have a go at doing this with an application (they are just disguised folders anyway). Strangely, Preview can "open" itself.
6. Use the Scroll Tool with Images
When viewing PDF files, you can access the scroll tool through the View menu. This allows you to drag the images about with a hand rather than using the scroll bars. Unfortunately, this tool is greyed out when viewing anything but PDFs. To use the scroll tool with other formats, hold the Space bar before dragging an image. Additionally, if you Space-Command-click you will zoom in, and if you Space-Command-Option-click you will zoom out.
7. Slideshows Without the Toolbar
When viewing PDFs fullscreen using the slideshow option in the View menu (Command-Shift-F), the toolbar appears at the bottom whenever you move the mouse. To prevent this, double-click anywhere (but not on the toolbar). Now the toolbar will stay hidden until you next click. You can still get its functionality using keyboard shortcuts: Space will Play/Pause and the Left and Right arrows scroll through pages. Pressing A and F will toggle between actual size and fit to screen.
8. Change Annotation Font Size
The annotate tool is available when viewing PDFs. You can have a red oval or a yellow text box. The text is fixed to the System Font, which is Lucida Grande, size 13. To change the size, type
defaults write com.apple.Preview NSSystemFontSize -int 9 into the Terminal (in Applications/Utilities) and press return. The number at the end is the font size (replace with 13 to return to normal). You will need to quit and reopen Preview for changes to take effect.9. Change Zoom Level after Spotlight Search
When you click on the PDF in the Spotlight results, it opens up in Preview with the search term highlighted throughout the document. This is pretty useful, however the PDF is actually zoomed in 280 percent. This means you can read the word you searched for pretty easily, but you can't see anything else. To reduce this, start by quitting Preview if it is running and open up Terminal from the Utilities folder in the Applications folder. Type defaults write com.apple.Preview Preview -dict-add PVPDFSpotlightSelectionSize 10 and press return. The 10 at the end corresponds to a 100% zoom level. To return to normal, replace this with 28 (280% zoom). More information here.
10. Image Correction Tools
Preview offers a lightweight alternative to iPhoto's image correction tools. This is accessible from the Tools menu, and offers almost everything iPhoto does. Be warned through, there is no undo option for these changes, so the only way to go back is to revert to the last saved copy.

11. Bookmark Images and PDF pages
This feature was originally designed for long PDF files. If you want to save a certain page for reference or are half way through a long ebook and want a break, you can bookmark the page by pressing Command-D or by choosing Add Bookmark from the Bookmarks menu. Interestingly you can also bookmark images that you use often so you don't need to locate them first.
If you hold the Option key before dragging a selection, a small grey box will appear, telling the size of the selection in pixels. More information here.
13. Tag Images
In Preview you can tag images with keywords that are recognised by Photoshop and Spotlight. To do this, press Command-I and click on the Keywords tab. This "Document Info" window acts like an inspector palette, so you can easily scroll through your images without having to open it again.
Reduce Preview's PDF zoom after Spotlight
When you click on the PDF in the Spotlight results, it opens up in Preview with the search term highlighted throughout the document. This is pretty useful, however the PDF is actually zoomed in 280 percent. This means you can read the word you searched for pretty easily, but you can't see anything else.
![]()
Luckily, by changing one line in the Preview preferences, you can change the zoom level to something less extreme. The easiest way to do this is using the Terminal.
First, quit Preview if it is running and open up Terminal from the Utilities folder in the Applications folder. Type the following line and press return:
defaults write com.apple.Preview Preview -dict-add PVPDFSpotlightSelectionSize 10The 10 at the end corresponds to a 100% zoom level. By default, this number is set to 28, or 280% zoom. If you want some zoom, but not quite as much, try a number like 15 for 150% zoom.
If you don't want to use the Terminal, or you are curious to see what the command actually does, you can open up the preference file in Property List Editor (which you will only have if you have installed the Developer Tools from the Mac OS X install Disk). Go to your user folder and navigate to Library/Preferences and open up com.apple.Preview.plist using Property List Editor.
![]()
Use the expansion Triangles to navigate to Root/Preview/PVPDFSpotlightSelectionSize. Here you can see the number is 28 (or 10 if you have already changed it in the Terminal).
Preview Selection Secret
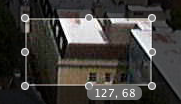
If you want to make a selection of a specific size, you normally just have to guess. By default Preview doesn't tell you the dimensions of the selection, but there is a way to make it.
If you hold down the Option key before making a selection on an image, a small grey box appears next to your cursor telling you the size of the selection in pixels.
This also works on already made selections. Hold down the Option key before dragging one of the dots around the edge of the selection box and the selection size will appear again.
When working with most image formats the select tool is the only one you have, so using it is simply a case of dragging across an image. If you are using a PDF file, make sure you are using the select tool by pressing Command-3 or by going to the Tools menu.
Using the Scroll Tool in Preview
The trick to getting the scroll tool when viewing any image with Preview is to press and hold the Space bar. You will notice that the cursor changes to the hand and you can drag your image about. Once you have started dragging you can even let go of the space bar and it will still work, even though the cursor changes back to the cross of the select tool. This is similar behaviour to that of other image viewing and manipulation applications, however it is a bit more hidden in Preview.