Automatically create Calendar events when receiving email
I’m always looking for ways to automate the most repetitive tasks I find myself doing on my Mac. The other day, I realised that I spend a lot of time manually creating Calendar events by copying information from booking confirmation emails. This is exactly the sort of task that can be easily automated to save you a little bit of time and effort every day.
Here’s how you can set up a custom rule in Mail app that runs a short AppleScript to create a new event in Calendar app.
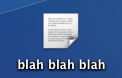
To illustrate how to do this, I’m going to use an example that I’ve set up for myself. I regularly receive booking confirmation emails from my local cinema that look like this:
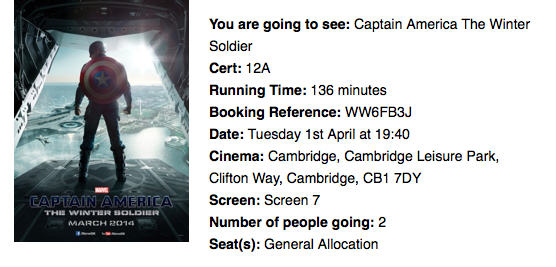
All the information to create a Calendar event is there in the text, but it is annoyingly time consuming to do this manually. Let’s set up a Rule to process these emails automatically.
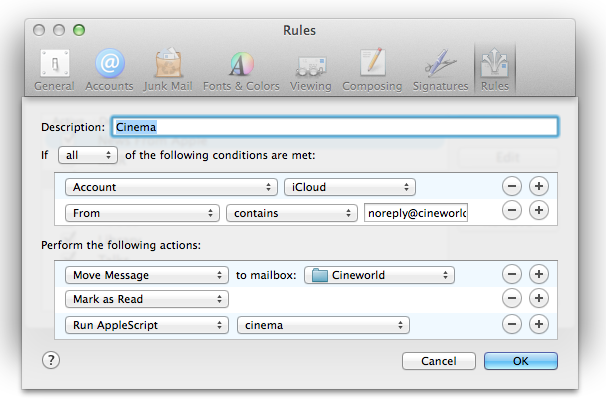
In Mail app, choose Preferences from the Mail menu, and click on the Rules tab. Create a new rule, and adjust the drop down menus to look like the screenshot below. The first section shows the conditions required to apply the rule to a message. In my case, I restrict the rule to only messages from “noreply@cineworldmail.com” in my “iCloud” account. When an email that meets these criteria is received, a series of actions are performed. First the message is moved out of my inbox into another mailbox, and it is marked as read.
The final action is the most complicated. It is a custom AppleScript that reads the email, figures out the name, date, time and location, then creates a Calendar event.
When you first choose Run AppleScript from the drop down menu, there will not be any AppleScripts available for you to run. First we have to create one.
To do this, open up AppleScript Editor. This is located in the Utilities folder in the Applications folder, or you can find it using Spotlight search or Launchpad. In the script window that appears, paste the following script:
-- Triggered by Mail rule.
using terms from application "Mail"
    on perform mail action with messages msgs for rule theRule
        tell application "Mail"
            repeat with msg in msgs
                try
                    set msgcontent to content of msg
                    set msgid to message id of msg
                    set {movie, runtime, cert, bref, starttime, addr, screen} to my parseMsg(msgcontent)
                    my createEvent(movie, runtime, cert, bref, starttime, addr, screen, msgid)
                end try
            end repeat
        end tell
    end perform mail action with messages
end using terms from
This is the general format of all Mail rule AppleScripts. One of the benefits of AppleScript is that it is very close to normal English language, and you can get some idea of what a script does even if you aren’t familiar with AppleScript. The above script takes each email message that the rule matched, and runs a function called parseMsg on it to extract the event details. Then it runs a function called createEvent using those details.
Next, below this paste the following functions:
-- Parse the email content to extract movie details.
on parseMsg(msgcontent)
    set movie to extractBetween(msgcontent, "You are going to see: ", "Cert: ")
    set cert to extractBetween(msgcontent, "Cert: ", "Running Time: ")
    set runtime to extractBetween(msgcontent, "Running Time: ", " minutes")
    set bref to extractBetween(msgcontent, "Booking Reference: ", "Date: ")
    set datestring to extractBetween(msgcontent, "Date: ", "Cinema: ")
    set addr to extractBetween(msgcontent, "Cinema: ", "Screen: ")
    set screen to extractBetween(msgcontent, "Screen: ", "Number of people going: ")
    set starttime to parseDateString(datestring)
    return {movie, runtime, cert, bref, starttime, addr, screen}
end parseMsg

-- Extract the substring from between two strings
to extractBetween(theString, startText, endText)
    set tid to AppleScript's text item delimiters
    set AppleScript's text item delimiters to startText
    set startComps to text items of theString
    set AppleScript's text item delimiters to endText
    set endComps to text items of second item of startComps
    set AppleScript's text item delimiters to tid
    return trim(first item of endComps)
end extractBetween

-- Trim all whitespace from start and end of a string
on trim(theString)
    set theChars to {" ", tab, character id 10, return, character id 0, character id 8232}
    repeat until first character of theString is not in theChars
        set theString to text 2 thru -1 of theString
    end repeat
    repeat until last character of theString is not in theChars
        set theString to text 1 thru -2 of theString
    end repeat
    return theString
end trim

-- Parse date and time from the string given in the email.
on parseDateString(datestring)
    set theDate to current date
    set dateWords to words of datestring
    set day of theDate to text 1 thru -3 of item 2 of dateWords
    set time of theDate to (item 5 of dateWords) * hours + (item 6 of dateWords) * minutes
    set monthList to {January, February, March, April, May, June, July, August, September, October, November, December}
    repeat with i from 1 to 12
        if item 3 of dateWords = ((item i of monthList) as string) then
            set monthNumber to (text -2 thru -1 of ("0" & i))
            exit repeat
        end if
    end repeat
    set month of theDate to monthNumber
    return theDate
end parseDateString
This is the core of the AppleScript, which parses the email to extract the event details. The way it works is to extract the text between two other pieces of text. For example, it extracts the text between You are going to see: and Cert: and sets it as the name of the movie. You will need to modify this to match the exact format of your email. A bit of trial and error may be necessary, so you may want to test the rule on emails you send to yourself.
Finally, paste the following function that creates the Calendar event:
-- Create a calendar event for the specified movie.
on createEvent(movie, runtime, cert, bref, starttime, addr, screen, msgid)
    set endtime to starttime + runtime * minutes
    tell application "Calendar" to tell calendar "Home"
        set theEvent to make new event with properties {start date:starttime, end date:endtime, summary:"Cinema: " & movie}
        set location of theEvent to screen & ", Cineword " & addr
        set description of theEvent to "Booking Reference: " & bref & return & "Run Time: " & runtime & " minutes" & return & "Certificate: " & cert
        set url of theEvent to "message://" & "%3c" & msgid & "%3e"
    end tell
end createEvent
You will also need to modify this to match the exact details in your email messages. Above, I set the name of the even to the title of the movie and I calculate the end time by adding the running time of the movie to the start time. I set the location of the event to the screen number and the cinema address, and I add a few details to the event notes like my booking reference number. Setting the url of the event to the email message id also provides a handy link back to the original email message from within Calendar.
You can find the full script here.
Now all we need to do is save the AppleScript somewhere Mail can see it. Choose Save from the File menu, and then press Command-Shift-G to bring up the Go to folder dialog. In the text field, type ~/Library/Application Scripts/com.apple.mail and press Return. Give the script a memorable name and save it. Now, when you return to Mail, your script should be available in the drop down menu next to “Run AppleScript”.
8 Tips for iCal in Lion
iCal has been completely overhauled in OS X Lion - here are 8 tips to help you take advantage of all the new features.
Create a quick event
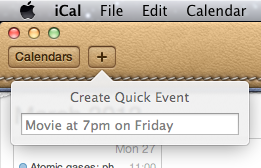
iCal now has a a great new way to add events that means you no longer have to spend ages filling out dates and times with fiddly controls. Instead, just click the + button in the toolbar or press Command-N to bring up the Quick Event popover. This allows you to type in the event details in a human-readable form — for example, “Movie at 7pm on Friday” or “Meeting at 3pm until 6pm” — and iCal will interpret what you mean and create an event.
Specify times in the event name
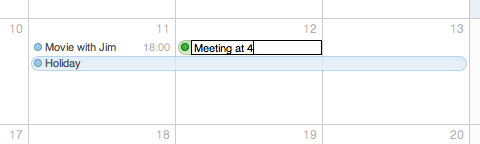
When creating events by double-clicking a day in month view, the new default behaviour is to create all-day events. If you want to create a normal event, just specify the time when typing in the event name. iCal seems to be quite flexible at interpreting what you mean - things like “Gym at 6” and “4pm Meeting” will both work.
You can also specify the length of all-day events in this way. Just type “Holiday until Saturday” or “Jim away until the 14th”.
Remove the leather effect
The new look and feel of iCal was one of the most controversial changes when Lion first came out, provoking outrage amongst many UI purists. If the new look isn’t for you, there are a couple of simple tweaks that will change things back to normal. First, if you just want to remove the torn page effect from the bottom of the toolbar, the Big Bucket Development blog shows you how to achieve this by replacing a single image. Alternatively, if you want to get rid of the new look completely, MacNix has a simple method that can bring back the aluminium look in both iCal and Address Book.
It’s worth making a backup of iCal before trying either method, just in case you ever want to revert back to the new leather style.
Show more (or fewer) than seven days in week view
This is a “top sekret” feature that requires a quick trip to the Terminal before it can be accessed. Start by opening the Terminal app (located in Applications/Utilities) then paste in the following line and press return:
defaults write com.apple.iCal IncludeDebugMenu YES
Quit and re-open iCal, and you should see a new Debug menu in the menubar. In this menu, under the Top Sekret [sic] section you’ll find an option to set the number of days in week view to 7, 14, 21 or 28 days. You’ll need a pretty large screen for these options to be that useful.
It isn’t necessary to enable to debug menu to show fewer than seven days in week view. First make sure you aren’t in week view, then just hold down the Command and Option keys and them press and number between 2 and 6.
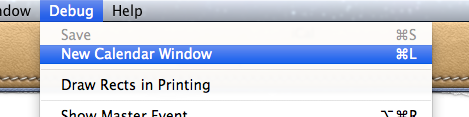
Open multiple calendar windows
This is another secret feature hidden in the debug menu (see above). Once the debug menu is enabled, it is possible to open up multiple iCal windows by selecting New Calendar Window or by pressing Command-L. This is great if you would live to have two different views open simultaneously — for example separate weeks, or a month view and a day view.
Adjust the font size
It’s now possible to change the size of the text in the calendar view. Just choose Make Text Bigger or Make Text Smaller in the View menu or press Command-minus (-) or Command-plus (+).
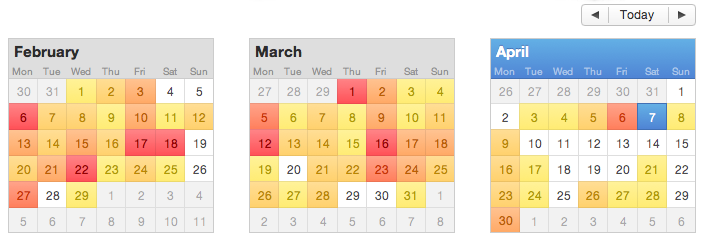
Year view heat map
The new “year at a glance” view is fancy, if not altogether that useful. It allows you to see a “heat map” of how many events you have throughout the year, with busier days shown in red and quieter days show in yellow. Double-clicking any month will bring up the month view for that month.
Set as Full Screen
iCal is one of only two apps that I regularly use Lion’s full screen mode with (the other being Terminal). This allows me to leave it always running in the background, out of the way. Whenever I need to check my schedule or reminders, a simple four-fingered swipe to the left will slide the desktop across to iCal running full screen in its own space. To set iCal as full screen, just click the full screen button in the top right corner of the window. You can even combine this with the multiple calendar windows tip to allow you to swipe between multiple full screen calendars that show the current day, week and month.
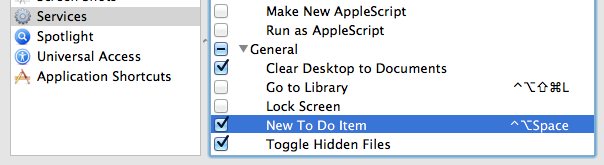
Quickly add to do items to iCal's Reminders from anywhere with a keyboard shortcut
Until recently, my favourite task management (to do list) app for Mac and iPhone/iPad has been Things. It has just the right balance of Apple-like simplicity and powerful features that makes managing tasks quick and easy and not yet another task in itself. Unfortunately, the developers, Cultured Code, have been very slow at getting the cloud sync sorted out, meaning you still have to manually sync your tasks between your different devices and on top of this it’s still not even possible to sync tasks between multiple Macs.
With that in mind, I’ve been trying out some alternatives, including Wunderlist, but I’ve finally settled on using Apple’s own solution. With the release of iOS 5, Mac OS X Lion and iCloud, finally iCal Reminders on the Mac and the Reminders app on the iPhone are good enough to rival these third party solutions.
One piece of Things functionality I find myself missing, however, is the Quick Entry window. This allowed you to quickly create a new To Do item using a simple keyboard shortcut that worked in any application. This meant I could be reading an email, press the keyboard shortcut and Things would bring up a new To Do item dialog, autofilled with the details of the current email message.
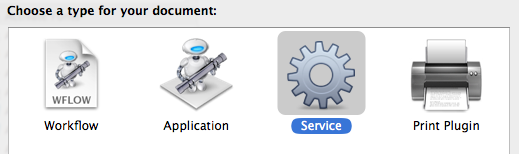
Fortunately, we can go some way to replicating this functionality using an Automator service. Don’t worry if you’ve never used Automator before, this is a really easy workflow containing only a single “Automator action.” Start by opening Automator (located in the Applications folder), and choose the Service type for your new document.
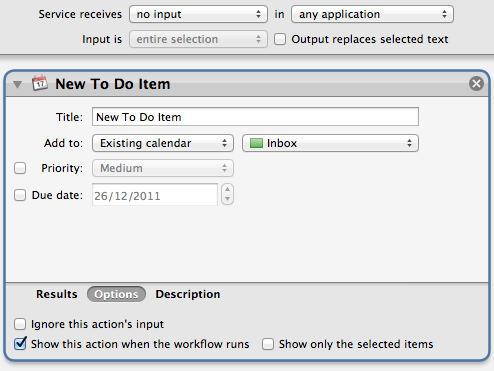
From the Calendar section of the Library, drag the New To Do Item action over into the workflow area on the right. This is the only action we’ll need! Using the fields and drop-down menus, you can customise the default values that will appear when the Quick Entry window is invoked. Before we save, there are two more things we need to set. Firstly, change the drop-down menus above the workflow to specify that the service receives no input in any application. Secondly, click the Options button at the bottom of the action, and check the box Show this action when the workflow runs. When you’re finished, it should look something like this:
To finish, choose Save from the File menu and give it a name like “New To Do Item.”
The next step is to add the keyboard shortcut so that we can easily bring up the Quick Entry window without having to go to the Services menu. To do this, open up System Preferences and go to the Keyboard section. Under the Keyboard Shortcuts tab, click Services in the list on the left, and scroll down to the bottom of the list on the right to find your new service. To add the keyboard shortcut, double-click on the area to the right of your service and press whatever shortcut you want. I went for Control-Option Space.
Finally, all that’s left is for you to test it out. Open up Safari or Mail or any of your usual applications, and start going about your normal business. Then try pressing your chosen keyboard shortcut, and the Quick Entry window should appear. iCal doesn’t even have to be open.
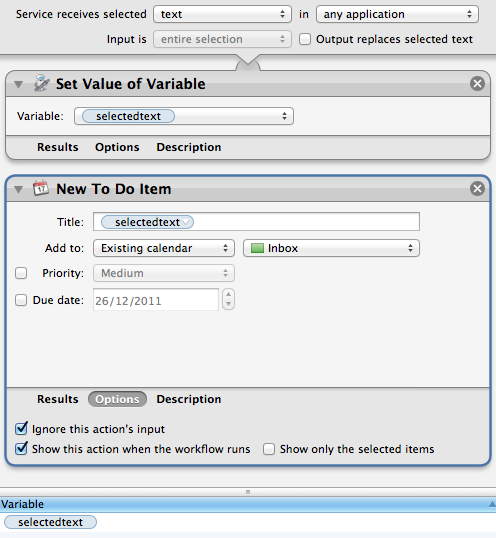
Bonus Tip: If you’re feeling adventurous, try creating a second service that automatically takes the currently selected text as the title of the to do item by changing the Service receives drop-down menu to text. Check out the screenshot below for some ideas on how to do this.
Drag-and-drop to create .ics files from iCal
If you want to share an iCal event with others, often the best way is to send them a .ics file that they can then double-click on to import into their calendar.
The easiest way to do this is to just click on the event and drag it onto the desktop, which will automatically export it to a .ics file for you. The icon even shows you the date of the event. You can then email this file as an attachment, or share it however you want.
If the desktop isn’t in view, it can be a bit tricky to drag the event as it doesn’t behave how you would expect when using Exposé or the Command-Tab switcher. In this case, it’s best to drag it up to the toolbar at the top of the iCal window, then hit the show desktop exposé shortcut (normally F11) and drop the event on the desktop.
When the recipient of the file double-clicks on it, iCal will open up and ask which calendar you want to import the event into.

Change the default duration of new iCal events
In iCal, whenever you create a new event, it is set to last one hour by default. A quick look in the iCal preferences seems to suggest that there is no way to change this, but luckily there is a hidden setting that you can change via the Terminal.
Start by opening up Terminal (located in Applications/Utilities). In the window that appears, paste the following line then press return.
defaults write com.apple.iCal 'Default duration in minutes for new event' 30
The number at the end corresponds to the duration of new events in minutes. You can change this to any number you like, including zero, which will create events with the same start and end time. You will need to restart iCal for the changes to take effect.
If you want to set it back to the default 60 minutes, you can either repeat the command with 60 at the end, or use the following command:
defaults delete com.apple.iCal 'Default duration in minutes for new event'
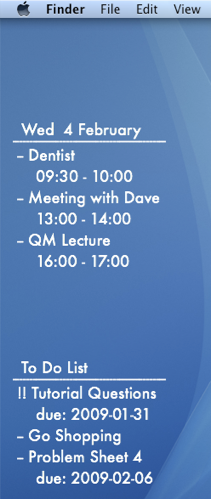
Display iCal Events and a To Do list on your desktop
If you are looking for more Geektool scripts then check out the Mac OS X Tips Geeklets site. It has loads of user-contributed Geeklets all in one place for you to download.
1. Get GeekTool and iCalBuddy
To set this up you need to download two (free) applications. The first is GeekTool, a preference pane that allows you to display files, images and shell scripts on the Desktop. The second is iCalBuddy, a command line utility that lets you access events and to do items without having to open iCal.
Download GeekTool from here and install it by double-clicking on the preference pane. You can now access it by going to System Preferences and looking in the bottom row.
Download iCalBuddy from here and double-click it to unzip the folder. Then double-click the install.command file, and enter your administrator password when the window appears. You can then close the window.
2. Set up GeekTool
Once you click on the GeekTool section in System Preferences, you will see a window with three different icons. Drag the one called “Shell” to a position on the desktop behind the window. A black “Properties” inspector window will appear, where you can enter the settings for this geeklet. The bits you need to change are the Command and Style sections. In the command box, paste
date and click the button below to set the font and colour to something that complements your background and make it a bit bigger. If you look on your desktop now, the date should be written in the top left. You can click and drag this around to where you want it, or you can type in the position in the bottom right of the GeekTool window. As you can see, the time only updates every 10 seconds. You can change this in the Refresh box above the Command box.3. Change the appearance
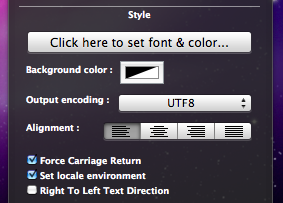
If you have a dark Desktop background, you may find that you can't see the date. By default the date appears in an ugly plain fixed width font with a black text colour. To make this more visually appealing, click on the "Colors and Font" tab and adjust the settings. You can see my settings in the screenshot below. Obviously lighter text colours work better with darker desktop backgrounds and vice versa.
The Shell option on GeekTool works just like the Terminal. If you type
date into the Terminal and press enter, you should get exactly the same thing back as shown by GeekTool. Conveniently, the date Terminal command has a number of options to change the style of the date. As you can see, the default setting includes the time, time zone and year that I don't really want. The command for my preferred date format is date '+%a %e %B' which gives something like Wed 18 February. Apple has a list of formatting options here you can use to change it to whatever you want. You need to put a + at the start, followed by the symbols for the bits you want. You can but punctuation like commas between the symbols, and the whole thing has to be enclosed in single quotes.

This is where the iCalBuddy application comes in. Create a new geeklet by dragging the “shell” icon onto the desktop as before. In the Command box type
/usr/local/bin/icalBuddy eventsToday. This should bring up a list of today's events on the desktop. There are loads of customisation options for iCalBuddy, so I won't go through them all, but I'll show you mine. The command I use is:/usr/local/bin/icalBuddy -nc eventsToday | sed -e "s/*/--/" | sed -e "s/!/!!/"-nc part removes the calendar name in brackets because all my events are in the same calendar. The sed -e "s/*/--/" part changes the * at the start of each event to a -- because I think it looks better. The "sed" and "awk" commands are really useful for customising the output, but I won't go into much detail here. Just do a Google search for a tutorial if you want more information. For the different iCalBuddy customisation options, check out the man page.One customization to note is the "eventsToday+NUM" option. Replacing
eventsToday with eventsToday+3, for example, will display the events for the next three days in separate sections titled by the date.6. Add to do items
To do items work in pretty much the same way as the iCal events. The command to use is
/usr/local/bin/icalBuddy uncompletedTasks. Similar to before, the command I use is:/usr/local/bin/icalBuddy -nc uncompletedTasks | sed -e "s/*/--/" | sed -e "s/!/!!/"7. Add some titles
If you just want GeekTool to display some text, the easiest way to do it is to use the
echo command. Just create a new entry and use the command echo To Do List to make it display "To Do List" on the Desktop.8. Set the Refresh rate
The next thing to do is to set a suitable refresh rate for each item. It is worth noting that these command take very little system resources, and having them all update every 10 seconds produces absolutely no decrease in performance whatsoever that I've noticed. However, in principle you should only really make them refresh as much as you need them too. I've set all mine to update once an hour (3600). This means that the worst case scenario is that the information is wrong for up to an hour between midnight and 1am each night. If you like having the time displayed in the date command, you probably want that to update every second.
8. Make it pretty
Finally, you just have to change the font and colour of each entry and position them somewhere you want on the Desktop. I went for the far left as it's a place guaranteed not to get covered up by icons.
9. Go crazy
There are hundreds of things you can do with GeekTool, and it's definitely worth trying them out and seeing what you like. In the end, I only kept the iCal events and to do list, but you may like having constant updates of your uptime, running processes, CPU use, local weather maps, IP address, current iTunes track etc. Check out the Mac OS X Tips Geeklets site for more.
Applescript your Calendar Colours
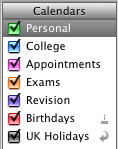
A more interesting way to solve this problem is by using randomly generated colours. To do this, we'll need to write a quick, easy AppleScript.
If you are using Mac OS X 10.3 or later, simply click this link to automatically open up Script Editor with a window containing the script you need.
If you are using an older version of Mac OS X, load up Script Editor (from /Applications/Applescript) and paste the following script into the window that appears:
tell application "iCal"
set calnum to (count every calendar)
repeat with currentnum from 1 to calnum
set calcolour to (the color of every calendar)
set red to random number 65535
set green to random number 65535
set blue to random number 65535
repeat until calcolour does not contain {{red, green, blue}}
end repeat
set red to random number 65535
set green to random number 65535
set blue to random number 65535
set the color of calendar currentnum to {red, green, blue}
end repeat
end tell
Now all you need to do is click Compile (the hammer icon) and then click Run. iCal will load up and each of your calendars will be assigned a new colour. It doesn't work perfectly - sometimes two colours will be very similar. However it is much more fun than going through each calendar individually and this is a great example of just how powerful AppleScript can be.
Get Custom Audio or Visual Alerts
You can add your own alert sounds by placing audio files in a certain folder. Before you do that however, you will need to convert your sound file to the AIFF format using iTunes. Open up iTunes and choose Preferences from the iTunes menu. In the Advanced section, click on the Importing tab and choose AIFF encoder from the pop-up menu. Click OK.
![]()
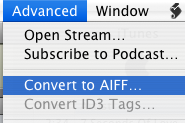
If the audio file you want to use is in iTunes, select it and then click on the Advanced menu. In here choose Convert selection to AIFF. If you audio file is somewhere else, hold Option while clicking on the Advanced menu and choose Convert to AIFF. This will bring up a dialog that will allow you to navigate to your audio file. Once the file is done converting, go back to the preferences and change the "Import Using" pop-up menu back to AAC.
Now we have to get this file to show up in the Alerts list in System Preferences, Mail and iCal. Open up your user folder, look in the Library for a folder called Sounds and drag the sound here from iTunes. Your new alert should now be in the list in the Sounds section of System Preferences.
Make your alerts visual
An alternative to the audio alert is a visual alert, which is basically a screen flash. You can turn this on in the Universal Access section of System Preferences, under the Hearing tab. This will flash the screen as well as playing an alert sound. If you want to get rid of the sound and just have the flash, go to the Sounds section of System Preferences and move the Alert Volume Slider all the way to the left.
![]()
Annoyingly, this will also mute the feedback you get when the volume is changed and the interface sound effects (like when you move something to the trash). If you're fine with this then use the method above. However if you still want these other sound effects, there is a better (but more complicated) solution.
Mac OS X will also flash the screen if for some reason it is unable to play the selected audio alert. To make this happen, open up TextEdit and press Command-Shift-T to convert the document to plain text. Save this empty file as Flash.aiff in the sounds folder inside your Library. If a dialog asks you which extension to use, choose .aiff.
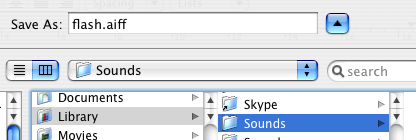
Now if you look in your alerts list in System Preferences there will be an alert called Flash that does exactly that - flash the screen. This is because Flash.aiff isn't really a sound file. When your Mac tries to play it and can't, it flashes the screen instead to make sure you still see an alert.
Peek inside Mac OS X Packages
Packages are great because they allow the developer to store all the important related files inside the application. They are also great because they make it very easy to tinker with the way applications work.
To view or edit a package's contents, Control-click (or Right-click) on the application and select Show Package Contents from the context menu. This will bring up a finder window containing a folder named Contents. Inside here is the actual package contents.
The following are a few examples of what you can do inside Mac OS X packages.
Warning: It is a good idea to keep a backup of any file you modify. To do this, just Option-drag the file to copy it to a safe place before making any changes to the original.
1. Change Unexpectedly Quit message
With some tinkering it is possible to customize Mac OS X alert messages and dialog box text. For a bit of fun, you can change the message that appears when an application crashes to something more humorous.
Open up your hard drive and navigate to /System/Library/CoreServices. Find the Crash Reporter package and open it by Control-clicking (or right clicking) and choosing Show Package Contents.
In the window that appears, navigate to Contents/Resources/English.lproj and find Localizable.strings. Copy it to your Desktop and open it up in TextEdit. Near the bottom of the file you will see the line -
/* Unexpectedly quit dialog */
In the lines that follow this it is fairly obvious how to change the message. The symbol "%@" will make the message display the crashed Application's name, and "\n" will make a line break. Save the file and then copy it back to the package to replace the old version. You will have to enter your administrator password.

2. Change an application's default icon
You probably know how to change an application's icon by opening up its Get Info window (Command-I), clicking on the icon and pasting a new one over it. You can use the Cut tool (Command-X) to remove this icon and return to the default. To change this default icon, you have to delve into the package. The icon file is stored in the Resources folder within the package contents, and normally has the same name as the application with the .icns extension. You can replace this file with any other icon file, whether it is downloaded from the Internet or taken from another application.
If you dislike the way the iCal icon always displays the date as July 17 when it isn't open, there is an alternative icon inside the iCal package. If you look inside the Resources folder you will find two icons - App.icns and App-empty.icns. To change which one iCal uses, simply rename App.icns something like AppJul17.icns and make a duplicate of App-empty.icns named App.icns.
Some people also dislike the iTunes 7 icon. This Mac OS X Hints article describes how to change it back to the one used in iTunes 6.
3. Open help files in a Web browser
Anyone who has ever used the Mac OS X help browser will admit that it is a little on the slow side. Annoyingly, it also lacks a Save command, meaning you have to go through the slow process of loading it up and finding what you want every time. Luckily, the help pages are just HTML files stored away inside the application's package. This means you can open them up in Safari, which is much quicker for browsing and allows you to save bookmarks and Save pages.
For example, to open up the iPhoto help, open up the iPhoto package in your Applications folder. Then navigate to the English.lproj folder inside the Resources folder. Here you'll find a folder called iPhoto Help with a file named iPhoto Help.htm inside. Double-click on this file to open it up in Safari.

Annoyingly, every now and again a link will open up in Help Viewer, but generally you can browse the help files from within Safari.
Things like Airport, Applescript, Bluetooth, iPod and Mac OS X itself don't have an Application package to store the help files in, so these are located in the Library folder. To find them, go to your Hard drive and look inside Library/Documentation/Help. Each of the .help files in here is a package.
4. Change Text Clipping Behaviour
5. Customize System Preferences
All the System Preferences panes are grouped into five categories - Personal, Hardware, Internet and Network, System and Other. It is quite easy to change these category names by going inside the System Preferences package, which is in the Applications folder. Inside it, navigate to the English.lproj folder inside the Resources folder. In here, find a file named NSPrefPaneGroups.strings and drag it to your desktop. Now open this file up in TextEdit and you'll see the following lines:
"personal" = "Personal";
"digitalHub" = "Digital Hub";
"hardware" = "Hardware";
"net" = "Internet & Network";
"system" = "System";
"addons" = "Other";
Don't change the words on the left, these are the ones used by System Preferences. You can change the words on the right. These are the ones displayed in the System Preferences window. Just make sure you don't delete any quotes or semicolons. Also, ignore the "Digital Hub" entry. This isn't used anymore and is probably just left over from a previous version of the operating system.
Now save the file and drag it back to the English.lproj folder from the Desktop. You will have to Authenticate this action with your administrator password.
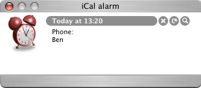
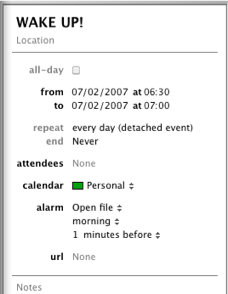
6. Modify iCal alarm message
Merge Two iCal Calendars
If you start off with two separate calendars it is fairly easy to merge them into one if you later decide to. Luckily you don't need to go through every single event and change the details. You can do them all in one with the export command.
First choose the calendar you want to get rid of. Select it in the calendars list, and go to the File menu and choose Export. Choose any name and location. You aren't going to need this file for very long, so save it somewhere like the desktop so you can easily get to it.
Now you are going to re-import the events into the calendar you are merging them with. Go to the File menu and choose Import. Navigate to the file you saved earlier, and click Import again. In the dialog box that appears, choose the Calendar you want to merge the events into.
If everything went OK and all the events are in one calendar, you can safely delete the other one.
5 Quick iCal Tips

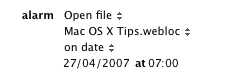
2. If you are really worried about missing an event, set more than one alarm for it. In the info panel for your event click on the word "alarm" and a menu will appear allowing you to add or remove alarms. You can even set alarms to go off after the event, for example if you need to drop someone off and then be reminded go pick them up an hour later.
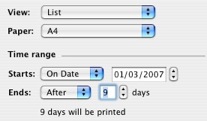
4. While iPhoto is great for printing pretty calendars, iCal offers a special customized print dialog that gives you much more flexibility in printing your calendars, albeit without the lovely photos. Check out this previous tip for printing To Do lists in iCal.
Printing To Do lists in iCal
Automate your Mac
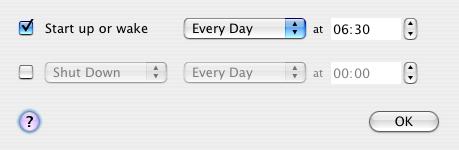
The first thing to do is to make your Mac turn on by itself. You can set it to do this in the Energy Saver preference pane in System Preferences. Just load it up and click "schedule" and choose a time to start up (and/or shutdown) and on which days you want this. This will also wake up your Mac if it is asleep, but this might not work if you have a password enabled screensaver.
As far a scheduling specific applications goes, you have to use applescripts or automator actions for most of them. If you aren't completely super lazy, it is pretty straightforward to create a workflow in automator that opens up a list of websites, or starts an iTunes playlist going. To get this worklow to be carried out at a certain time, create an event in iCal and set an alarm. As the alarm action, set it to open up the automator file.
However, in some applications you can get the same results without making workflows or scripts. For example, in Firefox you can set multiple websites as your homepage, and all of these will open up when you start Firefox. There are two ways to do this. The first is to create a folder of bookmarks with all the sites you want to load on startup. After creating this folder, go to the Firefox preferences and click "use bookmark" to select the folder. The alternative way is to type in each address into the homepage field with a | (pipe) in between. Be sure to set Firefox to load your homepage on startup using the dropdown menu.

Finally, some applications have built in scheduling capabilities. Microsoft Entourage has tools to set Send and receive schedules that check for email at certain times and Apple's Backup has its own scheduling feature to carry out automatic backups however frequently you want.
You can use all of these features to automate your Mac and make sure that you never have to carry out a tedious task again.
Top iCal Tips
The list of tips includes ways of getting the most out of iCal, organising multiple calendars and scheduling a "dash," a way to prevent procrastination.
Scheduled Startup and Shutdown
This is just about the only way to schedule things without buying other software or using iCal. Basically you can set your computer to come on in the morning on weekdays and go off in the evening for example.
I combine this with a locked screen saver. In the evening I start my "Big Clock" screensaver, then put my mac to sleep. In the morning it wakes up at a specified time, and loads the password dialog box. Then, when no password is typed in, it goes to the screen saver after 30 seconds. This means when I wake up in the morning I can look over and see the time in big bright letter next to me, without them on all night to wake me up.
You can also combine this with an applescript or automator actions to play music or load web pages every morning. After writing the script to do this, set a daily alarm in iCal that loads it every morning, but make sure to make it a minute later than the time your mac wakes up from sleep.