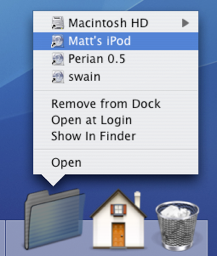
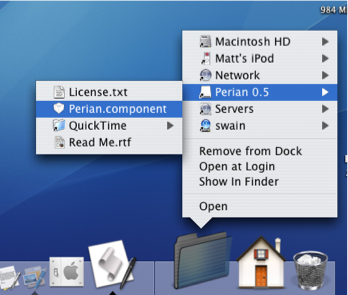
Create a Drives Menu in the Dock
In the Dock you can use the section to the right of the divider to store folders. Many people choose to put their user folder or Hard Drive here for easy access. One of the greatest benefits is that you can right click (Control click) on the icon to get a handy pop-up menu containing the contents of the folder. From here you can navigate through to any file contained within.

This works great, apart from with the Volumes folder. If you don't already know, the Volumes folder contains your Hard Drive, CDs, DVDs, Disk Images, iPods, iDisks and any other mounted media devices. To get to this folder, choose "Go To Folder" from the Go menu and enter /Volumes. You'll find that if you put this folder in the Dock you can still right-click to view the pop-up menu, however you can't navigate into any of the drives apart from your startup disk (Probably Macintosh HD).
The work around for this involves creating a folder action using AppleScript to make a self-updating Dock pop-up menu. Start by opening up Script Editor (located in Application/AppleScript). Paste the following script into the window that appears:
property scriptfolder : ((path to documents folder) as string) & "Drives"
on run
   tell application "Finder"
       if not (exists alias scriptfolder) then
           make folder at folder ((path to documents folder) as string) with properties {name:"Drives"}
       end if
   end tell
    Update()
end run
on adding folder items to thisfolder after receiving addeditems
   Update()
end adding folder items to
on removing folder items from thisfolder after losing theseitems
   Update()
end removing folder items from
on Update()
   tell application "Finder"
       set theFolder to folder script_folder
        delete every item of theFolder
        set theDisks to disks
        repeat with i in theDisks
           make new alias at theFolder to i
       end repeat
   end tell
end Update
Click Compile (the Hammer icon) and then click Run. The first time you run this script it will create a folder named "Drives" in your Documents folder and put an alias to every drive in it. You can drag this to your Dock and you will have a Drive pop-up menu that allows you to navigate through all of your mounted media. However, the list in the menu only updates when the script is run. This is where Folder Actions come in to make the script run every time a new drive is mounted or a drive is removed.
Save the script to your desktop and then go to your user folder and navigate to Library/Scripts/Folder Action Scripts/. You may need to create these folders if they don't already exist. Drag your script from your desktop over to here. Now we have to attach it to the Volumes folder.

As described earlier, to get to the Volumes folder choose "Go To Folder" from the Go menu and enter /Volumes. Right click (Control Click) on the icon and choose "Enable Folder Actions" (If folder actions are already enabled this will say disable - don't click it!). Then right click again and choose "Attach a Folder Action". Choose the script you saved earlier.

If you haven't already dragged the "Drives" folder from your Documents folder to the Dock, do so, and then you're done. Note that every time the list updates it moves the old list to the Trash, so if you insert and remove CDs, external Hard Drives, iPods etc. often, the Trash will get quite full. You might also want to change the icon of the Drives folder to something a bit nicer than the standard folder icon.