A collection of tips for iTunes 11
iTunes 11 is the most radical update for iTunes in a long while. It’s a fairly comprehensive redesign, although it’s quite clearly the same app under the surface. Here’s a collection of cool new things you can do in iTunes 11.
Up Next
Up Next is the headline new feature that is a great improvement on iTunes DJ which it replaces. For any song you can right-click and choose Play Next to add it to the top of the Up Next List, or Add to Up Next to add it to the end. You can also just drag a song up to the centre display in the top toolbar. Alternatively, just hold down the Option key and click the plus (+) icon that appears next to the song, or press Option-Return while the song is selected.

All of the above applies to entire albums and playlists as well as individual songs, or an arbitrary selection of multiple songs. It even works with songs from a shared library on another Mac or on a connected device.
Unfortunately the rarely used song voting features that were part of iTunes DJ have gone, but Up Next is much simplified and will undoubtably be more widely used.
Click and drag
Since the sidebar is now gone, you could be forgiven for thinking you can no longer just drag songs into a playlist or onto a connected iPhone, iPod or iPad. But if you try it, you’ll find a sidebar slides in from the right as soon as you start dragging a song — allowing easy access to all your playlists and devices.
The new miniplayer
iTunes has had a miniplayer for years, but it has been completely redesigned in iTunes 11 with a few new features. Firstly, the way you switch to and from the miniplayer has changed: Instead of clicking the green zoom button, there’s now a small rectangular icon in the top right of the iTunes window, next to the full screen button. You can also use keyboard shortcuts - Command-Option-M will switch to the miniplayer, and Command-Option-3 will open up a separate miniplayer in addition to the regular iTunes window. The benefit of having both is that you can have the main iTunes window full screen, with the miniplayer still present on other desktop spaces.
The miniplayer displays the song and artist until you place your mouse cursor over it, when it switches to display playback controls. Be aware that if you have full keyboard access enabled in the Keyboard section of System Preferences, the miniplayer will only display the controls. You can tell this is the case if you have a blue “halo” around one of the control buttons that moves when you press the Tab key.


The best new feature of the miniplayer is that you now have access to your entire music library without having to switch back to the full size iTunes window. Just click the magnifying glass search button (or press Command-F) and begin typing the name of the artist, album or song you want to play. You can play it right away by selecting it and pressing return, or add it to the “Up Next” list by pressing Option-Return.

If you find yourself wondering where the volume controls have gone, try clicking in the AirPlay button. This should display a popup that allows you to control the volume on your Mac and separately for any connected speakers.
Navigate with the keyboard
With the sidebar gone, navigating to the different areas of your library can feel a bit harder, even though it’s only one extra click away. To make things easier, you can use the Command key with the numbers one through seven to access different areas:
- Command-1 : Music
- Command-2 : Movies
- Command-3 : TV Shows
- Command-4 : Podcasts
- Command-5 : iTunes U
- Command-6 : Books
- Command-7 : Apps
You’ll need to make sure none of these sections are disabled in the iTunes Preferences otherwise the shortcut won’t work.
Another cool trick is navigating with the arrow keys in the album view — up, down, left and right will move the selecting from album to album, sliding out the song lists as the selection moves. Press Tab to move the selection to the song list, then Escape to go back to the albums.
Redeem gift cards with your camera
While in the iTunes Store, clicking Redeem in the menu on the right now brings up a camera view in addition to a simple text field. This allows you to hold up your gift card and the code is inserted automatically. I haven’t been able to test this as it doesn’t seem to be available for me, possibly due to being outside the USA. Also, interestingly this feature was the result of a collaboration with a 3rd party app developer named Geppy Parziale, who may have got a telling off from Apple for blogging about the work.
Search your entire library
The search feature in iTunes used to just act as a way to filter the list you were currently looking at. Now, as you type in the search field, items from your library appear in a popover, no matter what you are currently looking at. The order does change depending on where you are — the media type you are looking at (movies, music, podcasts, etc.) appear higher in the list.
Typing a search term and pressing return will filter the current view, just like older versions.

Change it back!
So you hate everything new? It’s not too tricky to get iTunes back to roughly the same as it used to be. First, click Songs in the navigation bar across the top to return to the classic song list. Next, chose Show Sidebar and Show Status Bar in the View menu to bring those elements back. You might also want to choose Hide Music in the Cloud in the View menu.
Show duplicates
It’s gone! Walt Mossberg assures us though that it will be back soon in the next minor bug fix update of iTunes. It is also likely that minor bugs with missing album artwork and marking a song as a podcast will also be fixed. On the other hand, apparently Apple has no intention of restoring the Cover Flow album art view.
Home videos
There’s a new Home videos classification for movies. This prevents the awkward situation where any videos stored in iTunes had to be shown alongside either your movies or TV Shows from the iTunes Store. Videos imported to iTunes from elsewhere automatically get this classification. To change the classification on a movie, just choose Get Info (Command-I) and change the Media Kind drop-down menu under Options.

Get iTunes track notifications in your Dock
In Lion there is a cool hidden setting to enable “Now playing” notifications that appear from the iTunes icon in the Dock. Every time a new song starts, a small popup containing the artist and the song name appears and then slowly fades out after a few seconds.
To enable this, start by opening Terminal (located in Applications/Utilities), then paste in the following line and press Return.
defaults write com.apple.dock itunes-notifications -bool YES
For the changes to take effect, the Dock has to be restarted. The easiest way to do this is to type killall Dock into the Terminal and press Return. If you change your mind and want to disable the notifications, repeat the above commands, but replace YES with NO.
For those of you who have your Dock set to hide when not in use, you’ll notice that when the Dock is hidden the iTunes icon is added to the notification. If you want the icon to show even when the Dock is not hidden, just use the following command in the same way as above:
defaults write com.apple.dock notification-always-show-image -bool YES
As before, remember to restart the Dock with killall Dock for changes to take effect.
It’s not entirely clear why this setting isn’t present in the iTunes preferences. It might still be under development — there is still room for improvement. For example it would be better if it included the album artwork like Bowtie, Growl and DockArt already do. It could also be a sneak peak of future plans Apple has for a notifications framework for all apps in Mac OS X, much like Growl provides at the moment.
Add any text to iTunes as a spoken track
There’s a great feature in Mac OS X that allows you to take any block of text and transfer it into iTunes as a spoken track, which you can then easily sync to an iPhone or iPod. This is done using a ‘Service’ that comes built into your Mac, but is disabled by default in Snow Leopard. This article explains how to enable it, and, for those who are interested, I’ve also included a short tutorial on how to add some improvements to make it more like the new version that will be included with Lion.
First, to enable the Service, go to the Keyboard section of System Preferences. This may sound like a bit of a weird place to have the Services settings, but it makes more sense when you consider pretty much the only setting for Services apart from turning them on and off is assigning keyboard shortcuts.

Click the “Keyboard Shortcuts” tab, and then choose “Services” from the list on the left. There are loads of great little features hidden away in here that are worth checking out, but for now just find “Add to iTunes as a Spoken Track” in the list on the right and make sure the checkbox next to it is checked. You might also want to add a keyboard shortcut if you think you might be using this often.
Now, whenever you have a block of text selected, just right-click on it and choose “Add to iTunes as a Spoken Track.” iTunes should open up, and a new track called “Text to Speech” should have appeared in your music library.
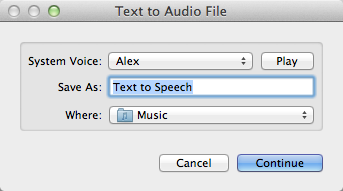
In Mac OS X Lion (coming out next month), this Service is enabled by default, and has been upgraded to give you the option to choose the voice used and the name and location of the track in iTunes. The screenshot below gives a little sneak preview of what to expect.
In the meantime until Lion is available, we can do a bit of tinkering to make our current Snow Leopard version almost as good as the upcoming Lion version. Like many Services, it is actually just an Automator workflow that you can easily modify yourself using ready-made building blocks. To see how this works, open up Automator (located in the Applications folder) and click “Open an Existing Workflow.” Navigate to
Macintosh HD/System/Library/Services/
and choose “Add to iTunes as a Spoken Track.”
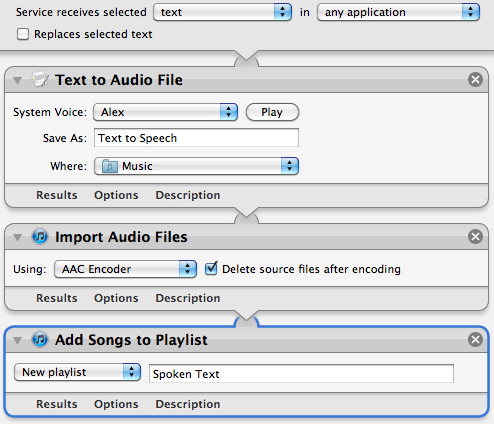
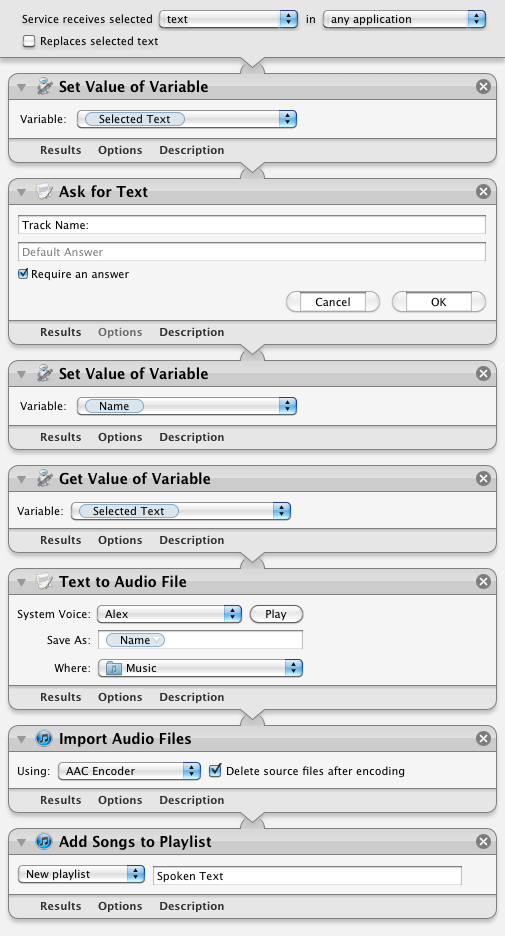
First lets familiarise ourselves with how this workflow operates. The selected text input comes in from the top into the “Text to Audio File” action. This creates an audio file with the specified voice and file name, and saves it in your Music folder. This file is then used as the input to the “Import Audio Files” action. This takes the file, adds it to iTunes, then deletes the original file. Finally, the “Add songs to Playlist” action takes this song and puts it in the specified playlist.
It’s quite clear that we can change the playlist, file name and voice from here, but with a bit of work we can make the Service work like the Lion version, where you are prompted to choose these values each time you run it.
First, if the Library isn’t visible, click the “Show Library” button in the top left of the window. This shows all the available actions we can add to the workflow. To start off, our main aims are to:
- Display a popup window that asks us what we want to call our track.
- Put that value in the “Save As” text field in the “Text to Audio File” action.
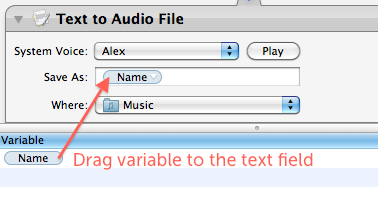
To do this, we need to add two actions to the start of the workflow. Drag across the “Ask for Text” action and the “Set Value of Variable” action, and place them above all the existing actions in the workflow. In the “Ask for Text” action, set the question to “Track Name:” and tick the checkbox “Require an answer.” In the “Set Value of Variable” action choose “New Variable...” from the drop-down menu, and call it “Name.”
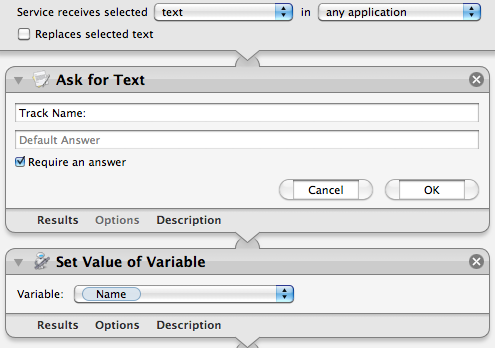
So what exactly is this thing called a “variable” that we’ve just created? Basically it just gives us a way to store a value (in this case the chosen file name) and then use it later in a different place. Once you have created the “Name” variable, you should see it in a new list that has appeared at the bottom of the workflow area. Using this variable in other places is simply a case of just dragging it there. So select “Name” in the list at the bottom, and drag it onto the “Save As” text field in the “Text to Audio File” action.
Great, it looks like we’re all done! But wait — there’s actually a small problem with our workflow. Look carefully at the order of the actions in the workflow, and think about how the output of each action acts as the input to the next action. The selected text comes in from the top, but the first action (“Ask for Text”) just ignores this, and outputs the chosen file name. This is passed on through the subsequent actions, meaning that the text that is spoken is actually just the file name instead of the selected text!
So the two new actions that we have added have got in the way, and don’t allow us to pass the selected text through to the “Text to Audio File” action. What we need is some way of storing the selected text somewhere safe, then retrieving it later to use in another place ... luckily that’s exactly what variables are for!
It just takes another two actions to save and then retrieve a variable. First, add a “Set Value of Variable” action right at the start of the workflow, before all the existing actions. Once again, choose “New variable...” from the drop-down menu, but this time call it “Selected Text.” Now the selected text is stored away safely in a variable while we do other things. To retrieve the value later on when we need it, add a “Get Value of Variable” action just before the “Text to Audio File” action. Finally, make sure “Selected Text” is chosen in the drop-down menu, and also right-click on the “Get Value of Variable” title and choose “Ignore input.” The final result should look something like the following screenshot:
Note: You will find that Automator won’t let you save over the built-in Service, so you will have to choose “Save As” and give this Service a new name. Further extending the workflow to allow the user to also choose the name of the playlist is really easy and can be done in exactly the same way, but choosing the voice is a bit more complicated, and can probably only be achieved using a bit of AppleScript.
Only show exact duplicates in iTunes
A great feature of iTunes is the “Display Duplicates” option that is located in the File menu. This is really useful for finding duplicate songs in your iTunes Library and deleting them.
However, by default, iTunes is quite lenient about what it defines as a duplicate. As long as the Song Name and Artist are the same, the song will be counted as a duplicate. This can be a bit annoying, for example if you have different versions of the same song on different albums and you want to keep both.
To make iTunes more strict when showing duplicates, hold down the Option key before selecting the menu item. You should see it change to “Display Exact Duplicates.” Now only songs that have exactly the same information will be displayed, allowing you to more easily find the true duplicates.

12 tips for iTunes 10
iTunes 10 has been released, and with it we get some great new features and some interesting user interface changes. Here is a collection of tips and tricks to help you get the most out of what’s new.
Make the Close, Minimize and Zoom buttons horizontal
Apple’s decision to rotate the red, yellow and green control buttons to save space has caused a bit of an outrage. If you prefer the way the old style looked, you can change it back using a Terminal command. Just open up Terminal (located in Applications/Utilities), paste in the following line and press Return.
defaults write com.apple.iTunes full-window -1
Now just quit and reopen iTunes, and the buttons should be back to their horizontal orientation. If you decide you want the new vertical style back, just use the following line in the Terminal instead.
defaults write com.apple.iTunes full-window -0


The Artwork player
If you like the iTunes miniplayer (press the green button) then you’ll want to try out the new artwork player. First make sure you have the album artwork displayed by clicking the fourth from left button on the bottom bar. Then, while a song is playing, click on the artwork to bring up the artwork player. When you hover over the artwork, the name of the song and some playback controls will appear. Now you can just close the main iTunes window and use this window to control your music.
Change the new icon
If you can’t bear to part with the old iTunes icon, don’t worry, it’s really easy to change back. First, download the old iTunes.icns file. Then find iTunes in your Applications folder, right-click on it and choose “Show Package Contents.” Find the Resources folder inside the Contents folder, and then drag the iTunes.icns file here. This will replace the new iTunes.icns file, so you might want to create a backup of it in case you ever want to change back.
There are also a load of alternative iTunes icons available on the internet (This one is good). Generally these won’t be available as icns files, but you can still use them as your iTunes icon. Find the image you want to use, right-click on it and choose “Copy.” Then select iTunes in your Applications folder and choose “Get Info” from the File menu. Finally, just click on the icon in the Info window and press Command-V or choose “Paste” from the Edit menu. If this doesn’t work right away, you may need to change your permissions to “Read & Write” at the bottom of the Get Info window first.
Alternatives to broken Automator workflows
Unfortunately there seems to be a bug in the new iTunes that breaks Automator workflows that involve iTunes. Old workflows won’t load, and if you go to create a new one you will find that the iTunes actions are missing. Hopefully this bug will be fixed soon, but for now you can get most of the same functionality using AppleScript. Check out the brilliant Doug’s AppleScripts for iTunes site for AppleScripts that do the same tasks as your Automator workflows.
Creating ringtones
If you were one of the few people who loved paying 99¢ to turn a song you already own into a ringtone, you will be disappointed that this functionality is gone from iTunes 10. Fortunately, you can still do it for free using the usual method.
To do this, first find the portion of a song you want to use as a ringtone, and note down the start and end times. Right-click the song and choose “Get Info" and then go to the Options tab. Enter the start and end times here, then click OK. Right-click on the song again, but now choose “Create AAC version." This should create a copy of the song that is only the length that you specified. Delete this new copy, but make sure you click “Keep File.” In the Finder, go to your Music folder and navigate into your iTunes music and find the file you just created. Change the file extension from “m4a" to “m4r,” then double-click it to add it back into iTunes as a ringtone.
Hiding sections in the sidebar
The disclosure triangles to show and hide the Devices, Genius, Shared and Playlist sections in the sidebar are gone. But if you hover your mouse over one of these titles, a “Show” or “Hide” button appears.

Bring back colours in the sidebar icons
If you hate the lack of colours in iTunes 10, you can do a bit of a hack to bring back some of the old icons. First you will need to find a modified iTunes.rsrc file somewhere on the internet. You can find some here, here, and here, and they all offer slightly different sets of icons.
Once you have found one you like, find iTunes in your Applications folder, right-click on it and choose “Show Package Contents.” Navigate to the Resources folder, and create a backup of the iTunes.rsrc file by dragging it to the Desktop. Then just drag the modified iTunes.rsrc that you downloaded into the Resources folder. You will need to quit and reopen iTunes for the changes to take effect. Just drag your backup file back into the Resources folder from the Desktop if you want to change back to colourless icons.
Remove sidebar icons
If you don’t like the colourless icons or the colourful ones, you can now get rid of them altogether. Just go to iTunes Preferences and un-check “Show source icons” under the General tab. This gives you a tiny bit more horizontal space, and makes the list look a bit cleaner.
![]()
Revert to the old hybrid view
Steve Jobs is very proud of the fact that the new iTunes hybrid view knows not to display the album artwork if you have less than five songs from the album. If you preferred the old system where the artwork was always displayed, just go to the View menu and choose “Always show Artwork.”
Hide the checkboxes
This is a welcome addition for everyone who doesn’t use the checkboxes that are shown next to every song in list view. In the iTunes Preferences just un-check “Show list checkboxes” under the General tab. Even if you do use the checkboxes (for example to select which songs sync to a iPod), you can still hide them for everyday use, and show them temporarily when you want to change which songs are checked and unchecked.
Manually pick “Music I like" on you Ping profile
If you don’t agree with the 10 albums that Ping automatically adds to the “Music I like” section of your profile, you can change them to whatever you want. On your Ping profile click “Edit profile” then scroll down to the “Music I like” section. Here you can click “Manually pick the music to display” and then use the search tool to add your favourite albums.

Share a link to your Ping Profile
If you want to send your friends a link to your Ping Profile, just right-click on your name at the top and choose “Copy link.” You can then paste it into an email, tweet or Facebook message to share it with whoever you want.
Set a poster frame in iTunes
When you add new movies and TV shows to iTunes, it automatically creates an image to display as that video's icon. To create this image it just takes one of the first few frames of the movie, hence why it's called the poster frame. Unfortunately, this normally just gives you an image of some movie studio logo, which isn’t very descriptive.

This isn't a problem if you add a custom poster (check out GetVideoArtwork), but occasionally a proper poster isn't readily available.
A simple solution to this problem is to choose another frame of the movie to use as the poster frame. To do this, just start the video playing in iTunes, go to the frame you want to use and then pause it. Then just right-click on the video and choose "Set Poster Frame." A good frame to use is when the title of the movie or TV show is displayed.

Top 15 Terminal Commands for Hidden Settings in Snow Leopard
Every time Apple brings out a new version of OS X, we compile a list of our favourite Terminal commands for enabling hidden features and changing hidden settings (here are the lists for Tiger and Leopard).
For those who are new to Terminal Commands, here's a quick run down of how to use them. Don't worry, it's really easy. Start by opening up Terminal, located in the Utilities folder in the Applications folder. In the window that appears, paste in one of the lines provided below, and then hit Return. For the changes to take effect, you need to restart the application concerned. For applications like the Dock or Finder, it is easiest to just type killall Dock or killall Finder into the Terminal to restart them. To reverse the changes, you just need to change the last word of the command and run it again. If the last word is YES, change it to NO, change 1 to 0, and change TRUE to FALSE and vice versa for all.
1. Folder previews in Quick Look
This is my favourite hidden feature in Snow Leopard. When enabled, using Quick Look (hit the space bar) on a folder will show you a preview of the folder's contents inside a translucent folder icon. The previews of the files inside the folder also cycle through so you can see all of them. Just use the following command:
<code>defaults write com.apple.finder QLEnableXRayFolders 1</code>
You will need to restart the Finder, either by typing killall Finder into the Terminal or by Control-Option-clicking on the Finder in the Dock and choosing Relaunch.
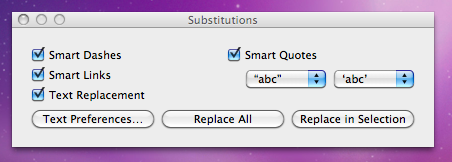
2. Globally enable Text Substitutions
You may have realised that the new text substitutions feature in Snow Leopard isn't enabled in all applications by default, most noticeably in Safari. To enable it , you need to right-click on a text box and choose Substitutions then Show Substitutions. To globally enable text substitutions, use the following three commands one at a time. The first one will enable substitutions, while the second will enable dash replacement and the third will enable spell checking.
defaults write -g WebAutomaticTextReplacementEnabled -bool true
defaults write -g WebAutomaticDashSubstitutionEnabled -bool true
defaults write -g WebContinuousSpellCheckingEnabled -bool true
If you decide there are some specific applications where you want to disable these again, you can do it in the normal way. As always you will need to restart each application for the changes to take effect.
3. Bring back AppleScript Studio palette
As of Snow Leopard, AppleScript Studio has be deprecated in favour of AppleScriptObjC. You can still work on AppleScript Studio projects, but you can't create new ones, and the AppleScript Studio palette in Interface Builder is gone. To bring it back, use the following command:
defaults write com.apple.InterfaceBuilder3 IBEnableAppleScriptStudioSupport -bool YES
4. Disable "focus follows mouse" in Terminal
In Leopard there was a Terminal command to make the Terminal's window focus change with mouse movement. If you had previously enabled this, you will find things don't work quite right in Snow Leopard when you use Command-Tab to switch between applications in different spaces. To fix this, you will need to disable the focus follows mouse behaviour using the following command:
defaults write com.apple.Terminal FocusFollowsMouse -string NO
5. Force Dictionary to only use one window
If you aren't a fan of using Command-Control-D to quickly look up definitions, you might use the "Look up in Dictionary" contextual menu item or Services menu item. In Snow Leopard, each word you look up using these methods opens in a new Dictionary window, which gets a bit annoying. To make each word you look up open in the same window, just use the following command:
defaults write com.apple.Dictionary ProhibitNewWindowForRequest -bool TRUE
6. Change the behaviour of the green zoom button in iTunes
With the release of iTunes 9, Apple messed around a bit with the behaviour of the green zoom button in iTunes. Things are back to normal as of iTunes 9.01, but briefly the green button maximised the window instead of switching to the mini-player. If you liked the temporary change, you can bring it back using the following command:
defaults write com.apple.iTunes zoom-to-window -bool YES
Of course, you can always get the alternative behaviour by holding the Option key and clicking in the green button.

7. Debug menu in Address Book
The debug menu has been available in Address Book for some time, but there are some new additions in Snow Leopard. If you don't already have it enabled, the command is:
defaults write com.apple.AddressBook ABShowDebugMenu -bool true
Restart Address Book, and then click Debug in the menu bar to see the new options. You can enable reflections under contacts pictures, get to the "People Picker Panel" and enable a debug panel called "Ye Olde Debug Settings”.
8. Autoplay movies in QuickTime X
One of the weird things about the new version of QuickTime is that it has no Preferences. Luckily you can still change things using the Terminal. To make a movie automatically start playing when you open it, use the following command:
defaults write com.apple.QuickTimePlayerX MGPlayMovieOnOpen 1
9. Keep QuickTime in full screen when switching applications
If you are watching a movie in full screen in QuickTime and you use Command-Tab to switch to another application then the movie will automatically exit full screen. To make it stay full screen in the background, use the following command:
defaults write com.apple.QuickTimePlayerX MGFullScreenExitOnAppSwitch 0
10. Disable Rounded corners in QuickTime
If the slightly rounded corners of movies in QuickTime bug you, use the following command to disable them:
defaults write com.apple.QuickTimePlayerX MGCinematicWindowDebugForceNoRoundedCorners 1
11. Always or Never show titlebar and Controller in QuickTime
The following two commands either permanently enable or disable the titlebar and controller that pop up when you mouse over a movie in QuickTime:
defaults write com.apple.QuickTimePlayerX MGUIVisibilityNeverAutoshow 1
defaults write com.apple.QuickTimePlayerX MGUIVisibilityNeverAutohide 1
12. Automatically show closed captioning and subtitles on opening
This turns on subtitles and closed captioning automatically when you open a movie that supports them.
defaults write com.apple.QuickTimePlayerX MGEnableCCAndSubtitlesOnOpen 1
13. Make list view stacks work like grid view Stacks
This command slightly changes the behaviour in Stacks in list view. Once enabled, they act more like grid view Stacks, but with a single list of files and icons on the left. The main difference is when "drilling-down" through folders within the Stack.
defaults write com.apple.dock use-new-list-stack -bool YES
You will need to restart the Dock for changes to take effect. The easiest way is to use killall Dock in the Terminal.
14. Enable mouseover highlight in stacks
If you want items in grid view stacks to highlight when you move the mouse over them, use the following command. It's slightly different from the equivalent in Leopard. Also, note that you can get the highlight behaviour in Snow Leopard without using this command by using the arrow keys to select items in a stack, or by clicking and holding on a stack before dragging the mouse up onto the grid.
defaults write com.apple.dock mouse-over-hilite-stack -boolean YES
You will need to restart the Dock for changes to take effect. The easiest way is to use killall Dock in the Terminal.
15. Set a precise screensaver password delay
A useful new feature of Snow Leopard is the ability to set how long your Mac is asleep or how long the screen saver is on before it requires a password to wake up again. You can access this from the Security section of System Preferences. However, you have to choose a time period from a drop-down menu, and you can't enter your own custom time period. To do this, use the following command. The number at the end is the time in seconds. For example 1800 is 30 minutes, which bizarrely isn't an option in the drop-down menu.
defaults -currentHost write com.apple.screensaver askForPasswordDelay -int 1800
9 Tips for iTunes 9
1. Nested rules for smart playlists
As well as the plus and minus buttons for adding multiple rules to a smart playlist, there is now an ellipsis button for adding nested rules. Whereas before you could only set it to match any or all of the rules, now you can make more complex rule combinations.
For example, you could set the first rule, then add two rules at the first nested level by clicking the ellipsis button and then the nested plus button. By then setting the top level to match all rules, and the nested level to match any rules, it will find songs that match both the first rule and either of the two nested rules.

2. Automatically Add to iTunes folder
iTunes stores all of your music inside the iTunes Music (or iTunes Media if you haven't had a previous version of iTunes) located inside the Music folder in your user folder. There is a new addition inside the iTunes Music folder called "Automatically Add to iTunes". Anything that you drop into this folder will be added to iTunes next time it opens, or instantly if it is already open.
This folder isn't in a very convenient place, so to use it properly you will want to drag it to the Dock or Finder sidebar, or create an alias on the desktop by holding Command and Option and dragging it.
Another great use for this is for copying music across a network to another Mac. Instead of having to go over to the receiving Mac and opening up iTunes to import the music, you can just drop the files in this folder directly from the sending Mac.
3. Organise the iTunes Media folder
The disorganisation of the iTunes Music folder really shows how iTunes has far outgrown its original purpose. Every time Apple has added a new feature, things have become more muddled. Up until now, Movies, TV Shows, Audiobooks and Ringtones etc. have been added as subfolders of the Music folder, which doesn't really make sense.
To fix this, you can choose “Organize Library” under “Library” in the File menu. In the window that appears, click “Upgrade to iTunes Media organization” and when you click OK, iTunes will sort out the mess in your iTunes Music folder. You will now have an iTunes Media folder, with subfolders for Music, Movies, Apps, TV Shows etc.
There is one reason you might want to avoid doing this however. Your next Time Machine Backup will probably take a long time, depending on the size of your media library.

4. Customize the column browser
The column browser in iTunes 9 is better than ever. You can enable it by choosing Show Column Browser from the View menu or by pressing Command-B. The new features that allow you to customise it are located in the Column Browser submenu of the View menu. You can position it to the top or to the side of the main music list, and you can choose which columns appear from Genre, Artist, Album, Composers, and Groupings.
Each playlist can also have its own browser. Apple have demonstrated this by adding a "Classical Music" playlist which has the Composer and Grouping columns, for those who group their music by Composer or Symphony rather than by Artist and Album.

5. Edit your iPhone's app screen
There is a new page for managing which Apps you want to sync to your iPhone and how you want to position them on your iPhone. When you have your iPhone or iPod Touch plugged in, just click on it in the sidebar and then go to the Applications tab.
It's fairly basic, but it's still loads quicker than organising your apps on the iPhone device. There are two major benefits: Firstly, you can drag and entire screen of apps in the list on the right to change the ordering on the screen. Secondly, you can hold Command when clicking apps to select more than one at a time and move them all together.
6. Different way to access the mini player
When you first download iTunes 9, you might think that the mini player is gone. Clicking the green zoom button in the top left now just changes the size of the itunes window instead of changing to the mini player. Now you have to hold Option when clicking the green button to get the old behaviour back.
Update: This appears to have changed back to normal with the iTunes 9.01 upgrade. If you liked the new 9.0 behaviour, simply use the following Terminal command to change it back:
defaults write com.apple.iTunes zoom-to-window -bool YES
7. Make Genius Mixes appear
One of the best new features in iTunes 9 is Genius mixes, a collection of ready made playlists that iTunes creates by analysing your music library. Unfortunately, it doesn't always appear right away. If you can't find Genius Mixes in the sidebar, choose "Update Genius" from the Store menu and it should appear.
8. The shopping cart is gone
If you had the iTunes store set up to add items to a shopping cart instead of buying straight away, unfortunately the shopping cart is now gone. It has been replaced by a Wish List, which works in pretty much the same way. Just click the arrow to the right of "Buy Now" and select "Add to Wish List". Also, in theory, all the items from your shopping cart should have moved over into your wish list.
9. Home sharing
The new home sharing feature allows you to actually share your music between computers, rather than just stream it across the network. This makes it a lot more easier to transfer your purchases between computers without having to use flash drives or email attachments.
When iTunes is open on other computers on the network, they will show up in the sidebar. Simply click on them, then choose any songs to transfer to your computer. This works with any media type including Movies and TV Shows, and it doesn't matter if the media was purchased from iTunes or not. On top of that, you can filter the list to only songs that you don't already have in your library, and you can set iTunes to automatically copy across any new songs that are purchased on the other computer.

However, things become a bit more complicated if you use multiple iTunes Store accounts (i.e. a different one for each computer). The iTunes Store doesn't have to be logged into the same account on both, but Home Sharing does have to be set up with the same account. If you find it isn't working, turn Home Sharing off and then on again from the Advanced menu. Then re-enter the iTunes Store account username and password, making sure you use the same account on each computer. Even though you only use one account for home sharing, you should be able to share songs purchased with either account, as long as both computers are authorised to play them.
Party with iTunes DJ
The only drawback to this approach is that all the iPhones need to be on your Wi-Fi network, which is inconvenient if you have an encrypted network. Moreover, everyone has to have the Remote application on their iPhone, but they can easily download this straight to the iPhone from the App Store.
To set up iTunes DJ, you first need to open iTunes on your Mac and click on the Settings button underneath the iTunes DJ playlist. In the settings window, you need to check the box to allow guests to request songs, and optionally type in a welcome message. Also check the box to enable voting.

Now, when you open Remote on the iPhone, different things will happen depending on whether you have previously paired with the iTunes library. Paired iPhones are assumed to belong to the host, and therefore have the ability to play, pause, skip song, and rearrange the playlist, just like they did before.

If your iPhone isn't paired to the iTunes library (i.e. you are a guest at the party) then you don't have quite as much control. You can view the playlist, but you can't directly change the order. You can, however, vote for songs to bring them higher in the list, and request new songs to add them to the bottom of the list. This works nicely, because if everyone in the room had the ability to skip songs there inevitably would be chaos.

You can also vote for songs by right-clicking on them in iTunes and choosing "Like It" from the menu. You can do this as many times as you like, while you can only vote once from a guest iPhone. This allows the host to manipulate the order if they want to.
For many people this feature will be absolutely useless. It requires that all your friends have iPhones, and I can't for the life of me imagine the kind of party where you log onto the WIFI as you arrive... but it's neat nonetheless.
Split your iTunes library between two locations
The obvious way around this is to store the iTunes library on an external hard drive, which can be done quite easily by moving the "iTunes Music" folder over to the new drive and selecting the new location in the Advanced section of iTunes Preferences. However, this would mean that I wouldn't have access to my music when I’m moving around without the (not very portable) external drive.
An ideal solution for me would be to split my iTunes library between the two locations, storing large files like movies on the external drive and keeping the rest on my MacBook so I can access it at all times. The way to do this isn't entirely obvious, but luckily it is pretty straightforward.
The first step is to move the large files over to the external drive. You will find the movies folder in
~/Music/iTunes/iTunes Music/Movies. Just drag this folder over to the external drive, and delete the copy on your Mac. You can do the same with any music files too, but you will have to organise them into folders on the external drive yourself.Next time you open iTunes, try playing one of the movies. It will give an error saying the file couldn't be found and would you like to locate it. Now you can just point iTunes to the new file on the external hard drive.

Of course, this process would be really annoying to have to do multiple times for loads of movies, so here is a quicker method. First, remove all you movies from the iTunes library by selecting them in iTunes and pressing delete. These are just references to files that don't exist anyway, so you aren't really deleting anything. Now we want to add all the movies files back into the library, without copying them across from the external hard drive again.
Many of you may have noticed that there is a "Copy files to iTunes Music folder when adding to library" option in the Advanced section of iTunes preferences. We want to turn this off for the movie files on the external drive, but leave it on for all other files we add to our iTunes library. Checking and un-checking this box each time we want to add a movie to our iTunes library would be really tedious, so here is a quicker way.

Simply hold down the option (alt) key while dragging the movie files onto the main iTunes window. That way, they will be left on the external drive and not copied back to your Mac. You can even do the whole folder in one go. Of course, if you don’t hold the option key, iTunes will behave in the normal way, allowing you to keep your music neatly organised in the iTunes Music folder.
Remember though, whenever your external hard drive isn't connected, you will get the "original file cannot be found" error if you try and play a movie in iTunes. Don't worry, as soon as you plug the external drive back in, all the movies will work again. Conveniently, movies synced to your iPod or AppleTV won't be deleted if you sync while the external hard drive isn't connected, but obviously you won't be able to add new movies to the iPod or AppleTV until you plug in the external drive again.
Custom Genre Artwork in iTunes 8 Grid View

If you aren't happy with the artwork provided, or you want to add your own genres, you can do this fairly easily by adding an image to the iTunes package, and then editing a plist file to pair it to the genre. Here's the step by step process.
Start by going to your applications folder and finding iTunes. Right-click (Control-click) on it, and choose "Show Package Contents" from the menu. In the folder that appears, navigate to the Resources folder. This is where you will find everything you need to change.
All the jpg images with names like genre-XXXXX.jpg are the artwork files. Note that all the movie ones end in M, and ones especially for TV Shows end in T. If you want to edit one, hold the option key and drag it to your desktop to copy it there. Once you are done editing, save the file to the desktop and the drag it back to the Resources folder. I would suggest you don't replace the old image, just in case you want to go back to it. Simply rename the old one to oldgenre-XXXX.jpg or something similar.
If you want to create your own genre artwork, note that all the movie genres are 171px x 256px and all the TV show and music genres are 256px x 256px. If you create artwork that isn’t the right size, iTunes will automatically scale it for you anyway, so you don’t need to worry about this too much. Also note that you don't have to round the corners yourself, iTunes does this for you. When copying the file to the iTunes resources folder, make sure to give it a name different from any existing genre images.
If creating your own isn't your thing, a quick search on google brought up a flickr group containing artwork others have created.
The next step is to get iTunes to use your image automatically when you use certain genres. In the Resources folder, look for the file genres.plist. Before we make any chages to this file, you might want to back it up. Once you've done this, open it up in TextEdit (Right-click and choose Open With TextEdit). This will pretty much look like nonsense to anyone unfamiliar with plists, but don't worry. You will notice that most of the file is made up of the following lines, repeated over and over again:
<dict> <key>matchString</key><string>action</string> <key>resourceFile</key><string>genre-actionM.jpg</string> <key>kind</key><string>movie</string></dict>This one looks out for any "movie" with the genre "action" and gives it the image "genre-actionM.jpg". You may notice that some other ones are slightly different. Most TV show and music genres don't have the final line. The one that does is the TV show genre "Classic" which also has the line
<key>exactStringMatch</key><rue/>. This is to make sure it doesn't get mixed up with the music genre classical.Say, for example, you created some genre artwork for Gothic Rock, and called it genre-gothicrock.jpg. After the last
</dict> in the file, you would write:<dict> <key>matchString</key><string>Gothic Rock</string><key>resourceFile</key><string>genre-gothicrock.jpg</string></dict>For movie genres you would also include the line
<key>kind</key><string>movie</string>.Save the file, the quit and re-open iTunes. If everything worked, your genre artwork should show up in grid view. If it doesn't, the most likely problem is typos in the genres.plist file.
One more thing to note is that you might lose your changes when iTunes updates. You might want to keep a backup of your new jpg artwork images and the genres.plist file in a separate place as items within the package contents are often replaced when the application updates.
Control the visualizer in iTunes 8
Like the previous visualizer, you also have the ability to control this one. While the visualizer is running, hit the ? key to bring up a list of available functions. They are as follows:

? - Toggle help screen
M - Change mode
As far as I can tell there are 8 or 9 different patterns.
P - Change palette
Changes the colours used.
I - Display track info
Displays information about the current song.
C - Toggle auto-cycle (on by default)
Turns on or off automatically cycling through modes and colours.
F - Toggle freeze mode
Freezes the visualizer while the camera continues to pan around.
N - Toggle nebula mode
Turns on or off the clouds in the background.
L - Toggle camera lock
Holds the camera still while the visualizer continues.
Change the default text for pretty much anything in OS X
Change the default new folder name
First, navigate to Macintosh HD/System/Library/CoreServices. In here, locate the Finder application. Right-click (Control-click) on it, and choose "Show Package Contents" from the contextual menu. In the window that appears, navigate through to Contents/Resources/English.lproj. A quick way of navigating here (you might end up doing it a few times) is to use the "Go to Folder" option in the Go menu. In the box that appears, paste the following line:
/System/Library/CoreServices/Finder.app/Contents/Resources/English.lproj/Find the file named "Localizable.strings" and drag it to the Desktop to make a copy. We are going to edit this copy on the desktop, and then copy it back into the English.lproj folder to replace the original version. You might want to make an additional copy of the file as a backup, just in case anything goes wrong.
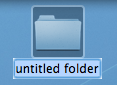
Open up the desktop version of the localizable.strings file using TextEdit. Scroll down to the line that starts with N2. it should say the following:
"N2" = "untitled folder";Now you can change the words "untitled folder" to anything you want. For something at the start of the alphabet, you could simply put "*untitled folder*".
Once you are done, save the file on the desktop and quit TextEdit. Finally, drag the file back to the English.lproj folder that you copied it from. Click Authenticate and type in your administrator password.
For changes to take place, you will have to relaunch the Finder, which can be done by holding down Control and Option, clicking the Finder icon in the Dock, and choosing Relaunch from the menu.
Suffixes for duplicates and aliases
These are done in exactly the same way as the new folder tip above. Only this time, change line N3 for aliases, or N4 for duplicates.In these cases, "^0" takes the place of the original file name. So, for a duplicate, the default is "^0 copy", meaning the duplicate of "file.doc" is "file copy.doc". As above, you can change this to anything you want. "copy of ^0" would mean the duplicate would work better with file extensions, giving "copy of file.doc". However, it wouldn't be next to the original file alphabetically.
Remember to relaunch the Finder when you are done.
Shorten the Finder's 'Show Item Info' text
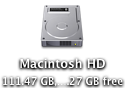
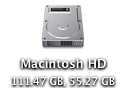
One of the features I like about Mac OS X is the "Show item info" check box located in the View Options of the Finder. This works for all windows in icon view, and is therefore especially useful on the desktop. However, one problem with it is the text for Hard Drives is too long, unless you make the text size really small.You can solve this problem by editing the same localizable.strings file as above. Carry out the steps exactly the same, but search for the line "IV9" = "^0 free";. The best way to change this is to get rid of the word free, just leaving "IV9" = "^0";. You can see the result below.
Remove default Genres in iTunes
iTunes comes with a long list of genres, some of which many people will never use. Occasionally this may become annoying, for example when using the autofill feature.To remove some of the genres, you have to edit the localizable.strings file within iTunes, rather than within the Finder. You can find this by going to iTunes in the applications folder, right-clicking and choosing "Show Package Contents". In here, navigate to Contents/Resources/Englihs.lproj where you will find the localizable.strings file. As before, you will have to copy it to your desktop before editing.
Open up the file in TextEdit. You'll find the list of genres under the line
/* ===== Genres ===== */. To remove a genre, don't bother deleting it, just in case you ever want it back. Simply "comment" out the line, by putting a /* at the start, and a */ at the end. For example, to remove Techno, you will simply replace the line with /* "9200.019" = "Techno"; */.As always, quit and reopen iTunes for changes to take effect.
Change the iTunes sidebar labels
The most obvious reason for wanting to do this is if you would prefer the labels to be lowercase. Using the same localizable.strings file as in the genre tip above, find the following lines:"135.011" = "LIBRARY";
"135.012" = "DEVICES";
"135.013" = "STORE";
"135.014" = "PLAYLISTS";
You can change these to anything you want, or simply remove the capitalization.
Change the Finder's sidebar labels
You can do exactly the same thing in the Finder's sidebar. The file you need to edit is localizableCore.strings, located in exactly the same place as the localizable.strings file inside the Finder application. The lines you want to change are the following:"SD5" = "DEVICES";
"SD6" = "SHARED";
"SD7" = "SEARCH FOR";
"SD8" = "PLACES";
Customize System Preferences
All the System Preferences panes are grouped into five categories - Personal, Hardware, Internet and Network, System and Other. It is quite easy to change these category names by going inside the System Preferences package, which is in the Applications folder. Inside it, navigate to the English.lproj folder inside the Resources folder. In here, find a file named NSPrefPaneGroups.strings and drag it to your desktop. Now open this file up in TextEdit and you'll see the following lines:"personal" = "Personal";
"digitalHub" = "Digital Hub";
"hardware" = "Hardware";
"net" = "Internet & Network";
"system" = "System";
"addons" = "Other";
Don't change the words on the left, these are the ones used by System Preferences. You can change the words on the right. These are the ones displayed in the System Preferences window. Just make sure you don't delete any quotes or semicolons. Also, ignore the "Digital Hub" entry. This isn't used anymore and is probably just left over from a previous version of the operating system.
Now save the file and drag it back to the English.lproj folder from the Desktop. You will have to Authenticate this action with your administrator password.
Dock Menu items
For a bit of fun (I can't see why else) you can change the items in the menus you get when right-clicking on icons in the Dock. The Dock application is located in /System/Library/CoreServices. Right-click on it and choose "Show Package Contents". In the window that appears, navigate to Contents/Resources/English.lproj where you will find DockMenus.strings. Copy this file to the desktop to edit it.Some of the lines you might want to edit are the "Application Not Responding" and "Force Quit" lines to something more reflective of the feeling you get when you see them.
Change Unexpectedly Quit message
With some tinkering it is possible to customize Mac OS X alert messages and dialog box text. For a bit of fun, you can change the message that appears when an application crashes to something more humorous.Open up your hard drive and navigate to /System/Library/CoreServices. Find the Crash Reporter package and open it by right-clicking and choosing Show Package Contents.
In the window that appears, navigate to Contents/Resources/English.lproj and find Localizable.strings. Copy it to your Desktop and open it up in TextEdit. Near the bottom of the file you will see the line -
/* Unexpectedly quit dialog */
In the lines that follow this it is fairly obvious how to change the message. The symbol "%@" will make the message display the crashed Application's name, and "\n" will make a line break. Save the file and then copy it back to the package to replace the old version. You will have to enter your administrator password.

A Few Questions
Iain writes:
I cannot delete a couple of folder shortcuts from my sidebar - Finder just says "the volume for XXX can not be found" - any ideas ?
You will need to delete the Finder's Sidebar preferences file. Go to your user folder and navigate to Library/Preferences and drag
com.apple.sidebarlist.plist to the desktop. Control-Option-Click on the Finder icon in the Dock and choose relaunch. If the problem is fixed, you can trash the file on the desktop. If not, you might want to put it back. Be warned though, deleting this file will remove all your other shortcuts from the sidebar as well so you will have to add them all again.Stopping Filemaker Pro
Brian writes:
I am having trouble with my mac. Every file I try to open defauts to filemaker pro. Is there a way to stop this? It happens with Excel files, Cad files, Etc....
Start by loading up NetInfo Manager, which is in the Utilities folder inside the Applications folder. Select Users from the middle column and then your user name from the right hand column. Look in the bottom pane for the uid, which is probably something like 501.
Now quit NetInfo Manager and any other running applications. Navigate to Macintosh HD/Library/Caches and trash the following two files:
com.apple.LaunchServices-0140.csstorecom.apple.LaunchServices-01XXX.csstorewhere XXX is the uid. You will need to enter your administrator password to do this. Now restart your Mac and check if the problem is fixed.
If not, go to your user folder, navigate to Library/Preferences and delete the
com.apple.LaunchServices.plist file. Repeat the above steps by deleting the two files from the Caches folder and restarting again.iPod Disk Use
Valentine writes:
How do I use my iPod for both storage and music?
Plug in your iPod and open up iTunes. In the iPod section there is a check box near the bottom that says "Enable disk use". Check this box. A warning will appear that says you have to eject your iPod before removing it from now on.
Your iPod should appear on the desktop as an icon. Double click it and it opens up like a normal folder. You can drag files over to it just any other drive.
Drag Chunks of Text onto Dock Icons
Doing this with different applications will produce different results. If the application will accept the text, it will darken when you hold the selection over it. Note that some applications will only accept the text if it is in a certain format (a web address for example). Here are the results with a few common applications. If you know of any more, add them in the comments.
1. Safari - If you drop a web address (i.e. something that starts with http://) on Safari, it will load up that address. If you drag any other bit of text, it will perform a Google Search on it. This is mainly useful if the text is from a non-cocoa app that doesn't have the "Search in Google" item in the right-click context menu.
2. Firefox - If dropped text is a web address, Firefox will load it. This is helpful if you want to view a site in a browser other than your default browser.
3. Mail - A new message will load up with the dropped text as the main message body. Annoyingly the text is placed in the body even if it is an email address.
4. TextEdit - As expected, this loads a new document containing the dropped text.
5. Skype - If the dropped text is a phone number, Skype will call it. This will also work with nicknames in your contact list.
6. Script Editor - A new script window will open up containing the dropped text. Script Editor will then attempt to compile it.
7. iTunes - If you drop a podcast address onto iTunes, it will subscribe to it. If the address isn't a podcast, iTunes will attempt to do it anyway (and fail).
8. Acquisition - Starts a new search with the dropped text.
9. Newsfire - Adds a new feed with the text as the address. (Why not try it out with http://feeds.feedburner.com/macosxtipsfeed )
10. Stickies - This will make a new Stickies note containing the text open up.
11. Dictionary - This will show you the definition of the dropped word. If you drop a selection of words, Dictionary will display the definition of the first. (In cocoa apps, it's probably quicker to use this keyboard shortcut).
Most of these also work if you drag the text to the desktop to create a text clipping first, and then drag it to the Dock icon.
Read new email on your iPod
Alternatively, click this link to automatically open up Script Editor with the script ready typed. Wherever it says <
If you are confident editing the script, you can set it to create the folder on your iPod instead of on the Desktop (This wasn't done in the original because everyone's iPod has a different name and you have to have the iPod connected to run the script). If you want to leave it as it is, all you have to do is plug in your iPod and copy across the folder from the desktop.
To make things even more automatic, you could set up an iCal alarm that runs the script every morning before you leave the house.
Make the Most of iPod Notes
Creating Your Notes
![]()
The easiest tool to use to create plain text files is TextEdit. Open it up and press Command-Shift-T or choose Make Plain Text from the Format menu. Once you are done writing your note, choose Save As from the File menu. You'll want to save it in the Notes folder inside your iPod.
Warning: Now you have enabled disk use for your iPod, you will need to eject it before you unplug it. Drag it to the trash or right-click and choose eject.
Each notes file is limited to 4KB by the iPod and if yours is too long, the end will be cut off. To avoid this, Daniel Duris has created an online tool to divide up long eBooks into 4KB sections. At the end of each section is a link to the next one, making it as simple as turning the pages of a book.
Format Notes with HTML
These links are interesting because they show that iPod notes have basic HTML support. You can use this to create links between your notes, just like the links you see on web pages. There are a few HTML tags that are supported by the iPod.
will create a link break, and to choose the title at the top of the iPod screen, put it between
Here's an example:
<title>Chapter 1</title>Once upon a time there was a man named John.<br>He lived in a bright yellow house.<br><br><a href="chapter2.txt">Next Chapter</a>When viewing these notes on your iPod, you can select links using the scroll wheel. If there is more than one link, the active one will have a blue underline. Using the scroll wheel will allow you to activate different ones.
Link to Songs and Videos
These links aren't just limited to notes. You can link to any song, video, album, artist or playlist on the iPod. For example, to link to the song "Song 2" using the text "Play Music" you would type
<a href="song=Song 2">Play Music</a>.
Linking to a video works in much the same way as with a song.<a href="video=Song 2">Link to Song 2 Music Video</A>
To link to groups of songs, you have to use a slightly different tag. Here are a couple of self-explanatory examples:<a href="ipod:music?genre=rock">Link to rock music</A> <a href="ipod:music?artist=Radiohead">Link to Radiohead</A>
You can even combine these to create the equivalent of Smart Playlists:<a href="ipod:music?genre=rock&artist=U2">Combo</A>
Set Notes Preferences
There are a few settings you can change involving the notes on your iPod. The first is a "Notes Only" mode, which was mainly designed for iPods being used as tour guides or in museums. This means that when your iPod loads up you are shown the Notes folder, and can't navigate out of it. You can only get to songs (or a audio tour) via links in your notes.
To enable this mode, create notes file called Preferences (without the .txt extension) and put the following line in it:<meta name="NotesOnly" content="true">
The second setting you can change is the title of the Notes folder. By default it is just called Notes, but if you are using the Notes Only feature, you might want to call it something like "Museum Tour". To do this, add the following line to the Preferences file:<title>Museum Tour</title>
The final setting is to do with linking to songs. Normally when you choose a song from a link in a note, the Now Playing screen appears. To set you iPod to continue displaying the note instead, add the following line to the Preferences file:<meta name=“NowPlaying” content=false>
Get Custom Audio or Visual Alerts
Whenever Mac OS X wants to get your attention, it plays an alert sound. For example it does this when a dialog box appears, when you receive an email and as an iCal alarm. Your Mac comes with a nice set of alert sounds, but after a while they may get a bit boring.
You can add your own alert sounds by placing audio files in a certain folder. Before you do that however, you will need to convert your sound file to the AIFF format using iTunes. Open up iTunes and choose Preferences from the iTunes menu. In the Advanced section, click on the Importing tab and choose AIFF encoder from the pop-up menu. Click OK.
![]()
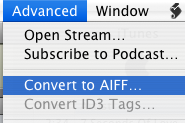
If the audio file you want to use is in iTunes, select it and then click on the Advanced menu. In here choose Convert selection to AIFF. If you audio file is somewhere else, hold Option while clicking on the Advanced menu and choose Convert to AIFF. This will bring up a dialog that will allow you to navigate to your audio file. Once the file is done converting, go back to the preferences and change the "Import Using" pop-up menu back to AAC.
Now we have to get this file to show up in the Alerts list in System Preferences, Mail and iCal. Open up your user folder, look in the Library for a folder called Sounds and drag the sound here from iTunes. Your new alert should now be in the list in the Sounds section of System Preferences.
Make your alerts visual
An alternative to the audio alert is a visual alert, which is basically a screen flash. You can turn this on in the Universal Access section of System Preferences, under the Hearing tab. This will flash the screen as well as playing an alert sound. If you want to get rid of the sound and just have the flash, go to the Sounds section of System Preferences and move the Alert Volume Slider all the way to the left.
![]()
Annoyingly, this will also mute the feedback you get when the volume is changed and the interface sound effects (like when you move something to the trash). If you're fine with this then use the method above. However if you still want these other sound effects, there is a better (but more complicated) solution.
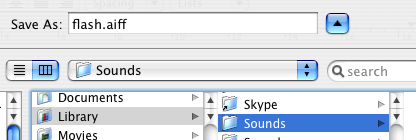
Mac OS X will also flash the screen if for some reason it is unable to play the selected audio alert. To make this happen, open up TextEdit and press Command-Shift-T to convert the document to plain text. Save this empty file as Flash.aiff in the sounds folder inside your Library. If a dialog asks you which extension to use, choose .aiff.
Now if you look in your alerts list in System Preferences there will be an alert called Flash that does exactly that - flash the screen. This is because Flash.aiff isn't really a sound file. When your Mac tries to play it and can't, it flashes the screen instead to make sure you still see an alert.
5 Quick Podcast Tips

2. It's fairly obvious that you can delete single episodes from a podcast by simply selecting it and pressing delete. However, getting them back is a bit less straightforward. Option-Clicking the triangle next to the podcast title will bring up the full episode list, including any that you have removed in the past. Now you can click "Get" to download the episodes again.
4. Many podcasts have excessively long descriptions (well, too long to fit in the description column of the iTunes window). To bring up a window that contains the episode description and other details, click the small "i" icon on the right side of the description column.
5. If you come across a podcast on the Internet but you can't find it in the iTunes Podcast Directory, you can still subscribe to it in iTunes. Choose "Subscribe to Podcast..." from the Advanced menu and enter the podcast feed URL.
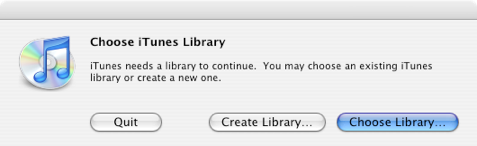
Multiple Music Libraries in iTunes 7
A dialog box will appear instead of the normal iTunes window, and from here you can choose an existing library or create a new one. Your existing library is in your user folder, under Music / iTunes / iTunes Library.
When you create a new iTunes library it doesn't just create this single library database file, it creates the entire folder, complete with a music folder and Album artwork folder.
This is quite useful for separating off a section of music. For example, you may want a separate library for your live music, your children's music or the music you don't want to copy to your iPod.
In an ideal world it would be possible to access all your music libraries from the sidebar in iTunes, but currently this isn't possible. Hopefully at some point it will be possible to change between your libraries without having to quit and load up iTunes again.
Top 15 Terminal Commands for Hidden Mac OS X Settings
Update: This article is very old. Most of the Terminal Commands still work, but consider checking out our top Terminal commands for Leopard and Snow Leopard. Our Terminal Tips category also has loads of other ways help you get the most out of your Mac.
There are a huge amount of hidden settings for Mac OS X and its applications that aren't accessible from preferences dialog boxes or the System Preferences. Applications such as Tinkertool and Mac Pilot allow you to access some of these, but the real flexibility is from the Terminal. From here it is possible to edit any preferences file for any application on your Mac.You'll find the Terminal in the Utilities folder within the Applications folder. To carry out any of the following commands you will need to copy/paste or type in the line of text then hit enter. For the most part, applications will need restarting before changes take place. For most applications you can just quit and open them again, but for the Finder and the Dock it is easiest to just type “killall Finder” or “killall Dock” into Terminal after the command.
To reverse any of them, just repeat the command with NO at the end instead of YES, or vice versa.
Feel free to add any of your favourites in the comments.
1. Make hidden applications' dock icons translucent.
defaults write com.apple.Dock showhidden -bool YES![]()
defaults write com.apple.iTunes invertStoreLinks -bool YES3. This allows you to drag widgets out of Dashboard onto the desktop. Requires the dock to be relaunched to take effect, so type "killall Dock" and press enter. Now, if you click and hold onto a widget in the dashboard and press F12 to return to the desktop, the widget won't disappear with the rest.
defaults write com.apple.dashboard devmode YES
defaults write com.apple.mail PreferPlainText -bool YES5. Set expanded save dialogs as default (showing column/list view of folders rather than a drop down menu). Replace TRUE with FALSE to reverse.
defaults write -g NSNavPanelExpandedStateForSaveMode -bool YES6. Display the currently chosen screen saver to be shown as the desktop background. Press Control-C or Command-. to stop. More details here.
/System/Library/Frameworks/ScreenSaver.framework/Resources/ ScreenSaverEngine.app/Contents/MacOS/ScreenSaverEngine -background7. Display useful system stats in the login window. More details here.
defaults write /Library/Preferences/com.apple.loginwindow AdminHostInfo SystemVersion Replace "SystemVersion" with one of the following for different stats:
SystemBuildSerialNumberIPAddressDSStatusTimeHostName
8. To remove accounts from the login window type this command with the short name of each account you wish to remove. More details here.
sudo defaults write /Library/Preferences/com.apple.loginwindow HiddenUsersList -array-add shortname1 shortname2 shortname39. Skip disk image verification. Potentially risky, use with disk images from trusted sources.
defaults write com.apple.frameworks.diskimages skip-verify -bool YES10. Put double scroll arrows at both ends of scroll bar. Use Appearance pane in system preferences to reset.
defaults write "Apple Global Domain" AppleScrollBarVariant DoubleBoth![]()
defaults write com.apple.CrashReporter DialogType none12. Set the history limit in Safari to a certain number of items and and/or a certain age.
defaults write com.apple.Safari WebKitHistoryItemLimit 2000defaults write com.apple.Safari WebKitHistoryAgeInDaysLimit 3013. Show hidden files in the Finder.
defaults write com.apple.finder AppleShowAllFiles -bool YES14. Enable the debug menu in Safari.
defaults write com.apple.safari IncludeDebugMenu -bool YES15. Deactivate Dashboard. Requires the dock to be relaunched to take effect, so type "killall Dock" and press enter.
defaults write com.apple.dashboard mcx-disabled -bool YESGet more iPod storage details in iTunes graph

It gives you the details in terms of the iPods storage capacity, that is, in bytes. However, you can also use the graph to display a count of how many songs, photos and videos your iPod contains or how long it would take to listen to all the songs and watch all the videos.
Change to this mode by clicking on the graph itself. Clicking once will cycle to the number count, clicking again will change it to the time count, and clicking one final time will change it back to the storage capacity.


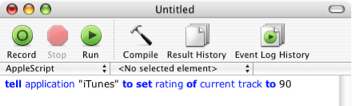
Set half star ratings in iTunes
The way it works is that ratings are stored as a number between 1 and 100 as increments of 20. For example, 1 star is 20, 2 stars is 40 and so on. Using a little bit of trickery you can set the rating at 10, 30, 50, 70 or 90 giving a half star rating between two of the normal ones. Note that setting the rating to something like 31 just breaks the whole thing and your rating will just show up as one star.
![]()
To set a half star rating, just open up script editor (search spotlight or go to Applications/Applescript) and paste the following line:tell application "itunes" to set rating of current track to 30
The number at the end can be changed to one of the following:
10 gives ½
30 gives *½
50 gives **½
70 gives ***½
90 gives ****½
To make the change, click "Run" at the top of the window. To get rid of the half star rating just click on a normal rating in iTunes, or run the script again with 20, 40, 60 or 80 instead.
This method is slightly inconvenient if you have to load up script editor every time you want to rate a song, so luckily iTunes has built-in script support. Doug Adams has even made a whole site dedicated to providing scripts for it - Doug's AppleScripts for iTunes. From there you can download Add-Substract A Half Star which is a script like the one above, but compiled into an application. Save this file in
Users-->[username]-->Library-->iTunes-->Scripts

If the scripts folder doesn't exist, you will need to create it.
Quit and re-open iTunes if it is already open, then in the menubar next to the Window menu there will be a little script icon. From there you can choose to add or subtract a half star from the rating of the current song.

On his site, Doug also explains how you can assign a keyboard shortcut to the script.
Essential Tips for Podcast Lovers
This contains everything a podcast junkie needs: Tips on finding and playing podcasts, managing your subscriptions and sharing them.
If you are still not with this newfangled podcasting stuff, take a look at the Podcasting FAQ.
iTunes Playlists
In the later versions of iTunes, just right-click (control-click) on the song and choose "Show in Playlist". This will bring up a list of all the playlists that contain that song. Neat.
To work the other way around, and with multiple playlists, you can create smart playlists to find songs that are in a number of playlists you specify. For instance, create a new smart playlist and set it to match all the conditions, which are something like; Playlist is 60s tunes, Playlist is Happy Mood, etc.
Multiple On-The-Go Playlists
To create an On-The-Go playlist on your iPod, navigate to a song, artist, album or genre then press and hold the centre button until you see the selector blink. Repeat this until you have chosen all the songs you wish to add to the playlist.
Next go to the playlists menu, and select On-The-Go, which should be at the bottom. You will see that there is a save option, select this and the playlist will be named Playlist 1. You can now create another On-The-Go playlist in the same fashion as before, but when saved, will be named Playlist 2.
Sort iPod Playlists
In iTunes and on your iPod it is impossible to sort your playlists other than alphabetically.
To sort your playlists you could just use punctuation marks, but a more interesting way of doing this is using hearts, stars and musical notes, which the iPod can also display.
Using the character palette, under International System Preferences and also accessible through the Input Menu, these symbols can be found in the Miscellaneous category of the Roman lettering. These don't just have to be for sorting your playlists, they can jazz them up too!
The iPod can't display more complex symbols, however this is actually even more useful. It leaves a blank space, but still sorts your playlists into the order of the symbols, meaning they are sorted in your own order, but without anything before them.