Fix portrait iPhone videos with iMovie
The iPhone’s ability to shoot video in any orientation is great, but it can be annoying when you realise you accidentally shot a video in portrait when you would prefer the more conventional landscape orientation. Generally there are two common scenarios: The first is where you shot an entire video in portrait, and secondly where you quickly realise and rotate the phone back to landscape for the majority of the video. Here’s how to fix videos in both these situations.
First lets consider the situation where you started filming in portrait, then quickly realised and rotated the phone to film the rest of the video in landscape. The problem with this is the iphone decides the orientation of the video at the start, meaning that after you rotate the phone the video stays in portrait and everything just becomes sideways.
Fixing this is simply a case of rotating the video 90 degrees to the correct orientation. In iMovie, start by selecting the portion of the clip that you want to rotate. This might be as simple as just selecting the entire clip, but if you rotated the phone multiple times during the video you will want to select each portion separately.
Next, click the crop button, located near the middle of the centre bar, as shown below.

Once you click the crop button, some new controls should appear over the top of the viewing window. The ones we’re interested in are the curved rotation arrows. Simply click the one that corresponds to the direction you want to rotate the video, then click the Done button.

This leaves you free to export your Movie from iTunes using one of the options in the Share menu. It’s really easy to export it straight to YouTube, Facebook or MobileMe or you can just export it back to a movie file to use however you want.
Now lets consider the situation where you have an entire video shot in portrait orientation. Obviously there’s no magic way to convert this into a nice looking landscape video, but we can do our best by cropping and adding black bars down the side. This will allow us to export to a standard landscape HD video, meaning there is no danger of getting a stretched video when uploading on online video sites like YouTube.
As before, start by clicking the crop button on the centre bar to bring up the controls over the viewer. On these controls, click the button that says “Crop”, and then click the button that says “Allow Black.” Now you can adjust the size and position of the green box to choose the new dimensions of your video. Before you click Done, it’s worth clicking the play button to check that you haven’t accidentally cropped something important out of the video.

To finish up, choose “Export Movie” from the Share menu. You can choose any quality, but HD 720p (1280 x 720) will preserve the original quality as much as possible.

20 tips and tricks for iLife and iWork '09


iPhoto
1. Enable scrolling zoom in Places maps
The new Places feature in iPhoto allows you to explore your photos on a map. Photos taken on a GPS enabled camera (i.e. the iPhone) will be automatically geo-tagged, or you can enter the location information manually. Annoyingly, by default the maps don't allow you to zoom using the two-fingered scroll on the trackpad or a scroll wheel on your mouse. To enable this, just open up Terminal (in Applications/Utilities), type the following line and hit enter:
defaults write com.apple.iphoto MapScrollWheel -bool YESTo disable the scrolling zoom again, just repeat the command with NO at the end instead.

2. Include location information in uploaded photos
The default setting is for iPhoto to remove the geo-tagging information from your photos when you upload them to the web, presumably so people don't unwittingly broadcast their location to the world. If you want to keep the location information in uploaded photos, go to the Web section of iPhoto preferences and check the box next to "Include location information for published photos."
Changing a person's key photo is exactly the same as changing the key photo for an event. Just move your mouse from left to right over their photo on the corkboard to cycle through all the photos of that person. When one you like is displayed, just hit the space bar to make that the new key photo. If you can't find the one you want this way, just go into that person's photos, right click on the new key photo and choose "Make Key Photo" from the contextual menu.
4. Enter information about a person
When you hold your mouse over someone in Faces, an small i appears. Clicking on this will allow you to enter a full name and email address for that person. It will also show you the number of photos with that person in, and the range of dates of photos they're in.
5. Batch accept or reject faces
If you look at a person's photos in Faces, there will be a group of unconfirmed faces that iPhoto has identified for you. To confirm a large group of faces at once, just drag across all the photos. To reject a group of photos, hold the Option key while doing this. You can also just Option-click on photos to reject them individually.
6. Corner-achored resize when adding faces
iPhoto's default behaviour when adding a missing face is a centre-anchored resize. To change this to the usual corner-anchored resize, just hold down the option key when dragging over a face.
7. Easily switch between multiple libraries
iPhoto libraries are now double-clickable from the Finder. If you want to open a different library in iPhoto, just open up your Pictures folder and double-click a different library file. iPhoto will then load up with the new library. No need for holding Option on launch anymore.
GarageBand
8. Create iPhone ringtones
To create a free ringtone from any MP3 or AAC file just choose "Example Ringtone" from the iPhone Ringtones section in the New dialog. Delete the example that Apple has provided, then select a song from your iTunes library by clicking on the Media button in the bottom right. Drag your chosen song into your GarageBand project. Move and resize the yellow bar at the top to choose the section of the song you want to loop for your ringtone. Finally, choose "Send to iTunes" from the Share menu.
9. Use Learn to Play on PowerPC or Core Solo Macs
The new Learn to Play lessons in GarageBand require a dual core Intel based Mac to run. If you are running an old PowerPC Mac or Core Solo Mac Mini, you can get around this by going to /Library/Application Support/GarageBand/Learn to Play/Basic Lessons. Once here, double-click on one of the .mwand files to open it in GarageBand. Consider closing all the other applications on your Mac if the lessons run slowly.
iMovie
If the videos you want aren't in the Event Library, just right-click below your list of events to import videos from anywhere on your hard drive or from within an older iMovie file.
11. DVD chapters are back
One feature that disappeared for a while was the ability to add DVD chapters in iMovie. For a while you had to do a laborious work around involving GarageBand. Now you can add chapter markers in iMovie, and they'll be carried across when you export to iDVD.

12. Add a location to travel maps
If you want to use a location in the travel maps feature that iMovie doesn't have listed, you can add it to the locations file. Find iMovie in your applications folder, right-click on it and choose "Show Package Contents." In the Resources folder find WorldLocations.txt and open it up in TextEdit. On a new line, enter the place name followed by a tab, then the region followed by a tab, then the country followed by a tab, and finally the latitude and longitude separated by a comma. For example you could add
Duxford Cambridge UK 52.093851,0.184870iWork
13. Get the free trial
As well as the boxed version, Apple offers a free 30 day trial of iWork to download from their web site. One thing to remember though is if you don't intend to upgrade after 30 days, remember to save any new or changed files back in the iWork '08 format just in case they don't work any more once your trial expires. You can do this by choosing iWork '08 from the "Save copy as" menu in the Save As dialog.
14. Enable hidden picture frames
Pages, Keynote and Numbers all have various different styles of picture frame that you can place around any object by choosing it from the stroke menu in the Graphic Inspector. However, it turns out there are loads of frames that are disabled by default. You just need to edit a single file to enable them.
Choose the application where you want to enable the hidden frames (Pages, Keynote or Numbers), right click and choose "Show Package Contents". Look in the Resources folder for one of the three following files:
For Pages, look for SLGraphicInspectorFrames.plist
For Keynote, look for BGGraphicInspectorFrames.plist
For Numbers, look for LSGraphicInspectorFrames.plist
Open it up in TextEdit, and notice how the names of the different picture frames are listed. The new frames available with iWork '09 are Fine_Artist, Jet Set, Moroccan, Nature, Nature2, Typeset, Venetian, Venetian2, and Venetian3. For example just add <string>Fine_Artist</string> to the end of the list. As well as these new frames available in iWork '09, there are many more that also work in iWork '08 listed here.
http://nemws1.googlepages.com/keynoteframepreview
15. Temporarily disable guide lines
When moving objects around, all the iWork applications helpfully give alignment guides that will snap the objects so they are perfectly in line with each other. Sometimes, when you don't want objects aligned or you want to align them in a different way, this can be quite annoying. The way to temporarily disable the guide lines is to hold down the command key while you are dragging the object. Now your shape, image or text box can be freely dragged to whatever position you want.
16. Password protect iWork documents
This is something that has been annoyingly difficult to do on the Mac for a long time. Generally previous solutions involved creating encrypted disk images, however, now all the iWork applications have a "Require password to open" option in the Document section of the Inspector.
17. Export has moved
The export command that used to be in the File menu has now moved to the Share menu. Also, remember that if you want to export to Microsoft Word format, you can now do this directly from the Save As... option.
When creating functions and formulas in numbers, you almost always want to refer to another cell or group of cells. In Numbers '08 you had to use the mouse to select these cells, but now you can use the keyboard to select them. Simply hold down the Option key and use the arrow keys to move about. To select a group of cells, hold down Shift as well as Option, and continue using the arrow keys to make the selection. To change the reference from relative to absolute, just hit Command-K to cycle through all the different possibilities.
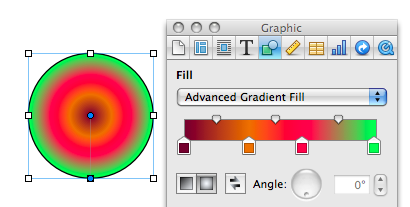
19. Advanced Gradients
The gradient fill options in iWork '08 were fairly limited. In iWork '09 you can now create linear or circular gradients with as many colours as you like by choosing "Advanced Gradient Fill" from the Fill menu.
20. Applescript in Numbers
One of the great new features of Numbers is Applescript support. Here are a few example scripts to give you an idea of what kind of thing is possible.
Ditch DVD menus
This is useful if you just have a single movie without chapters where the only option on the menu would be a rather pointless "Play Movie". It's also great for if you want to play a DVD in a kiosk and just have it loop over and over.
Start by launching iDVD from the Applications folder. Create a new project then click on the DVD map button, located right next to the Play button. In the map that appears, there is a box that says "Drag content here to automatically play when the disc is inserted". This area is normally used for the trailers and copyright messages, but you can just as easily drag your whole movie here.
Now the menu will only appear after the movie has finished. You can set an option here to play the movie again, or alternatively you can cut out the menu completely by setting the movie to loop.
Do this by clicking on your movie in the map view and choosing Loop Movie from the Advanced Menu. Burn your movie as usual. Now when you put the disc into a DVD player or your Mac, your movie will automatically play over and over again.
Stop Rippling in iMovie
To temporarily stop rippling from happening, hold down the Command key while doing an edit. This will stop all other clips from moving, so any gap you create in the timeline will appear as blank space.
If you want to extend a clip and trim the next one along, you can do this in one process by disabling rippling. Hold down the Command key and drag one clip over the next one along. Normally this would push the next clip along, but with rippling disabled, it overwrites that portion of the underlying clip.