A secret shortcut to use Emoji in Mavericks
Emoji are the cute little smileys and emoticons that originated in Japan and have grown popular around the world since they became available on the iPhone. Here’s a neat trick for using Emoji on the Mac in OS X Mavericks.
Whenever you are in a text field in Mavericks, just press Command-Control-Space and an emoji panel will appear. Then click any of the Emoji icons to insert it at the current position in the text.
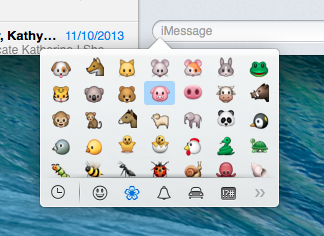
For those who find it quicker to use the keyboard than the mouse, you can navigate between the Emoji icons with the arrow keys, and shift left and right between the different sections using Tab and Shift-Tab respectively. If you know what you are looking for, just begin to type the name, and the Emoji will filter as you type. Give it a try with “dog” or “kiss” or “poo”.
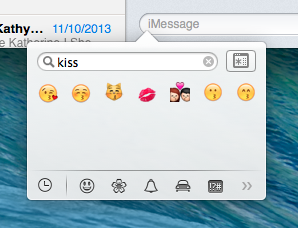
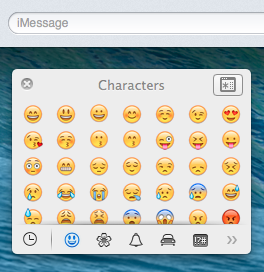
By default, the Emoji panel will disappear once you choose an icon. However, if you find yourself using it a lot, just drag it away from the text field to “detach” it, and it will stay open until you click the close button in the top left. Also, the button in the top right expands the panel into the full size “Character Viewer” that was previously available in Mountain Lion.
Get to grips with Notification Center in Mountain Lion
One of the most visible new features in Mountain Lion is Notification Center - borrowed straight from iOS. It works in a similar way to notifications on the iPhone and iPad, and bears more than a passing resemblance to Growl. Here are a few tips to help you make the most of Notification Center.
Pause all notifications
If you want to temporarily stop notifications appearing, the easiest way is to simply hold down the Option (alt) key and click on the notification center icon in the top right corner of the screen. It should become greyed out, indicating that notification center is turned off. Alternatively, while viewing your notifications, scroll up to see a switch that will allow you to pause notifications for the rest of the day. This is great as a “do not disturb” setting - for example if you are watching a movie or giving a presentation.

Access notifications using a gesture
The swipe gesture used to access notification center is a little tricky to get the hang of at first. It’s a two finger swipe from the right towards the left of your trackpad. The best way to do this is to start with your fingers actually off the right side of the trackpad, then swipe left onto the trackpad. Swiping back in the other direction hides notification center again.
Add a keyboard shortcut
If you don’t have a multitouch trackpad, you can just click the notification center button in the top right to see your notifications. But to speed things up, you might want to add a keyboard shortcut. Just go to System Preferences, and in the Keyboard section click the Keyboard Shortcuts tab and find Show Notification Center under Mission Control. Enable the shortcut by ticking the checkbox, then press whatever shortcut you want to use.

Send Tweets
After upgrading to Mountain Lion, when you first visit Twitter in Safari and log in you will be asked if you want to allow other applications to access your account. Alternatively, you can manually add your Twitter account(s) by going to the Mail, Contacts & Calendars section of System Preferences. Once an account is set up, a Click to Tweet button appears in notification center, allowing you to quickly send tweets without first opening Safari or a Twitter app.
There’s no Facebook integration yet, but according to Apple it is “coming this fall.”

Disable notification sound
By default, every notification makes an alert sound as it appears. This seems fine at the moment, but I have a feeling it will start to get annoying, especially with apps like Messages. Fortunately, in the Notifications section of System Preferences you can specify which notifications can make an alert sound on an app-by-app basis. Just un-tick the Play sound when receiving notifications checkbox.

Banners vs. Alerts
Also in the Notifications section of System Preferences, you can specific whether notifications for each app appear as Banners or Alerts. Banners are most like Growl and iOS — they appear in the top right and fade out automatically. Alerts will stay until you click the Close button, and also sometimes have extra options, such as a Reply button for message notifications. I’m yet to figure out which type I prefer, but I suspect each type will be better suited to specific apps.
Bring back “Save As” in Lion
The autosave functionality in Lion takes some getting used to. It’s arguably a better way to do things, but after decades of manually saving files, it can take some time to get comfortable with how the new system works.
One change that particularly irritates me is the way the old Save As workflow has been replaced with Duplicate. The old system worked like this: After opening up an existing document and making changes, choosing “Save As” from the file menu allowed you to save those changes in a new file, instead of overwriting the existing one.
Of course this workflow isn’t really compatible with the autosave system, and as a result it has been replaced with Duplicate. There are two main problems I have with Duplicate:
The first is that it has no keyboard shortcut assigned by default, meaning it requires a time-consuming trip to the File menu. Fortunately, this is easily solved by assigning the shortcut yourself in the Keyboard section of System Preferences. Under the Keyboard Shortcuts tab, click on Application Shortcuts in the list on the left, then click the plus (+) button to add a new shortcut. Leave the drop-down menu as All Applications, set the Menu Title to “Duplicate” and assign a shortcut of Command-Shift-S, the same as the old Save As shortcut.

The second problem is that if you duplicate your file after you’ve already made changes (like you would do commonly with Save As), then you are presented with the following cumbersome dialog:
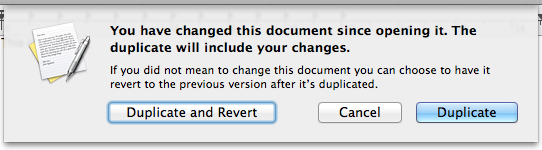
The default option, Duplicate, updates the existing file with the changes you have made as well as creating a duplicate, while Duplicate and Revert is more like the old Save As functionality. While there’s no perfect solution to this problem, there are two ways to avoid this dialog: Firstly, you could always remember to duplicate your files before you start making changes that you don’t want overwrite the existing file. This is probably the safest (and Apple-preferred) way, but will probably take me years to get used to. For those who really can’t stand the new way of doing things, Shawn Blanc has written a hack using Keyboard Maestro that automatically chooses Duplicate and Revert in the dialog for you.
Customize the login screen in Lion
A lot of people have complained that the login screen is too bland and boring in Lion - it now sports Apple’s new favourite grey linen texture. Fortunately, it’s not to tricky to make some customisations. It is possible to change the background, add a custom welcome message and display system stats. Find out how below.
Changing the background
In Lion, the background used for the login screen is located at
/System/Library/Frameworks/AppKit.framework/Versions/C/Resources/
The easiest way to get to this folder is to choose Go to Folder in the Go menu while in the Finder. Then just copy and paste in the above line and click Go. The image that is used for the background is NSTexturedFullScreenBackgroundColor.png. You can replace this with any other image, and as long as you give it exactly the same name, it will be used for the login screen background. Before you make any changes, make sure you make a copy of the original file somewhere safe so you can go back to it if you want.
You’ll notice that the image is only a small 256x256 pixel square — this is because it is automatically tiled across the screen. If you want to use a similar type of texture, any size image is fine. However, if you would like to use a full size image without tiling, you need to make sure the image dimensions exactly match your screen and the resolution is 72 dpi. Either way, it must also be in PNG format like the original. It’s pretty simple to use Preview to adjust any image to the correct size and format.
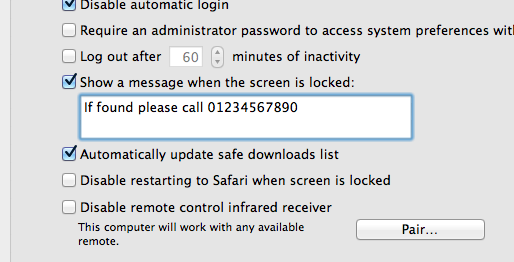
Display a short message
Before Lion, displaying a message on the login screen was a complicated process that involved entering commands into the Terminal. Luckily, Apple have now added an easy way to set a message using System Preferences. To do this, go to the Security & Privacy preference pane, and under the General tab, tick the checkbox Show a message when the screen is locked then add your message. Only about the first 200 characters you enter will be displayed, so make your message short and sweet.
Display system stats
In older versions of Mac OS X, simply clicking on your computer name in the login window would cycle through displaying lots of useful system information. Unfortunately this feature has been removed in Lion, but you can bring it back to a certain extent. Open up Terminal (located in Applications/Utilities), paste in the following line and press Return:
sudo defaults write /Library/Preferences/com.apple.loginwindow AdminHostInfo HostName
Now when on the login screen, clicking on the time in the top right will cause the computer name to appear, followed by the OS version and build number, followed by the IP address.
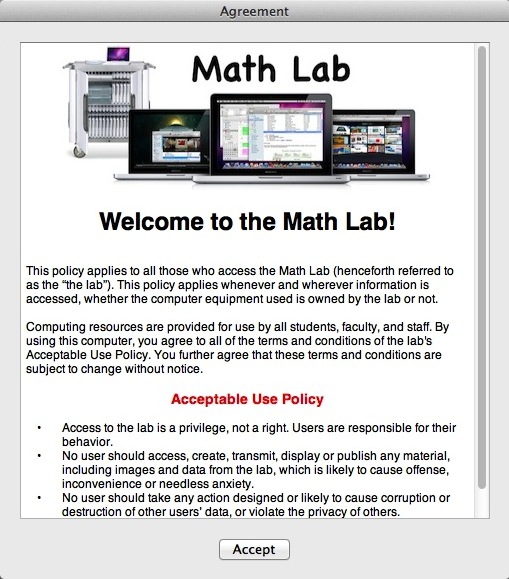
Display a login banner
Apple has a great article over on their support site on how to display an agreement window where users must read and click Accept before logging into the computer. This is really useful for people who manage lots of Macs in a school or company with an “Acceptable Use Policy” that all users must agree to.
To do this, just create a file in TextEdit that contains whatever text you want to display. You can embed images and use whatever text styling you want. Once you are done, save the file with the name PolicyBanner in the Security folder in the Library in Macintosh HD.
Disable restored windows when re-opening specific apps
There’s a great tip over on the Macs in Chemistry blog on how to stop Lion from restoring your previous windows when re-opening specific apps. In System Preferences there’s a checkbox for turning this on and off globally, but using a handy little AppleScript you can disable it on a per-app basis.
One of the new features in Lion is the ability of applications to resume activity at the point an application was quit. This means that when you reopen an application it will open and display all the documents you were editing in the state when you quit the application. This is obviously very useful but there are times when you may not want confidential documents automatically opened and displayed when you open an application.
Here’s an example of the script for Safari:
set statePath to POSIX path of (path to home folder) & "Library/Saved Application State/com.apple.Safari.savedState"

set quotedPath to quoted form of statePath
try
   do shell script "test -w " & quotedPath
    set current to "enabled"
on error
   set current to "disabled"
end try

if current is "enabled" then
   tell application "Finder" to delete every item of ((POSIX file statePath) as alias)
    do shell script "chmod u-w " & quotedPath
    display dialog "Disabled window restore for Safari" buttons "OK" default button 1
else
   do shell script "chmod u+w " & quotedPath
    display dialog "Enabled window restore for Safari" buttons "OK" default button 1
end if
Head over to macinchem.org for a quick explanation of how to add it to your scripts menu to give you an easy place to access it.
Resize windows like a pro in Lion
A great new feature in Lion is the ability to resize windows in a much more flexible way. Whereas Snow Leopard only allowed resizing a window using a “handle” in the bottom right corner of every window, in Lion placing your mouse near any edge of a window will result in a new “Resize” cursor indicating that you can resize the window from there.
If this wasn’t enough, there are a few other new resizing features that can make this even more useful.
Firstly, holding the Option key while resizing results in both sides of the window resizing equally. For example, if you have a full screen window and resize it by Option-dragging the left side in towards the centre, the right side will also move in by an equal amount. If you resize from a corner using this method, it essentially has the effect of anchoring the window by its centre rather than by the opposing corner as usual.
Secondly, holding the Shift key while resizing forces the window to keep the same proportions. This is similar to when you resize an image and want to avoid stretching it in one direction. If you double the width of a window, the height will be doubled as well.
Finally, you can use the Command key to resize windows in the background without moving them to the front. This has actually been around since before Lion, but it has become much more useful now you can resize windows from any edge.
Now, if you really want to be a pro, you can try using the modifier keys in combinations. You can also press and release Option and Shift at various points while you are already resizing to add and remove the constraints.
Bonus Tip: If you go to resize a window from an edge, but instead drag the mouse cursor in the wrong direction (i.e. drag up/down while resizing from the left/right edges) you can move the window around. This means you no longer have to only move windows using the title bar at the top.
Press and hold keys for iOS-style accents popup
Here’s yet another iPhone feature that has cropped up on the Mac in Lion. While typing, simply pressing and holding on a key will bring up a popup showing all the possible diacritics (accents, cedillas, etc.) that can be added to the letter. You can then choose from the possibilities by pressing the corresponding number on your keyboard, or by clicking the one you want.
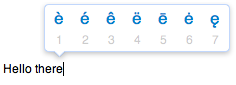
This seems to be a fairly quick way typing accents, and is much easier to use than the old method which involved remembering a number of Option key combinations. It does have one drawback however — it stops you from pressing and holding to write a long line of repeated letters, like thiiiiiiiiiiiiiiiis.
If you don’t regularly type accents, then losing the repeated character functionality might not be worth it for you. In this case, you can disable this new feature using a Terminal command. Open up Terminal (located in Applications/Utilities), paste the following line and press Return.
defaults write -g ApplePressAndHoldEnabled -bool NO
You will need to restart each application for the changes to take effect. Simply repeat the command with YES at the end to reverse.
Getting started with the Mac App Store
Yesterday the Mac App Store went live with more than 1000 apps already available. Here are a few tips to get you started.

Download the App Store
The Mac App store is available through Software Update, which you can access through the Apple menu. It actually shows up in the list of available downloads as Mac OS X Update Version 10.6.6. You’ll need to restart after installing it, and then the App Store will show up as a new icon in your Dock.
Different ways to access the App Store
If you would prefer not to have an extra icon in your Dock, it’s fine to just drag it out to remove it like you would for any other application. Then if you still want to access the store, there are a number of alternative ways.
A new item “App Store...” is added to the Apple menu, which gives you quick access no matter what application you are in. This also means you can also set a universal keyboard shortcut for it. Just go to System Preferences, go to the Keyboard section, then click on the “Keyboard Shortcuts” tab. Click the plus (+) button to add a new shortcut, and in the dialog that appears, leave the dropdown menu as “All Applications,” Type “App Store...” as the menu title, and then choose a shortcut.

Alternatively, you can access the App Store just like you would any other application. You can just find it in the Applications folder and double-click it, or use Spotlight (Command-Space is a handy shortcut) or any other application launcher like Alfred.
Fixing Error 100
For many people, everything seems to be working fine until they go to download an app, and then they receive a dreaded error message:
We could not complete your App Store request. An unknown error occurred (100).
Luckily it’s easily fixed. It turns out this is because there is a new set of iTunes Terms and Conditions that you have to “read” and agree to, but the App Store doesn’t give you the opportunity to do this. The best solution I found is the following:
- Quit both the Mac App Store and iTunes.
- Open iTunes, go to the iOS App Store and download a random free iPhone app.
- You should be prompted to agree to the new terms and conditions.
- Delete the iPhone app you just downloaded.
- Open up the Mac App Store and everything should be fine.
What about applications you already own?
When you download an app through the Mac App Store, the little button next to it changes to “Installed” and the app appears in your purchases section. But what about apps that you already own from before the App Store was around?
It turns out that in general, the App Store recognises that you already have the application, and marks it as “Installed.” However, with some applications (like Pixelmator and Rapidweaver) this doesn’t happen due to the version numbers not matching, and for some this can be fixed by updating the application to the latest version.

Unfortunately, this turns out to be pretty useless. These applications won’t show up in your purchases list, and you won’t be able to re-download or update them through the App Store at all. Unless you want to pay a second time, this means you will have to continue to update these applications in the same way as before - by checking the developer’s website or by using the application’s “Check for Updates” feature.
Of course for free applications, it’s not too much trouble to just download them again through the App Store. If you want to do this with an application that is listed as “Installed,” you will have to drag it from the Applications folder to the Trash and then restart the Mac App Store before you can download it again.
It’s still only iWork ’09
Don’t be fooled by seeing Pages, Keynote and Numbers being sold as separate applications. So far iWork ’11 still doesn’t exist, and these are just the same 2009 versions of the iWork applications. While this is disappointing, it turns out that iWork is the exception to the rule when it comes to updating previously bought applications through the App Store. If you already own iWork ’09, Pages, Keynote and Numbers should sown up in your purchases section and you should be able to update them through the App Store in future.
Finder now searches the store for unknown file types
It’s always been the case that if you try to open an unrecognised file type, a dialog will appear asking you to choose which application to open it with. A new button has now been added that allows you to search the App Store for the application that opens files with that extension. All it does is open up the App Store and perform a search using “extension:” as a filter. For example, if you were trying to open a Pixelmator file, it would search “extension:pxm” bringing up Pixelmator as the only result.

Get some good deals!
You may have noticed that many applications are much cheaper on the App Store than elsewhere. For example, Apple applications like the iWork and iLife suites and Aperture and much cheaper than the boxed versions. Many third-party applications like Pixelmator and Rapidweaver are also much cheaper. It’s hard to say if these prices are only temporary or are here to stay, so it might be worth taking advantage if this while you have the chance.
The downside to lower prices is that free upgrades are likely to become less common in future, meaning you will probably have to spend a lower amount on each version, rather than a big one-off payment at the start.
Option-click menu extras to reveal hidden settings
Menu extras are the little icon menus that live over on the right-hand side of your menu bar. Most people will probably have the Volume and Airport menus, but there are loads more that you can enable.
You can find 26 built in ones located in /System/Library/CoreServices/Menu Extras that you can just double-click to start. On top of this there are many more that come with applications (like Evernote, QuickSilver and Tweetie) and some that are small applications themselves (like Caffeine, F.lux and iStat menus).
If you have a lot of menu extras, you can rearrange them by holding the command key and dragging them around. To remove one, just hold command and drag it off the menu bar.
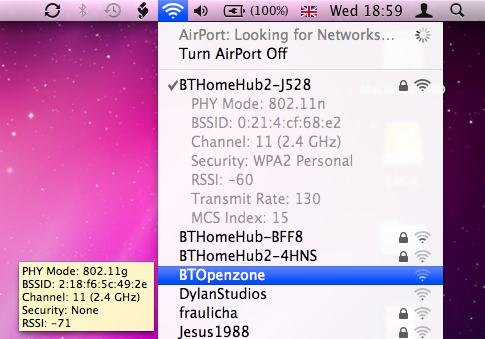
One not so well known trick is holding down the Option key when clicking on the menus. For some of them this will reveal hidden settings and information that aren't normally shown in the menu. Here's what you'll see in the Option-click menu for some of the most common ones.
AirPort
In Snow Leopard the Airport menu has already got a lot more informative with the new way the icon displays the current status. In the Option-click menu you'll see a lot of extra information about your current wireless network, including the protocol (e.g. 802.11n), the signal strength (RSSI), security mode (e.g. WPA2 Personal), the channel (e.g. 11) and some other things like the hardware address and the transmit rate. If you want to get some of this information about another wireless network in the list that you aren't using, just hold your mouse over it and a yellow tooltip will appear.
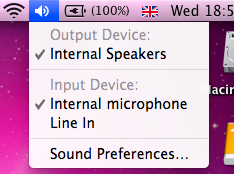
Volume
This menu normally just shows a slider for you to adjust the volume, but option-clicking shows some settings that you can normally change in the Sound section of System Preferences. It allows you to select different input and output devices, such as an external microphone or external speakers.
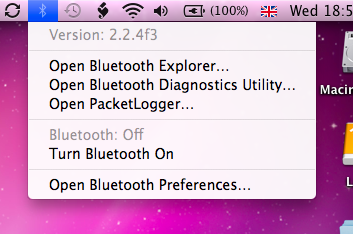
Bluetooth
If you have Bluetooth on your Mac, option-clicking the menu will show you the bluetooth version number. If you have the developer tools installed, it will also give you options to open Bluetooth Explorer and Packetlogger.
Battery
This one is just for laptop users. Option-clicking will add an item at the top of the menu that displays the condition of your battery. Clicking on this will open up a help page explaining what your condition means. You can find out more information about your battery here.

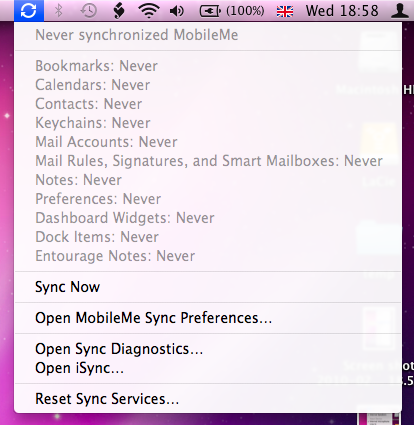
iSync/MobileMe
A normal click on this menu gives the time of the last sync, but option-clicking gives a huge list of the last time each individual data type was synced (i.e. Bookmarks, Calendars, Contacts etc.). It also adds in an option to open Sync Diagnostics and iSync, as well as giving the option to reset sync services.
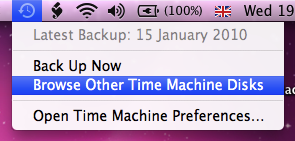
Time Machine
In this one, Option-clicking changes "Enter Time Machine" to "Browse Other Time Machine Disks". This brings up a dialog listing all the connected drives that contain Time Machine backups. Select one and click Use Selected Disk to browse the Time Machine backup.
Delete large files from a Time Machine Backup
If you are looking to reduce the size of your Time Machine backup, it's quite easy to go through you backups and remove files.
Just enter Time Machine, locate the file you want to delete, right-click on it and choose "Delete All Backups..." But which files do you delete?
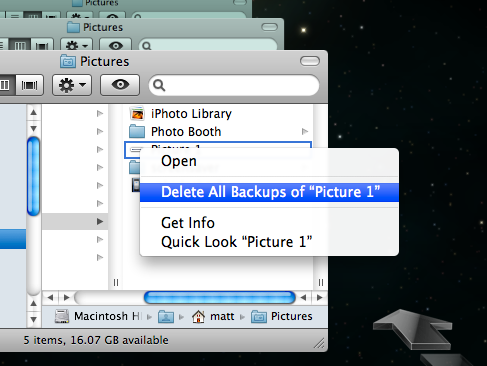
You want to get rid of large files, but not those that are important. The best way to do this is to use an application called GrandPerspective. Pierce Wetter has created a modified version of this application specifically for Time Machine backups.
It searches through your backups, and finds large files that have only been backed up once. These will be the files that either constantly change by small amounts or were only on your Mac for a very short time.
It then produces a nice "map" of your backup, so you can easily see which files are taking up the most space. Hold you mouse over one of large boxes, and make a note of the backup date and location, shown at the bottom. Then just enter Time Machine, go to the date, and remove the backup as usual.
If you find that a lot of the files you are removing are in the same location, you might want to exclude that folder from the Time Machine backup. To do this, just go to the Time Machine section of System Preferences, click the Options button and then drag the folder into the list.
Ignore Software Updates
It’s really convenient that you get get all the updates for the Apple software on your Mac by going to the Apple menu and choosing "Software Update...". However, occasionally you might want to skip an update, and you don't want Software Update to carry on reminding you to update. A common example is a printer drivers update for a printer you don't use very often or not at all any more.
To ignore an update, just select it in the list and choose "Ignore Update..." from the Update menu. Alternatively you can just press the delete key. Now the update will stop showing up in the list of new software.

If you change your mind, you can all you ignored updates back by choosing "Reset Ignored Updates" from the Software Update menu. Unfortunately this will bring back all of your ignored updates, so if you only want to bring back one you will have to ignore all the rest again.

Change or disable the Front Row shortcut
This isn't very well publicised, and the only reason I know about it is that I keep accidentally pressing it when I go to Force Quit an application (Command-Option-Escape). People with American keyboard layouts also report accidentally activating Front Row when going for Command-Tilde (cycle through windows). As Front Row often takes a few seconds to load up and it takes over your entire screen, this can be pretty annoying.
If you are as clumsy as me, you might want to change the keyboard shortcut for Front Row. This is easily done by going to the Keyboard and Mouse section of System Preferences. Under the Keyboard Shortcuts tab you should find a list of all the keyboard shortcuts you can change.
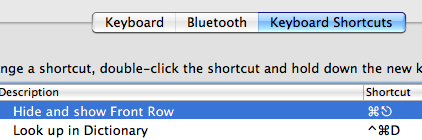
Simply double-click on the shortcut for "Hide and show Front Row" and press the new combination you want. I went for Command-Control-Escape, as it's almost the same but much harder to accidentally press.
Alternatively, if you want to disable the shortcut completely, just un-check the box to the left of "Hide and show Front Row". Even if you do this, Front Row is still accessible via the remote.
Get the most out of your laptop battery
Over time, your battery holds less and less charge, meaning your laptop doesn't last as long between charges. Apple claims that their batteries are designed to retain 80% of their original capacity after 300 cycles.
You can check how many cycles your battery has done by looking in System Profiler. You can find this by clicking on the Apple menu in the top left and choosing About This Mac. In the window that appears, click the "More Info..." button. In the sidebar of System Profiler, click on Power to bring up all the details about your battery. The interesting part is the Health Information. (Note that the stats shown below are for a fairly new battery).
Charge remaining (mAh): 4940
Fully charged: Yes
Charging: No
Full charge capacity (mAh): 4940
Health Information:
Cycle count: 21
Condition: Good
If it says "Check Battery" under Condition, there is likely a problem with your battery. The good news is that if the cycle count is under 300, Apple are likely to replace the battery for free. If your laptop is under one year old, they will almost definitely do so. However, before seeking out a new battery, make sure to completely charge and discharge the battery at least one to check it is not a temporary problem.
If your battery is in good condition or is starting to show signs of aging, you will want to make sure you get the most out of it before you have to replace it. Here are a few tips to prolong the lifespan and battery life of your battery.
The best way to use your laptop on a day to day basis is to keep it fully charged as much as possible (i.e. plugged in), but run down the battery fully at least once per month. This is because it is important to keep the electrons inside moving occasionally. Doing this will make sure that your battery will continue to recharge to the maximum capacity for as long as possible.
To get the longest possible battery life, you should use your laptop between 10° and 35°C (50° to 95°F). More importantly, when storing your laptop you should keep it between -25° to 45°C (-13° to 113°F) even if you are not using it.
If you are going to store your laptop for a long time, Apple recommends you remove the battery from the laptop and store it at 50% charge. If you leave it fully charged or fully discharged you may find the battery loses a lot of capacity.
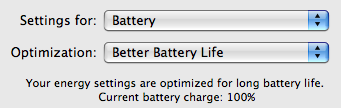
A simple method that can make your battery last a lot longer between charges is to tweak your System Preferences. Firstly, go to the Energy Saver Pane. Here, make sure the optimization menu is set to Better Energy Savings for when the laptop is powered by the battery. This will put the hard disk to sleep whenever possible, and reduce the laptop's CPU performance.
One trick that I often use if I am trying to squeeze an extra half an hour out of my battery is to reduce the brightness of the display. The simplest way to do this is to use the F1 key (F2 will increase the brightness again). Dim the screen to the lowest comfortable level, which should be pretty low especially if you are indoors.
You might also want to eject any CDs or DVDs you aren't using, quit as many applications as possible, disconnect any unused peripherals and turn off Bluetooth and Airport.
Volume Change Shortcuts
Holding down the Option key while pressing one of the volume change keys will bring up the Sound System Preference pane. Here you can change the alert sound, alert volume, and when different sound effects are played. You can also change the sound input and output, incase you have an external microphone or speakers.
Holding down the Shift key when pressing the volume keys will disable the sound that is normally played when you change the volume. You can disable this permanently from within the Sound Preference Pane by un-checking the box "Play feedback when volume is changed". Now, when you hold shift it does the opposite, temporarily enabling the volume change sound.
Unfortunately, this one is Leopard only. If you hold down both Option and Shift while pressing the volume keys, you can change the volume more accurately. The entire volume spectrum is divided into 65 instead of the usual 17 (by my count). This means you can adjust the volume by just a tiny amount if it is not quite right.

To disable the startup sound that plays when you turn on your mac, simply hold down the mute button while pressing the power button. Keep it held down for a while, until after the sound would have normally played.
The Ultimate Mac Screenshot Guide
Keyboard Shortcuts
The quickest way to take a screenshot is to use a keyboard shortcut. Annoyingly, these aren't particularly intuitive. There are two main ones:Command-Shift-3 - Take a screenshot of the entire screen.
Command-Shift-4 - Allows you to click and drag around the area you want a shot of.
Each of these will save a file to the desktop named Picture 1.png, or a higher number if that file already exists.
Now there are a few extra things you can do. If you press Space after pressing Command-Shift-4, you will notice that the cursor changes to a picture of a camera. You can now just click on a window, icon, widget or almost any other interface element to take a screenshot of it. You can also add Control into the keyboard shortcut to put the image in the clipboard instead of saving it to the desktop. For example, pressing Command-Control-Shift-3 would allow you to then paste the image into another document.
The Grab Application

You can create a timed screenshot by going to the Capture menu, or by pressing Command-Shift-Z. Using this, you can achieve screenshots that are supposedly “impossible”. One example is the login window.
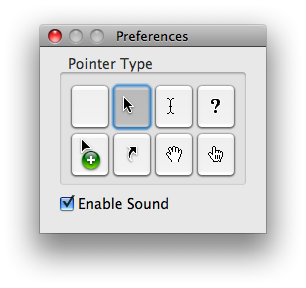
To change the pointer type, go to the Preferences. See the image below for the different options.
Disable Shadow
If you use the Command-Shift-4 Space method to take a screenshot of an entire window, you will find that the shadow is in the screenshot. This was added in Leopard because without the shadow, windows don't actually have a border if they have no scrollbars. However, if you prefer no shadows, you can disable them with a Terminal command. Simply open up Terminal (located in Applications/Utilities), paste in the following line and hit return.defaults write com.apple.screencapture disable-shadow -bool trueAfterwards you will need to log out and in again for changes to take effect. To enable shadows again, simply repeat the command but with false at the end. The two images below show a before and after shot.

Change Image Format
The default image format for screenshots is png, which gives a nice, high quality picture. However you can change this if you want. As before, use the following Terminal command:defaults write com.apple.screencapture type pngSimply replace png with your file format of choice. The available options are jpg, tiff and pdf. Changing to jpg gives a lower quality but smaller file. Some people prefer this for quick snaps, but others dislike the slightly blurry results it gives. As before, log out and in again for changes to take effect.
Advanced Screenshot Applications
If widgets are your thing, Screenshot Plus will probably be the method of choice for you. It's free, and allows you to do everything that you can achieve with keyboard shortcuts. It also allows you to view a preview image, before saving it to the desktop or importing it into Preview.If you really want to go all out on your screenshots, you might want to consider buying an application like Snapz Pro. It allows you to do all of the things above, as well as record movies of your screen.
Finally, if you want to get screenshots of long webpages that don't fit on the screen, Paparazzi! is your solution. It gives allows you to set the size of the image, set a delay, choose the file name and choose the file format. Of course, if you want a PDF of the web page, that functionality is already built into Mac OS X.

Also, the MacTipper Blog pointed out one more thing I forgot. Using another Terminal command, you can change the default save location to somewhere other than the Desktop. The command is as follows:
defaults write com.apple.screencapture location /Full/Path/To/FolderFor full instructions, check out the MacTipper Blog.
Reset a lost OS X account password in single user mode
Remember, only use this if you have lost the Mac OS X install DVD. Also, don't do this if you have FileVault enabled in your account, and note that this will not change your keychain password.
First, we need to restart in Single User mode. To do this hold down Command-S while the computer is starting up. A command line prompt should appear on the screen instead of the login window or your normal desktop.
At the prompt, type
mount -uw / then return. Next, type launchctl load /System/Library/LaunchDaemons/com.apple.DirectoryServices.plist then return. You will need to type these exactly the same, so write them down beforehand.
The next step requires you to know the short username of the account. If you don't know this, type
ls /Users followed by return, and look for it in the list that appears.Next, type
dscl . -delete /Users/username AuthenticationAuthority followed by return. Make sure you replace username with the short username of the account.The final command to type is
passwd username followed by return. As before, replace username with the short username of the account.The rest is self-explanatory. Type the new password, followed by return. When prompted, retype the password.
Finally, type
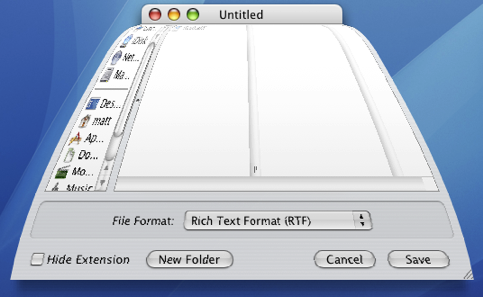
reboot and hit return! Your password should be reset.New features in Open and Save dialogs
![]()
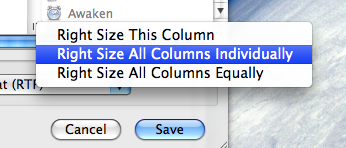
In column view, there is a new contextual menu for changing the column widths. Simply right-click (or hold Control and click) on the handle at the bottom of each column, and the menu will appear. You can choose from Right Size this Column, Right Size All Columns Individually and Right Size All Columns Equally. Strangely, this menu is unique to Open and Save dialogs, and doesn't appear if you right-click the column handle in a normal Finder window. In that case, you have to use the old method.
There are also a couple of new keyboard shortcuts for Open and Save dialogs. Command-I will open up the Get Info window on the selected item, and Command-R will show the item in the Finder. However for some reason, these don't seem to work all the time in Save dialogs.
5 Login Window Tips
1. Add a message to the login window
You can add a string of text above the list of users in the login window. To do this, start by opening up Terminal. This is located in the Utilities folder, inside the Applications folder. Once it has loaded, paste in the following line and press return:
sudo defaults write /Library/Preferences/com.apple.loginwindow LoginwindowText "Hello There”Replace "Hello There" with your text. To remove the text, type the following line:
sudo defaults write /Library/Preferences/com.apple.loginwindow LoginwindowText “”2. Hide accounts
If you find yourself with an overly long list of users in the login window or you just want to get rid of that annoying scroll bar down the side, you can stop accounts appearing in the login window.
Start by go to the Accounts pane in System Preferences, and find the "short name" of each user you want to hide. Once you have these, open up Terminal and enter the following:
sudo defaults write /Library/Preferences/com.apple.loginwindow HiddenUsersList -array-add shortname1 shortname2 shortname3Replace shortname1 2 and 3 with the short names of the user accounts you wish to hide. You can hide as many as you like, just separate each with a space.
To make a hidden name appear again, type the command with no names in it, therefore resetting the list of hidden users.
sudo defaults write /Library/Preferences/com.apple.loginwindow HiddenUsersList -array-addNotice that doing this adds an extra option to your login window - "Other..." When you select this, you will be presented with text boxes to enter a username and password.
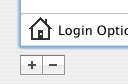
If you aren't running OS X 10.4, this doesn't work. Another option is to replace the list of users with username and password text boxes. Go to the Accounts pane in System Preferences and click on Login Options. There you will find an option to display the login window as name and password fields. This isn't as pretty, but saves time if you have lots of users, and is also more secure.
3. Change the Apple logo
You can replace the large Apple logo that appears at the top of the login window with any tiff image that is 90x90 pixels. In the Finder, choose Go to Folder from the Go menu or press Command-Shift-G. In the dialog box that appears, type the following line:
/System/Library/CoreServices/SecurityAgent.app/Contents/Resources/To change back to the Apple Logo, just drag the copy that you made back to the Resources folder.
4. Get useful system stats
The name of you Mac is displayed in the login window below the words "Mac OS X". Since Mac OS X 10.4.3, you can click on the name of your Mac to show different statistics about your machine. Each time you click, it will cycle through different bits of information that are particularly useful when troubleshooting problems.
The order of the statistics are as follows:
One click: Your OS X version number (e.g. Version 10.4.9)
Two clicks: Your OS X build number (e.g. Build 7M271)
Three clicks: Your mac's serial number (e.g. WN1511LHKNW)
Four clicks: Your mac's IP address (e.g. 196.254.0.1)
Five clicks: The status of any networked account
Six clicks: The date and time (e.g. Saturday, January 20 2007 4:02:31 AM GMT)
Seven clicks: Back to where you started, the name of your computer.
So you click a few times and set the information line to your favourite thing, but next time you log in, it has changed back to the name of your mac. To change the bit of information that appears first, you need to do a bit of tinkering in the Terminal (Applications/Utilities). Open Terminal and type the following command:
sudo defaults write /Library/Preferences/com.apple.loginwindow AdminHostInfo HostName Depending on which piece of information you want displayed, replace HostName with one of the following:
SystemVersionSystemBuildSerialNumberIPAddressDSStatusTime
After doing this, hit return, and the next time you view your login window the information you chose will be displayed. To change it back to normal, simply repeat the command with
HostName at the end.5. Change the background image
There are ways to change the background image by replacing the Aqua Blue image, but that is slightly crude. A better way to do it is using the Terminal. Type the following command and press return:
sudo defaults write /Library/Preferences/com.apple.loginwindow DesktopPicture /Users/Shared/mynewbackground.jpg
/Users/Shared/mynewbackground.jpg is the location of the image you want to use. You don't have to type it out. Just paste the command as far as DesktopPicture and put a space after it. Then find your image in the Finder, and drag it onto the Terminal window. The address to your image should just appear. As far as I can tell, you have to place the image in a place that all users have access to (the shared folder is a good place).To change back to the normal Aqua Blue image, type the following command and press return:
sudo defaults write /Library/Preferences/com.apple.loginwindow DesktopPicture /Library/Desktop\ Pictures/Aqua\ Blue.jpg Reset a Lost OS X Account Password
If you still know the Administrator Password
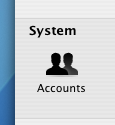
If you still know the password to an administrator account, it is very simple to reset any standard or managed user's password. While logged in as the administrator, open up System Preferences and click on the Accounts section. All the accounts on the computer should be listed down the left hand side. Under each account name it should say Admin, Standard or Managed. If the lock at the bottom of the window appears locked, click on it to allow changes to the preferences.
Resetting an Administrator Password
Obviously, if you don't have access to an administrator account, you can't carry out any of the above steps. If you have forgotten the Administrator password or you can't log into your Mac at all, you will need to use the Mac OS X Install Disc.
Enter the Mac OS X Install Disc that is the closest version to that running on the Mac. For example, if you are running Mac OS X 10.6 Snow Leopard, you should enter the Snow Leopard install disk, not any earlier ones. Restart the computer, and hold the C key as it starts up. This might take longer than usual, and you can release the C key as soon as the Apple logo appears on the screen. When the window appears, choose your language and click the right arrow.
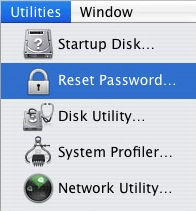
The next step depends on what version of Mac OS X you are using. Generally you need to choose Reset Password from the Utilities menu. For earlier versions of Mac OS X, choose Reset Password from the Installer menu.
Choose your Hard Drive from the top and then choose the Account from the drop down menu. Be careful not to select System Administrator, as this is actually the root user, not the administrator account on your Mac. Now enter the new password, click Save, quit the Installer and restart the computer.
Note that there are a few issues with this method. Firstly, it does not reset your keychain password. You will have to do this separately. Secondly, do not attempt this if you have FileVault enabled. To reset an FileVault protected account, you need the master password.
Resetting a FIleVault Protected User's Password
If you have enabled FileVault to encrypt your Account, you need to know the master password that you set when you enabled it. This is the password that the administrator should know that allows you to reset any password on the computer. If you have forgotten the master password, unfortunately your data is lost forever.
If you know the master password, start by attempting to log into your account. When you get the password wrong three times, you will be able to click “Forgot Password”. Now you will have to enter the master password and then a new login password for your account.
If you have lost the Mac OS X install Disc
If you have lost the install disc, don't try and use one from an earlier version as this might permanently block you out of your account. You really have two options: Firstly, you could buy a new copy of Mac OS X (try Amazon). Secondly, there is a way of resetting an administrator password without the disc if you are running Mac OS X 10.4 Tiger. Note: Do NOT do this with a FileVault protected account, or your data will be lost forever.
First, note the short name of the account. This is the same as the name of its home folder, but not necessarily the name that appears in the login window. Restart your computer, and while it is starting up, hold Command-S. This will start up your Mac in Single User Mode. Once it has started up, you will need to enter three lines of code. Enter
sh /etc/rc and press return. Then enter passwd yourusername and hit return. Now you will have to enter a new password twice. What you type won't appear on screen, but it is working. Once you have done this, type reboot and hit return.Similarly to the Install Disc method,this will not reset your Keychain password. You will have to do this separately.
Recovering Lost Users
In general, there seems to be two reasons why a user account and their home folder can disappear. The first is simply that you have (accidentally) deleted the user. Any administrator account has the ability to do this from the System Preferences.
The second way occurs when upgrading or installing Mac OS X from the install disks. If you inadvertently chose an "Archive and Install" installation, all users are deleted unless you choose to preserve them.
Luckily, in both of the above cases, Mac OS X keeps a copy of the user folder in case you want to get it back.
Recovering Deleted User Folders
In the Accounts section of System Preferences you can delete a user by selecting them and clicking the minus button. You are presented with two options - to keep a copy of the user folder (the normal way) or to delete immediately. Unfortunately, if you chose to delete an account immediately, it is almost impossible to retrieve it.

However, it is more likely that you kept a copy (the option with the big blue "OK" button). This copy is kept in the Users folder under "Deleted Users". You must be logged into an administrator account to have access to this folder. Look in here for the name of the deleted user you want to recover, and double click it. This will mount a disk image on the desktop that essentially the deleted user folder. Hold option and drag this disk image from the desktop to the Users folder in your Hard Drive. Now you have restored the user folder, but you still need to create an account for it. Skip down to "Recreating the Account" to do this.
Users lost during an Archive and Install
When you perform an archive and install without preserving users, your user folders are archived away along with the rest of the existing system files for your Mac. A new folder called "Previous Systems" is created in Macintosh HD that contains all the users from before the archive and install. If you have done an archive and install multiple times, you will have a number of previous systems. Choose the one that contains all the users you wish to restore. In here is a users folder containing each of the deleted user folders. Drag the ones you wish to restore to the users folder in Macintosh HD. Now you have restored the user folders, but you still need to create accounts to be associated with them.
Recreating the Account
If you just want to retrieve certain files from the deleted user, you don't need to go through the hassle of creating a new user. From any administrator account you can open up the deleted user's disk image or Previous Systems folder and copy specific files from it.
Speed Up Dialog Boxes
The sliding animation may be pretty, but it can waste a fair amount of time if you are opening and closing sheets all day. You can speed this up and make your Mac feel much snappier by using a simple Terminal command to reduce the amount of time taken to display the animation.
Launch the Terminal (located in Application/Utilities) and type the following command:
defaults write NSGlobalDomain NSWindowResizeTime 0.001The number at the end is the length of the animation in seconds. With it set to 0.001, sheets appear pretty much instantly. The default is 0.2, so type the command with 0.2 at the end to return your sheet animation to normal.
For fun you can try higher values. This allows you to see just how detailed the animation is. Type the command with 2 at the end and load up TextEdit. Resize the window to as small as possible before selecting Save As from the File menu. You'll see the sheet jump up out of the window then gently fall into place.
Ask a Question
The Ask a Question page that I recently added to the site has been surprisingly popular. Here's a few of the latest questions. If you have a question or tip about Mac OS X use the corresponding link in the sidebar to send it to me.
Dan writes:
My one year old daughter attacked my wife's iBook, and has somehow changed the settings so that the computer has gone 'negative' — everything looks like a photographic negative — desktop background, icons, the dock, everything. Does anyone know how to get this back to normal?
The "negative" effect is a feature of the Universal Access preferences. To quickly reverse it, press Control-Option-Command-8. You can change all the settings for this in the System Preferences, under the Universal Access pane. For more information on this, check out this previous tip on Universal Access.
Ignacio writes:
Hello, I accidentally erased the Ical application, I would like to know how to install it again.
The iCal application is included on the Mac OS X install disks that came with your Mac. However, technically you would have to reinstall the entire operating system to get it back.
A shareware application called Pacifist ( http://www.charlessoft.com/ ) allows you to open up the installer files and just install a single application. This should work for iCal or any other application included with Mac OS X.
Sean writes:
I have a delightful neighbour who's 90 years old who uses the net daily. She is sight impaired. I need to find a method of increasing the width of the scrollbars and their arrows to a size she can use. She recently switched from a PC to the Mac. She loves the Mac. It was easy to set the scrollbar size on XP. How can this be done on the Mac? Her Mac is a beige desktop G3 with lots of memory and OS X 10.2.8.
The only tools for the sight impaired that come with Mac OS X are the settings in the Universal Access pane of the System Preferences (in the Apple menu). There is an option here for zooming that zooms in on the cursor when you press a keyboard shortcut. However, this isn't exactly what you want and it involves learning a load of keyboard shortcuts.
Another option is to change the screen resolution. Go to the Displays pane in the System Preferences and choose a lower number from the list of resolutions. The drawback of this method is that everything gets bigger, and there is less room for viewing things like large photos.
I understand that neither of these are perfect solutions, but they may be worth a try.
Playing with Half Minimized Windows
They mentioned the killall Dock thing... if you hold shift and collapse a window it goes slowly into the dock. if you do a killall Dock command in the terminal while it's collapsing, the window freezes in it's squished state, while still allowing you to scroll in it and click links (although the links will be in their original location).
SleepingInsomniac | Homepage | 03.21.07 - 4:42 am | #
This is great fun, and also a little weird. As mentioned, you will need to press Shift while clicking minimize to slow things down and give you enough time to run the command. Have Terminal open with "killall Dock" ready typed so you just have to press enter. When the Dock relaunches, your currently minimizing window gets stuck half way, but is still treated like a normal window. Drag it around, scroll up and down, browse web pages. It's not perfect however - as SleepingInsomniac notes, the links on web pages are still where they were before you minimized, making things a bit confusing.
Check out the image below to get an idea of what it looks like.
To get your windows back to normal you just need to close (Command-W) and reopen them.
Thanks to SleepingInsomniac for this!
Another Way to Force Quit

However robg, the man in charge over at Mac OS X Hints notes that this tip is pretty useless - if an application is stuck so much that you want to force quit it, it is unlikely to respond to menu clicks. To access force quit through the Apple menu you often have to switch to a working application before clicking it. The keyboard combination (Command-Option-Escape) still works no matter what the frontmost application is, but at first appearances adding in the shift seems to do nothing.
This is where the Mac OS X Hints community step in through a discussion in the comments. Turns out you can use the shift in the keyboard combination, but you have to hold it for a few seconds. Hold Command-Option-Shift-Escape for about 2 seconds and the current application will force quit without the hassle of the dialog box. Neat!
You can also force quit using the dock as noted before here on Mac OS X Tips. Right-Click (Control-Click) an application's icon in the dock and if it is not responding there will be a Force Quit option in the contextual menu. If the application appears to be fine, you will need to hold Option to change 'Quit" to "Force Quit". Note that with the Finder you need to hold Option before you Right Click to make "Relaunch" appear.
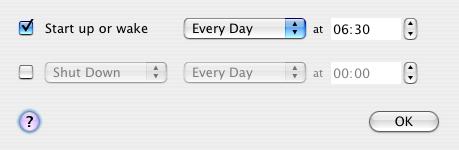
Automate your Mac
The first thing to do is to make your Mac turn on by itself. You can set it to do this in the Energy Saver preference pane in System Preferences. Just load it up and click "schedule" and choose a time to start up (and/or shutdown) and on which days you want this. This will also wake up your Mac if it is asleep, but this might not work if you have a password enabled screensaver.
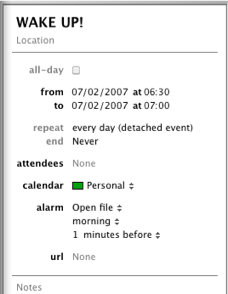
As far a scheduling specific applications goes, you have to use applescripts or automator actions for most of them. If you aren't completely super lazy, it is pretty straightforward to create a workflow in automator that opens up a list of websites, or starts an iTunes playlist going. To get this worklow to be carried out at a certain time, create an event in iCal and set an alarm. As the alarm action, set it to open up the automator file.
However, in some applications you can get the same results without making workflows or scripts. For example, in Firefox you can set multiple websites as your homepage, and all of these will open up when you start Firefox. There are two ways to do this. The first is to create a folder of bookmarks with all the sites you want to load on startup. After creating this folder, go to the Firefox preferences and click "use bookmark" to select the folder. The alternative way is to type in each address into the homepage field with a | (pipe) in between. Be sure to set Firefox to load your homepage on startup using the dropdown menu.

Finally, some applications have built in scheduling capabilities. Microsoft Entourage has tools to set Send and receive schedules that check for email at certain times and Apple's Backup has its own scheduling feature to carry out automatic backups however frequently you want.
You can use all of these features to automate your Mac and make sure that you never have to carry out a tedious task again.
Rectangular Selections
To do this type of selection, hold down the Option (alt) Key while the cursor is over a block of text in a cocoa application. Notice that the mouse arrow changes to a cross.
With the Option Key still held, click and drag to make a selection without the text up to the end of the line being automatically selected when you drag down over multiple lines.
If you want to do something particularly neat, once you have made a selection hold down the Command Key as well as the Option Key, which will allow you to make another selection somewhere else in the document, whilst keeping the first block of text still selected.
This works just about everywhere you are able to edit text, including Microsoft Word (although the cursor doesn't change to a cross) and text boxes in Safari. As you would expect, it works in TextEdit, Mail, and all the other usual Cocoa Apps.
Mac OS X keyboard shortcuts
Stop screen burn
Commonly referred to as screen burn, this used to be a major problem with CRTs that displayed the same image for a long while, and it got "burnt" into the screen so that it was permanently displayed.
Many people think that LCD displays are unable to get screen burn, but actually they can. Manufacturers call these faint remnants of an image "persistence". However it is quite easily solved, as detailed in the Apple article.
To avoid screen burn, set the energy saver preferences to turn off the display when not in use. To try and remove persistence, create a slideshow screensaver with one white photo, and display it until the persistence is gone.
Cancel a shut down command
This isn't a perfect solution and won't always work, but it is definitely worth trying if you suddenly remember you have to do one last thing before you shut down. The best conditions for this seem to be when you have lots of open applications and when the shut down seems to be taking quite a while.
From the article:
Have you ever told your machine to shut down, and then remembered that you had one last thing you wanted to do—send an email, check the weather forecast, or pay a bill online, for instance? Once the shut down process has started, it seems you’re out of luck—there’s no obvious way to cancel a shut down command.
However, there are two things you can do that will prevent your machine from shutting down. Either one should work, assuming you have enough open applications that the shut down process is taking a bit of time.
Font Scaling
Most cocoa applications have the ability to scale fonts mathematically. This means that you can resize a selection of text containing different sizes while keeping the relative sizing between fonts. It also means that if you want all the text on a page a little bit bigger, instead of selecting each size and changing it a bit bigger (the 12 point to 14 point, the 16 point to 18 point etc.), you can just do it relatively.
Select all the text in your document and open the Font panel ( Usually Format->Font->Show Fonts) and enter "*1.2" or another mathematical expression. The example given will multiply all font sizes by 1.2, but you can do anything, like "/2" to half the size, "*.0.75" to get 75% of the original size.
Also its worth pointing out you can also use addition and subtraction to change the point size, but that won't make the fonts scale relative to each other.
Word Completion in Cocoa
There are a number of different ways of doing this however. In certain places it isn't possible to press escape, because it does something else (like clearing the Google search box in Safari). In these cases you can use Option-Escape, or just press F5. These two alternatives may take a little longer, but seem to work everywhere.
So now if you can't spell something, you don't have to attempt the whole word, just put in the first few letters and let the system spelling dictionary do the rest.
Application and Window Switching
This isn't everything though. Continue to hold down the Command key after releasing tab, and the icons of all your applications appear across the middle of your screen. Press tab again whilst still holding Command and you can cycle through all open applications.
But there's more! Whilst still holding the command key, pressing Q will quit the hilghlighted application, and the list of open applications will remain active. Now you can use tab to move along the list and hitting Q will quit further applications.
Likewise this can be used with H to hide applications, and ~ to cycle through in the reverse direction.
Thats Application switching sorted, but a small development of this is a keyboard shortcut for window switching. This is less known about, and it involves pressing Command-~ (tilde) whilst in an application with multiple windows open. It doesn't bring up the screen display of open windows, but merely cycles through all open ones.
I find these shortcuts are sometimes a faster and easier alternative to the F9 and F10 of Exposé.
Do things in the background
For example, command-click a link in an email. Safari opens up in the background, without disturbing your reading, allowing you to go to the page later.
This also extends to moving, closing and resizing windows. If you can see a Finder window behind your iTunes library for example, command-clicking on close, minimize or holding command whilst moving or resizing performs the action without switching to the finder, instead staying within iTunes.
Hidden File
Heres an unexpected file hidden in the Mac OS X system files.
Go to the Finder's Go menu, and select Go to Folder. In the window that appears, type:
/System/Library/Frameworks/Python.framework/Versions/2.3/lib/python2.3/test/
and hit Go. In the window that opens, double-click on the audiotest.au file and voilà!
Character Swap
In all cocoa applications (TextEdit, Mail etc.), two adjacent characters can be swaped by positioning the cursor between them and pressing Control-T.
This can be useful if you often end up typing "teh" and "becuase".