12 Tips for Finder in Mac OS X Lion

Looking through the list of new features in Lion, you might get the impression that Apple doesn’t want you to use the Finder anymore. Features like Launchpad, Versions and Resume all conform to the iOS philosophy of keeping plenty of distance between the user and the file system. As much as this might alarm expert users, it’s simply a natural acceptance of the fact that many users either doesn’t understand or doesn’t care about the file system. As John Siracusa writes (in his epic 19 page Lion review, which is well worth reading):
Fear of the file system practically defines novice users; it is usually the last and biggest hurdle in the journey from timid experimentation to basic technical competence. To put it another way, your dad can't find it if it's not in the Dock.
Even within Lion’s Finder, features like “All My Files” show all your documents and media in one place, with no information about what folders they are in. But even though the file system is a bit more hidden, it’s still there, and the Finder is still a powerful and useful tool for accessing it. In fact, I’d argue that the changes in Lion do little to hinder the expert user, while providing a huge improvement in usability for beginners. For experts and beginners alike, here are 10 tips to help you get to grips with everything that is new in Lion’s Finder.
Arrange by…
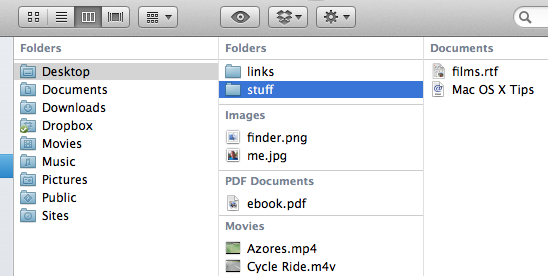
Lion introduces a cool new way to arrange your files when viewing them in the Finder. Either right-click on a window or go to the View menu and choose Arrange By to see all the available options. I personally find that arranging by Kind is the most useful, apart from in the Applications folder where a special Application Category option is available.
As you can see in the screenshot below, this groups your files according to the criteria you choose, and it works in all three view modes — icon, list and column. One of the most useful consequences of this is that it allows you to having all the folders positioned at the top of a list or column, a feature that has long been requested by Windows users.

All My Files
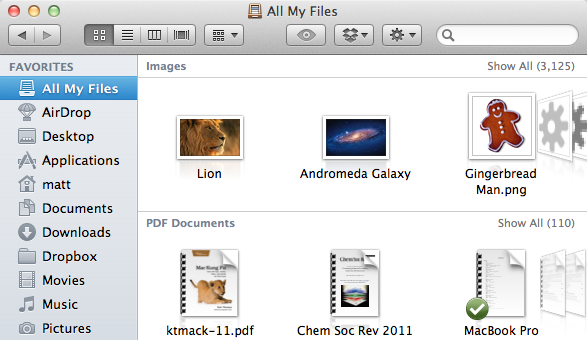
This is probably the most easily noticeable new feature in the Finder. Located at the top of the sidebar on every Finder window, All My Files provides an easy way to see all of your most recently used documents, regardless of where they are actually saved. They are organised by kind (e.g. images, PDFs, music) and each section has a fancy “coverflow” way of scrolling. You can get this type of display for any folder you want — simply use icon view, and then choose Arrange by Kind, as described above.
For those that are curious, All My Files is just a simple saved search, a feature that was actually introduced with Snow Leopard. You can still create your own custom saved searches in the usual way by performing a search in the search field in the top right of a Finder window and then clicking the Save button. In fact, if you were a keen user of the Today, Yesterday and All Images saved searches that appeared by default in Snow Leopard, you might want to re-create them.

If you don’t find All My Files that useful, it’s pretty straightforward to hide it away. The first thing you’ll want to do is remove it from the sidebar. Simply right-click on it and choose Remove from Sidebar. If you ever want it back, simply go to the Sidebar tab in the Finder Preferences and re-select it.
At first glance that’s all you need to do, but you’ll soon notice that every new Finder window now opens with All My Files displayed by default. To change this back to the Snow Leopard behaviour of showing your home folder, simply go to the Finder Preferences (located in the Finder menu) and change the New Finder windows show drop-down menu.
Sort by date added
Lion brings a useful new sort order for your files — date added. The one place this is especially useful is in the Downloads folder, where up until now it has been really tricky to sort files by the date they were downloaded. This option is available in icon, list and column view using the new Arrange by method described above, and also using the more traditional sorting in list view by clicking on the Date Added column heading.
Group a selected files into a new folder
This feature appears to have been inspired by the method for creating new folders for apps on the iPhone and iPad. Whereas before you had to create a new folder, rename it, and then drag all the different files into it, now you can simply select the files, right-click and choose New Folder with Selection. All the items will be combined into a single folder, and the folder’s name will be highlighted, ready for you to type in whatever you want to call it.
You can streamline the process even more by using the keyboard shortcut, Command-Control-N. Now you can simply select the files, press Command-Control-N and type the name of the folder.

Keep Both Files
This is another little feature that will make you think, “Why wasn’t it always like that!” Up until now, if you moved or copied a file to a location that already had a file with the same name, you had two options: Replace or Cancel. Finally, after the best part of three decades of Mac development, Apple have finally realised that it might be useful to have an option to Keep Both Files.

Bring back missing sidebar items
While this has been a trend for a while now, in Lion more and more things are hidden or disabled by default to stop the UI getting cluttered with stuff that isn’t useful for the majority of users. One place where this will be obvious to more experienced users is in the Finder’s sidebar and on the desktop, where hard drives and connected volumes no longer appear.
Fortunately it’s no trouble at all to turn these back on. Simply go to the Finder Preferences (located in the Finder menu). Under the Sidebar tab you’ll find checkboxes for adding items back into the sidebar, and under the General tab you’ll find the same for the desktop.
Access the Library folder
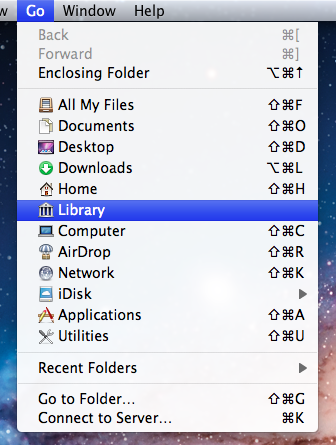
A lot of noise has been made about the fact that the Library folder inside your user home folder is now hidden by default in Lion. Even though you can’t just go to your home folder and click on it any more, there are still plenty of ways to access it. The easiest way that should be suitable for most people is to hold the Option key while clicking on the Go menu. This will make the Library folder appear in the middle of the list of places. If you want to permanently show the Library folder like in Snow Leopard, check out our article on every conceivable way of accessing the Library folder in Lion.

Copy and paste files
Before Lion, the only way to move files was to drag them to a new location, and hold down the Option key while dragging to copy them. Now, it is possible to copy files using the “Copy and Paste” keyboard shortcuts Command-C and Command-V. Users familiar with Windows might be annoyed that the “Cut and Paste” shortcuts Command-X and Command-V haven’t also been implemented for moving files instead of copying them. But don’t worry, this is possible. Just “copy” the file as usual using Command-C, but then use Command-Option-V when “pasting” to move the file instead of copying.
Merge folder contents instead of overwriting
This feature works similarly “Keep both files” described above, but it’s specifically for when you try and move a folder into a location with a pre-existing folder of the same name. As well as the normal options of overwriting the whole folder or cancelling, you can now choose to merge the contents of the folders by clicking Keep both.
There are a couple of quirks to watch out for with this though. Annoyingly, it only seems to work when copying a folder, not when moving one. This means that you either have to hold down the Option key when dragging the folder, or use the copy and paste shortcuts described above. In addition, you have to watch out when merging folders containing files of the same name. If you do so, instead of the option to Keep both, you can now only choose to Keep newer, which means in each case where two files conflict, the file that was most recently modified will be chosen to overwrite the older one.


Bring back the status bar
When you first look at a Finder window in Lion, it looks different, cleaner, but it’s hard to put your finger on what exactly has changed. Probably the most significant difference is that the status bar along the bottom of each window is disabled by default. In general this is a good decision — it took up a lot of space to give very little information — but occasionally you will still want to quickly check how much disk space is available, or how many items are in the current folder.
While you can choose Show Status Bar from the View menu, I’d recommend a quicker method of simply pressing Command-/ to quickly toggle the status bar on and off every time you want to see it.
![]()
Search suggestions and tokens
Finder’s search has been seriously revamped in Lion, offering some great new functionality. As always, the words you type into the search field in the top right of any Finder window are searched for everywhere — the contents of every document, the filename, the kind, as well as other specific meta data such as the album or artist for a song, or the name of a website a file was downloaded from. The changes in Lion make it much easier to filter your search to specific aspects of a file. As you type, suggestions will dynamically appear, asking you if you want to filter the results based on their kind, download source or the person who sent it to you.

Choosing one of these suggestions creates a blue “search token” that instantly filters the search results. It’s also possible to combine multiple search tokens, and to combine search tokens with normal text queries that search everywhere. If you want to save some time, you can even type the tokens directly, for example using kind:Movie or from:Matt.

Duplicate Exactly
One way of discovering all the new things you can do in the Finder is to open up the menus (File, Edit, View etc.) and see what new things appear when you press the Option, Control and Shift keys.
One interesting change that is easy to miss is that Duplicate (Command-D) changes to Duplicate Exactly (Command-Option-Shift-D). So what exactly does it do? Surely the normal duplicate command is exact?
It turns out the difference is when duplicating files owned by different users (or root). The normal duplicate command will create a copy of the file owned by you, while Duplicate Exactly will make sure the duplicate is still owned by whoever owned the original file.
Similarly, when copying and pasting files, press Command-Shift-Option-V to Paste Exactly.